All posts in "terrain"
Warhammer 40,000 Cities of Death Terrain
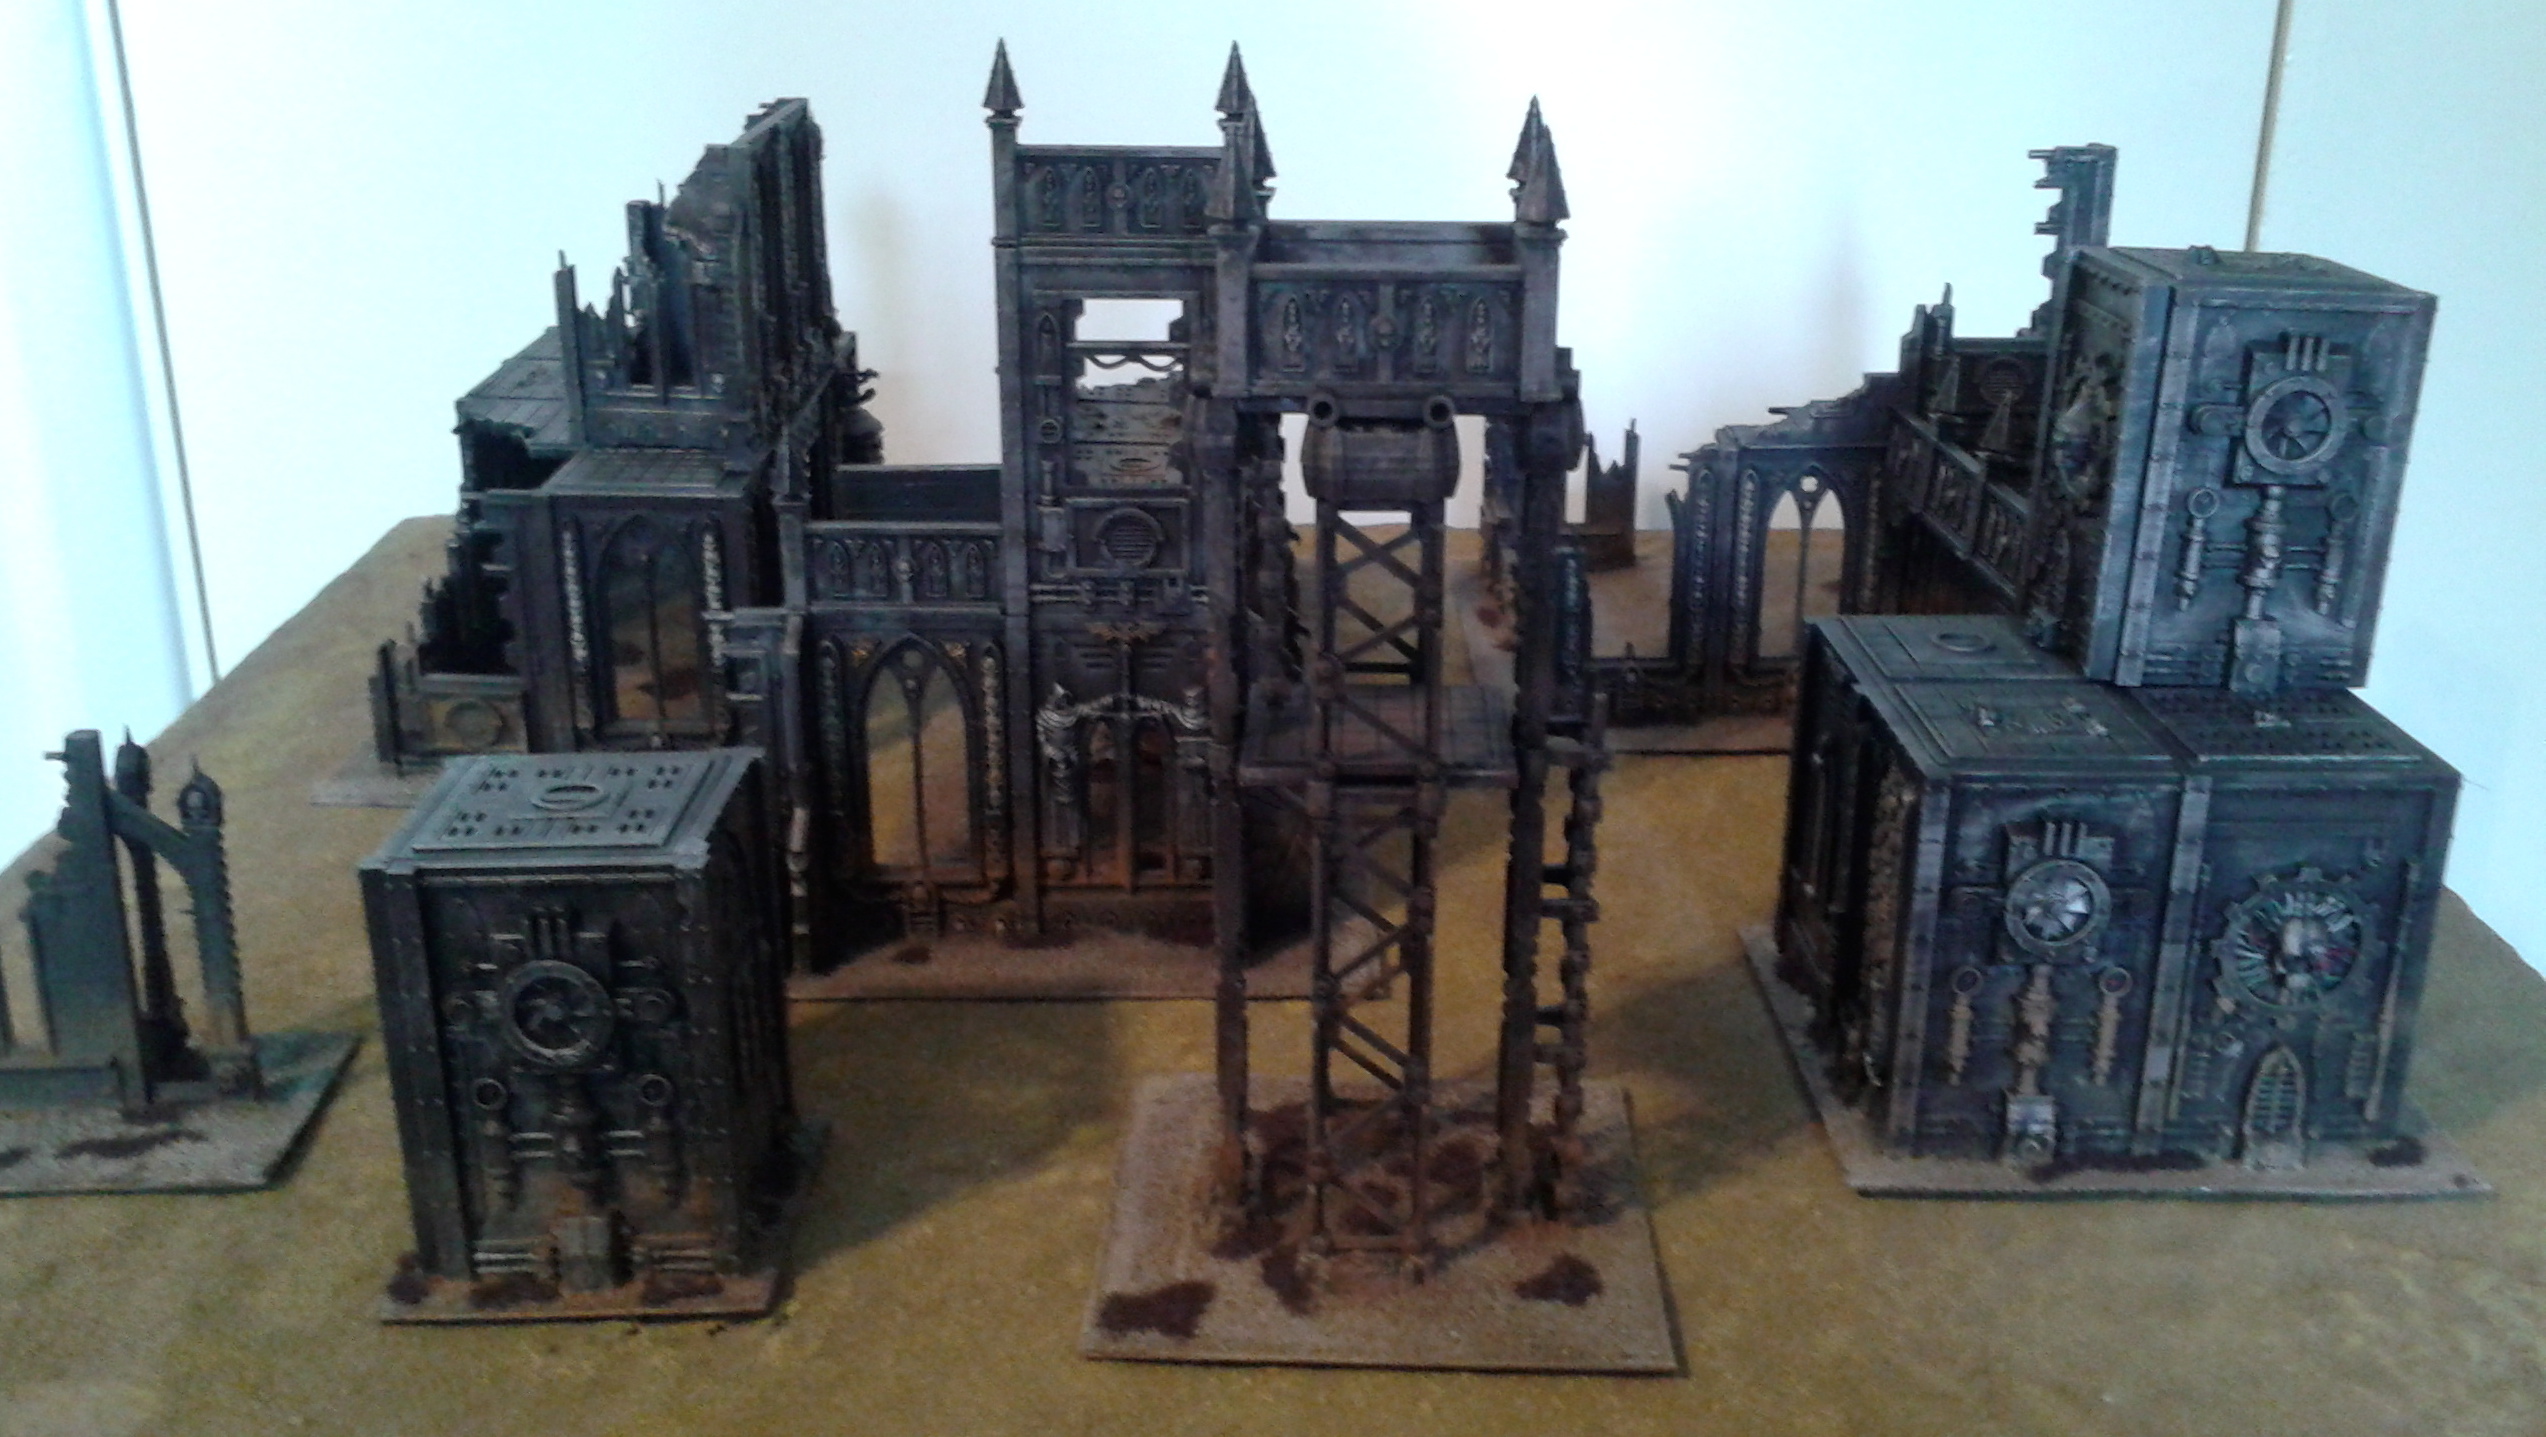
I bought some terrain for Warhammer 40K a few years ago, but never bothered to make it usable on the tabletop until recently, because I had No Mans Land on my doorstep: if I wanted a game I had access to the gaming tables and their vast array of terrain.
Unfortunately, NML is no more, but now that I've moved house I now have a dining room (with a big dining table) to play games on, so in advance of a four-way game a couple of weeks ago, I decided to refresh my modular gaming boards (which I'll blog about soon) and paint the terrain pieces that I'd assembled all those years ago.
The paint scheme is very simple: after a black undercoat, the walls were drybrushed with Tin Bitz and then Army Painter, Gunmetal, then washed with Army Painter Strong Tone wash shot through my airbrush. Then I applied some Forge World Light Earth weathering powder at the base of the walls. The plasticard bases were covered in PVA glue and acquarium sand, then sprayed with Army Painter Leather and then drybrushed.
More pictures below.
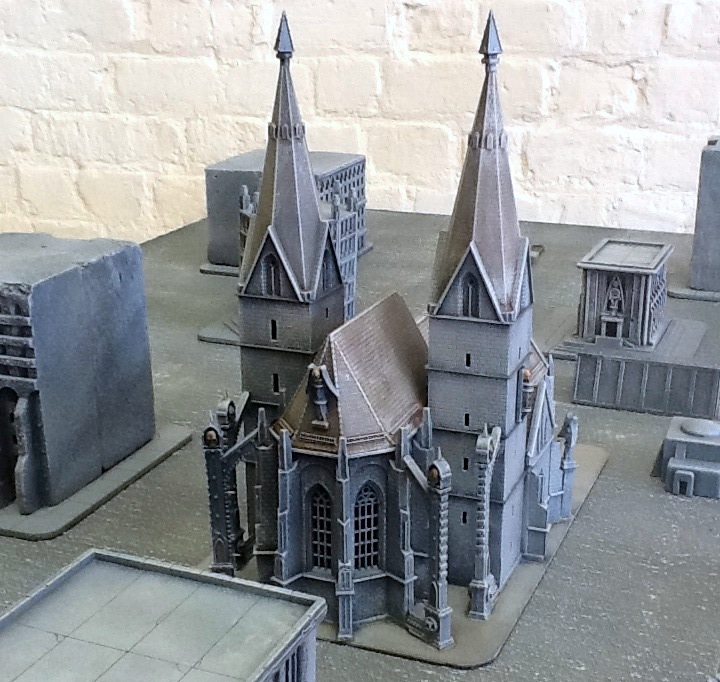
Epic Terrain: Kibri 6818 Gothic Cathedral (Basilica Imperialis)
Here are some photos of the cathedral itself. It was relatively simple to paint: I sprayed it black, then sprayed it with Army Painter Uniform Grey. The roof was washed with Gryphonne Sepia and Devlan Mud, then the whole thing was drybrushed with Coat d'Arms Mid Grey. Then I picked out details such as the shutters, doors and various spikey bits.
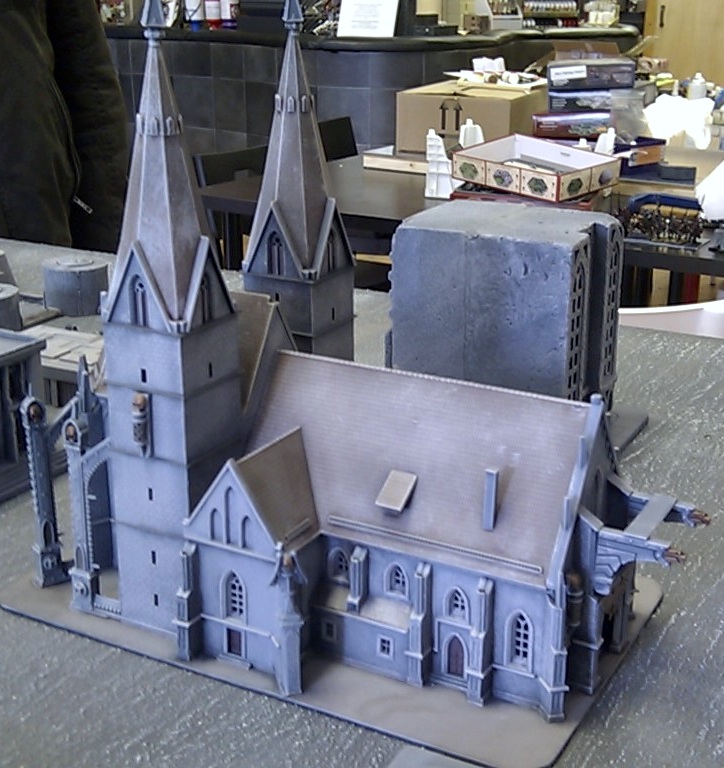
These photos were taken with a crap camera, I will update the post with decent pics later on. For now, I'm off to London for Salute!
Work-in-Progress: Epic Imperial City

With the building modules removed, you can see the road layout:

There are pieces of plasticard in the slots to elevate the building modules. This gives the effect of a slightly elevated pavement. The buildings represent three generations of Epic: the original foam buildings from the Adeptus Titanicus boxed set, the ruined buildings sprues from Epic 40,000 and the later Forgeworld Epic buildings:


You can also see a building from Gateshead Gaming, and the previously mentioned Kibri church, which is the centerpiece:

I've also created some ruined buildings, which could be used to replace buildings destroyed during the game:

The roads are arranged so that another board can be slotted in on either of two sides (assuming S6 starts selling the road system again, or I'm able to find suitable replacements). The other two sides will have a reinforced defensive wall from GameCraft Miniatures.
Grimdarking the Kibri Goppingen Church

But if you want to use it to play Epic, it's a little plain. It needs grimdarking, with the judicial application of spikey bits:


Having just bought a bunch of Cityfight boxes to build some 40K terrain, I've quite quite a few leftover pieces, which I've used to add some character to the building.
I've finally started to make some progress on my modular city system. I've glued down the roads and junctions in an arrangement that will let me expand to another board if/when Scott starts S6 Engineering back up again (or I find someone who can make some custom pieces for me). I'm planning on using the Fortress Walls system from GameCraft Miniatures to add a defensible city wall along two edges. More details to follow.
The Plans of Mice and Men...
Now I'm forced to consider my options. Should I redesign the board so the city doesn't cover it entirely? Should I not glue the road sections down so I can create smaller urban areas a la carte? Should I use them to create a 15mm town instead?
Cityboard: The End Of The Beginning
Progress was slow: I wasn't entirely happy with the design, and didn't want to commit materials to something I wasn't 100% sure of. So last year I was very happy to discover S6 Engineering and their small-scale (6, 10 and 15mm) road system. very quickly I junked my old design and began planning a new system, mounted on 18mm MDF boards.
I've just recently started laying out the city. Here are some photos of the initial design:


The road and junction sections will be glued to the board and will be permanent. The block sections will be removable; each one will have a different building or terrain piece mounted on it, so that while the basic layout won't change, the city will be different for each game. This also means that we can replace destroyed buildings with ruins.
One thing I'm quite pleased about is an idea I had to put a small piece of plasticard under the block sections: this will raise them slightly above the roads, creating a raised pavement which is quite effective (and also makes the plates easier to remove):

The design has two "hard edges" where the roads end, and two "soft edges" with junctions that stick out over the edge of the board. I will be putting a defensible city wall along the hard edges: if another board is placed next to these edges, then they will be interesting terrain features, but if not, then the walls will prevent the city just stopping, which looks a bit weird. The soft edges will allow for another board to be linked in to the city on those edges, so we can have a sprawling metropolis over several board sections, which will be pretty awesome!
The current plan is to spray the road sections with Rust-oleum Aged Iron Textured Spray, as recommended by Robin of Gruntz fame. You can see the 15mm board he created using the S6 system in this video:
More to follow.
Gale Force 9 "Battlefield In A Box" Green Crystals
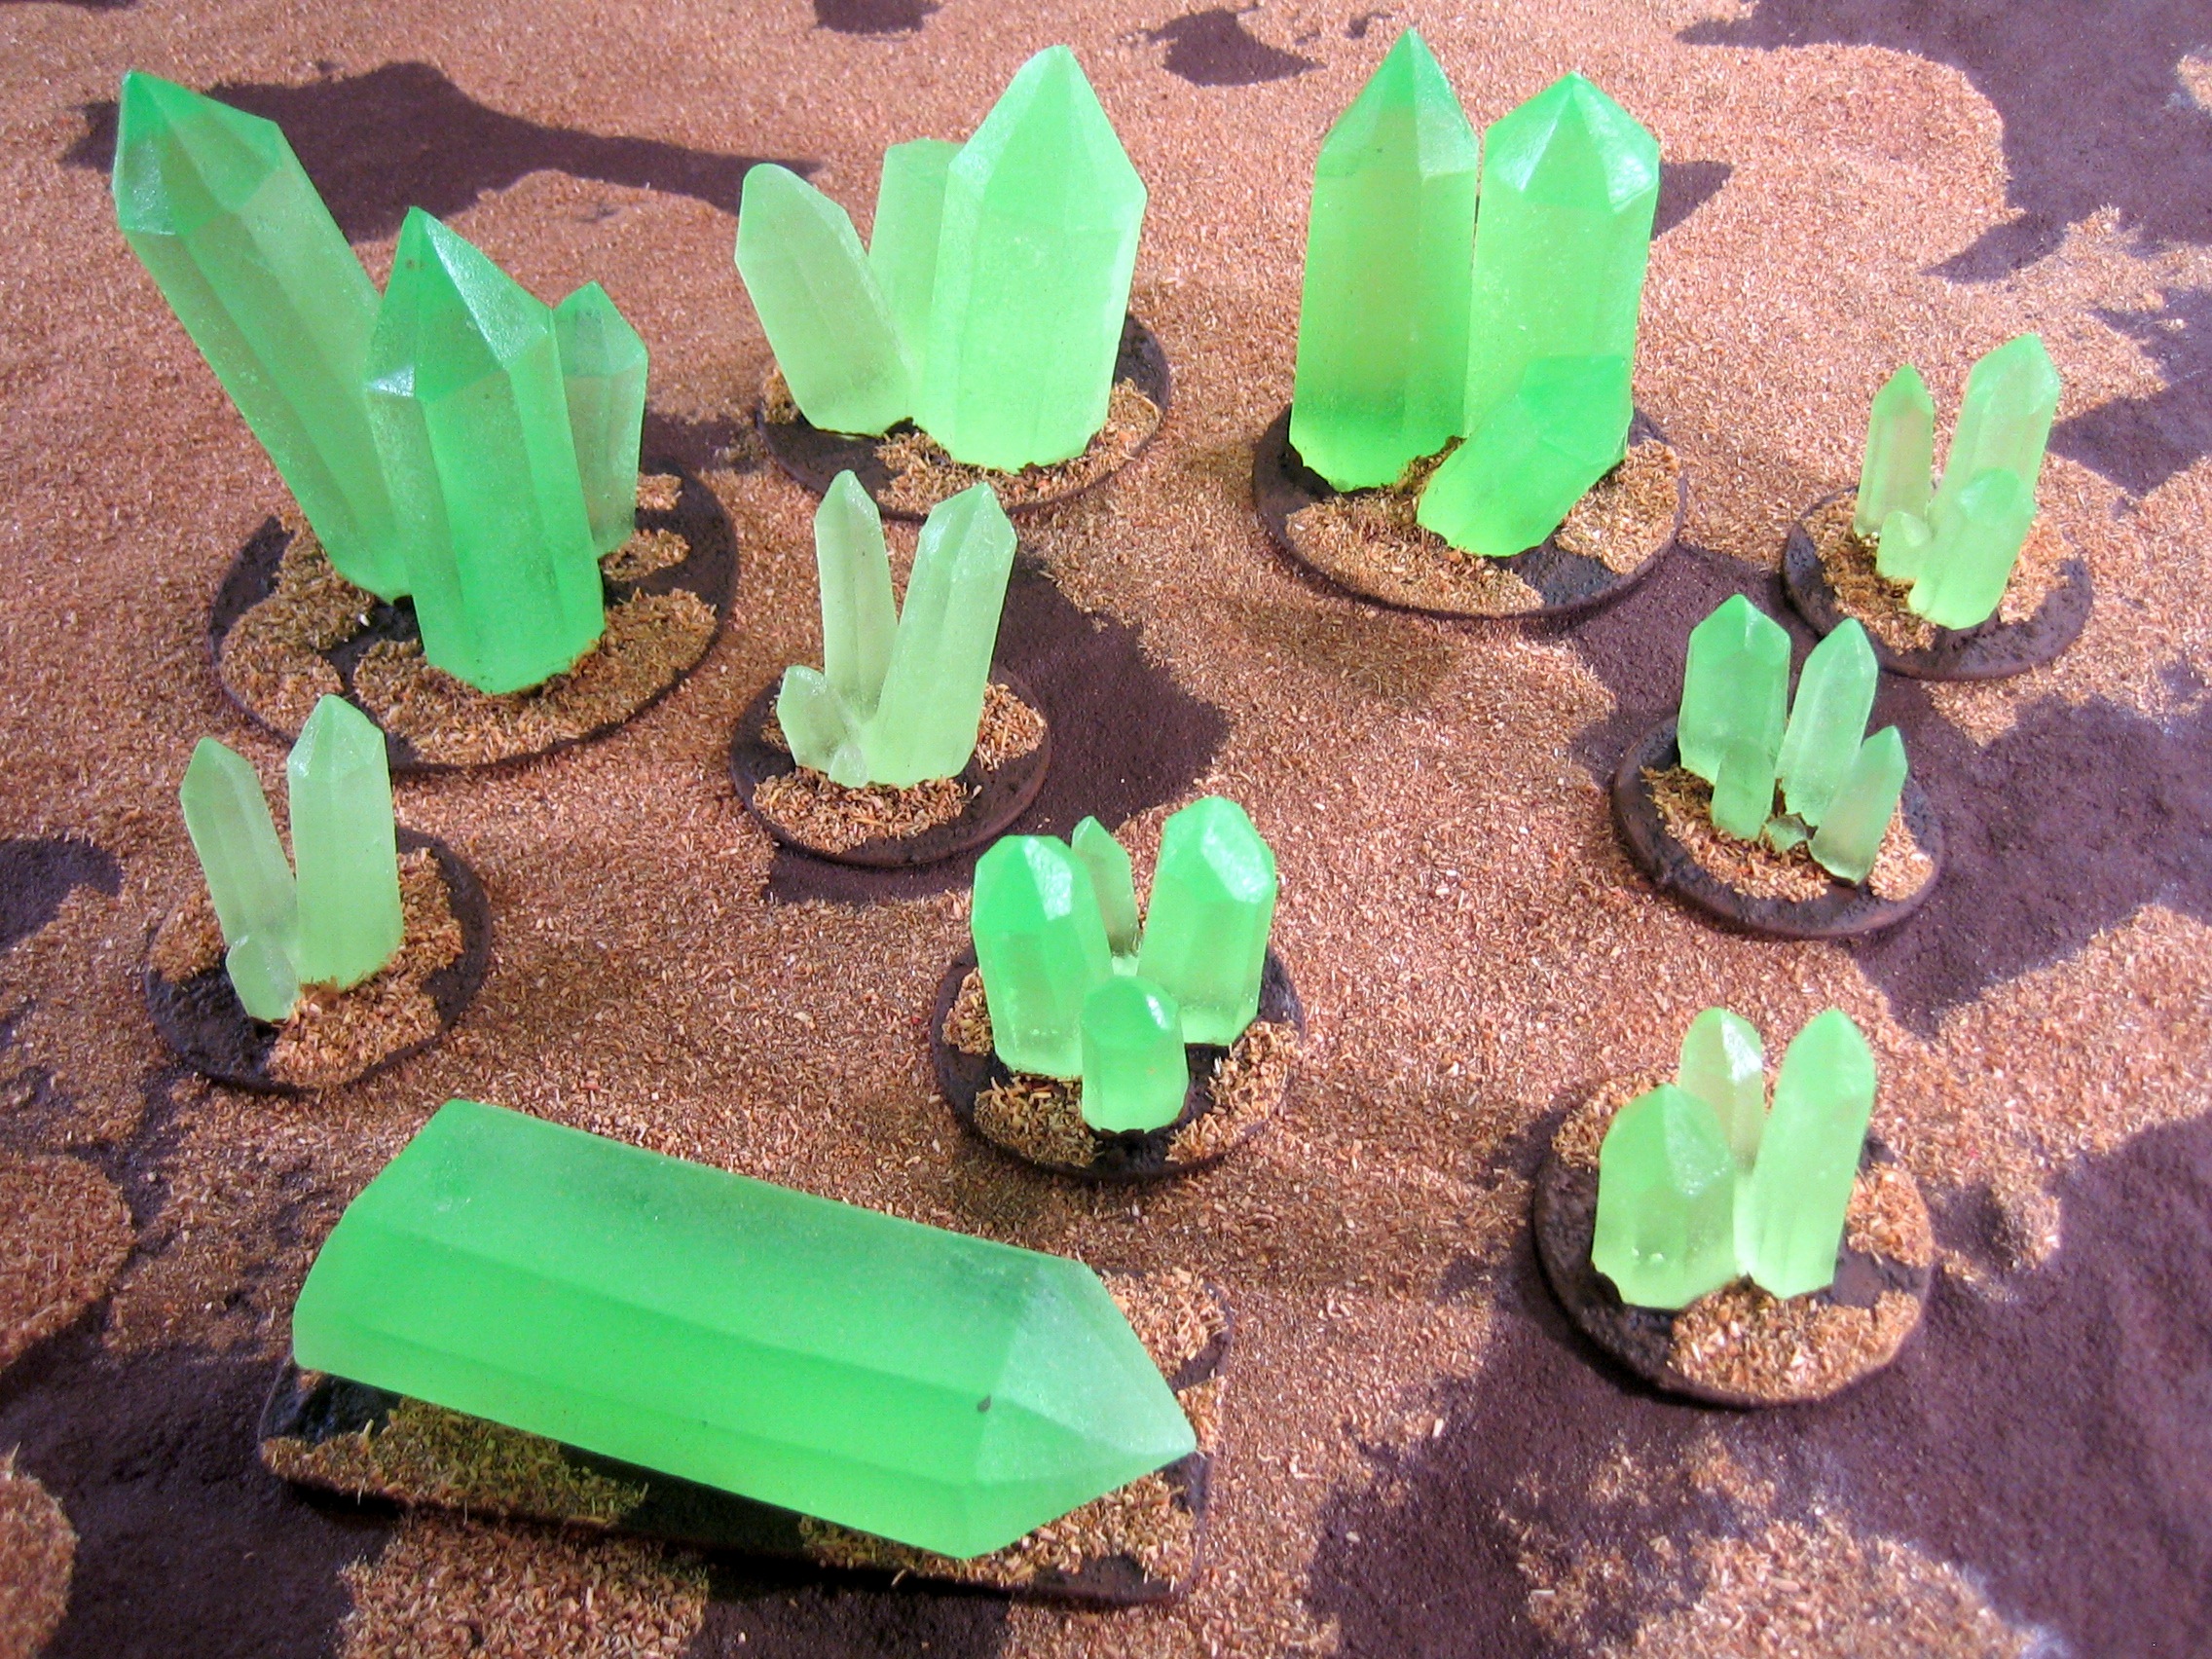
I found out about these terrain pieces from the Beasts of War, who have a series of excellent unboxing videos.
I realised that they are perfect for both 40k and Epic scale games. Unfortunately they're extremely hard to get hold of! It took me a while but I finally tracked down a box of them on the Marquee Models website (they're now out of stock on there as well).
I decided that I wanted to base them so that they'd be more stable on the gaming table. Taking my trusty compass cutter I made some based from 1mm plasticard and glued them on. All I needed to do then was apply some Basetex textured paint, some Devlan Mud, and then the same flock that I use to base my Epic necron models. Here's the result:
Epic Necron Tomb Structure Finished
First up is the large tomb structure that I've featured in the last two posts. It was initially sprayed black. I tried a number of different techniques to give it an aged stone appearance, including stippling and airbrushing, and I even got out my old airbrush to give that a try! In the end I used an old bath sponge to apply successively lighter shades of gray. Then I just needed to texture and flock the base and apply some decals from Games Workshop's Necron Transfer Sheet.


At Cavalier last year I picked up some resin Egyptian obelisks. I necron-ified them by filling in the hieroglyphic writing on the sides, and then sanding them smooth. They got the same paint job as the Necropolis, and some decals as well:


Next up is an Exodus Wars Khazari Droid Controller painted up to look like a Necron Abattoir (I previewed this miniature in a post last year:


I met Tom Webb of Steel Crown at Salute earlier this month and he's a very nice chap. Go buy his stuff!
Lastly there's the board I used to take these photos with. This is one of six Ziterdes modular gaming table modules that I bought a few years ago and use for Epic games. They were originally painted using car body sprays, but I've never been very keen on the shiny finish that they picked up, so I made up a texture paint using brown craft paint, aquatic sand and PVA glue (similar to the "concoction" used by Beasts Of War), which gives a nice flat muddy finish, and is flexible as well. I then applied some of the same flock I use on my Epic necron model's bases.

Large-scale Epic Necron Structure

The original piece is a 28mm scale defensive wall, so I cut out a square of plasticard and placed it on top of some balsa wood supports that I glued to the inside of the walls.
The roof is a bit featureless, so a while back I started making a huge great obelisk to sit on top, but I think it might be a little over-the-top:

What do you think?
Epic Necron Terrain Pieces

This is the method I came up with (it took a couple of attempts). First, the ingredients:
- 3mm plasticard
- 1mm or 0.5mm plasticard
- Liquid poly cement
- 5mm drill
- Razor saw
- Clothes pegs
The first thing to do is cut out two 15mm x 24mm rectangles from the 3mm plasticard. I decided to score on the design while they were still attached to the main sheet. You'll almost certainly want to use a razor saw to do this.

Then cut a 12mm x 22mm piece of 1mm or 0.5mm plasticard. This is a spacer that goes between the other two pieces, making a sort of sandwich. It's smaller than the other two pieces so that a gap shows. Glue them all together with liquid poly and use some clothes pegs to clamp them together.

Once the glue has set, use a 5mm drill to drill a hole through the middle. The hole should be 7.5mm from the top, and on the centre line. I drilled a pilot hole with a pin vise to make the drilling a bit easier.
Once you've drilled the hole, take your razor saw and cut grooves over where you've previous scored. If your razor saw is a thin one like mine, you may need to make two parallel cuts and carve out between them. A round file can be used to chamfer the edges of the grooves.
Mount on a 24mm base and you're done! Here's the finished piece.

Here's another terrain piece I made. You can get quite nice effects with just a few bits of plastic.


Building a Building


At £12 for 13 sprues (which would be enough to make several buildings like the one above, the Large Platform Builder box is great value. I will definitely be buying more!
Modular City Board, Pt 3
These old building were nice in that they fitted together with a nice tongue and groove on the back. But to go the extra mile, I've been using putty to fill the gaps between two glued-together buildings.

The filler I'm using is Revell's "plasto". Unlike green stuff, which has the consistency of chewing gum, this stuff is more like car body filler, or cement, and it's applied in the same way: squeeze a dollop out of the tube onto the relevant area, then use a spreader to shape it, and then file smooth once it's dried.

The finished surface of the affected areas will be visibly different from the rest of the building, so I will probably end up applying a thin coat of the filler to the roof and sides of the buildings, just to keep it consistent.
Modular City Board, Pt 2

You can probably work out how this was made: I used balsa wood to create the walls (I manually mitred the ends so that they'd make nice corners. I used cocktail sticks to create the posts, and used 28mm razor wire rolled around a paint brush handle to create the barbed wire around the top. The resin buildings come from Old Crow and Wargamer.pl.

These Forge World buildings (now sadly out of production) are very nice, but have a thick 4mm base which makes them look a bit weird as stand-alone buildings. Rather than trying to cut the base off (I did have a try with my trusty razor saw) I decided to build up around the base with 4 squares of 1mm plasticard, each 1cm smaller than the next, to create a set of stairs. Since the finished piece is too big to share a panel with anything else, I decided to put it on its own panel, at a diagonal angle. I might add some more detail in the empty space in the corners later on.
Modular City Board, Pt 1

I started with a large sheet of 0.5mm plasticard. This is hard to get but can be found from professional modelmaker's stockists, such as the 4D Modelshop in London, where I got mine.
The system is intended to be compatible with the Ziterdes modular gaming table that I use for all the games I play. This means that I had to cut the sheet to be 600mm square: when it's finished, I will mount the sheet on a piece of MDF or similar to raise it to the same height as the Ziterdes boards.
My plan is to have a simple grid system, with square blocks that can be moved around as required. Indivudual terrain pieces such as buildings will be mounted onto inserts that sit in holes cut into the sheet. This gives the impression of a raised pavement, and also hides the joins, making the whole thing look like it's a single piece.
After cutting the sheet to size, I cut four 200mm x 200mm squares out, leaving a 50mm border around the edge and 100mm gap between each hole (the roads are 100mm wide: not very realistic but they need to be big enough for titans and other super-heavies to maneuvre!). This means that if two boards are placed next to each other, there will always be a 100mm gap between each terrain piece.
Having cut out the four holes, I now have four 200mm x 200mm pieces of plasticard, which will form the base of each terrain piece:

More to follow!