All posts in "necrons"
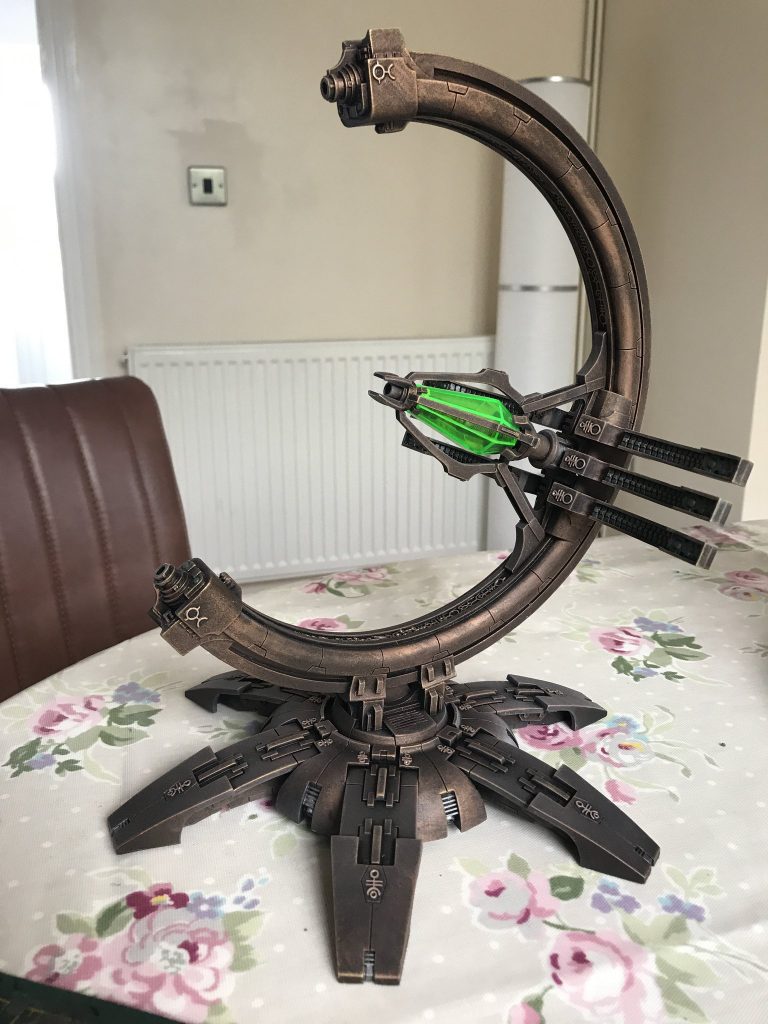
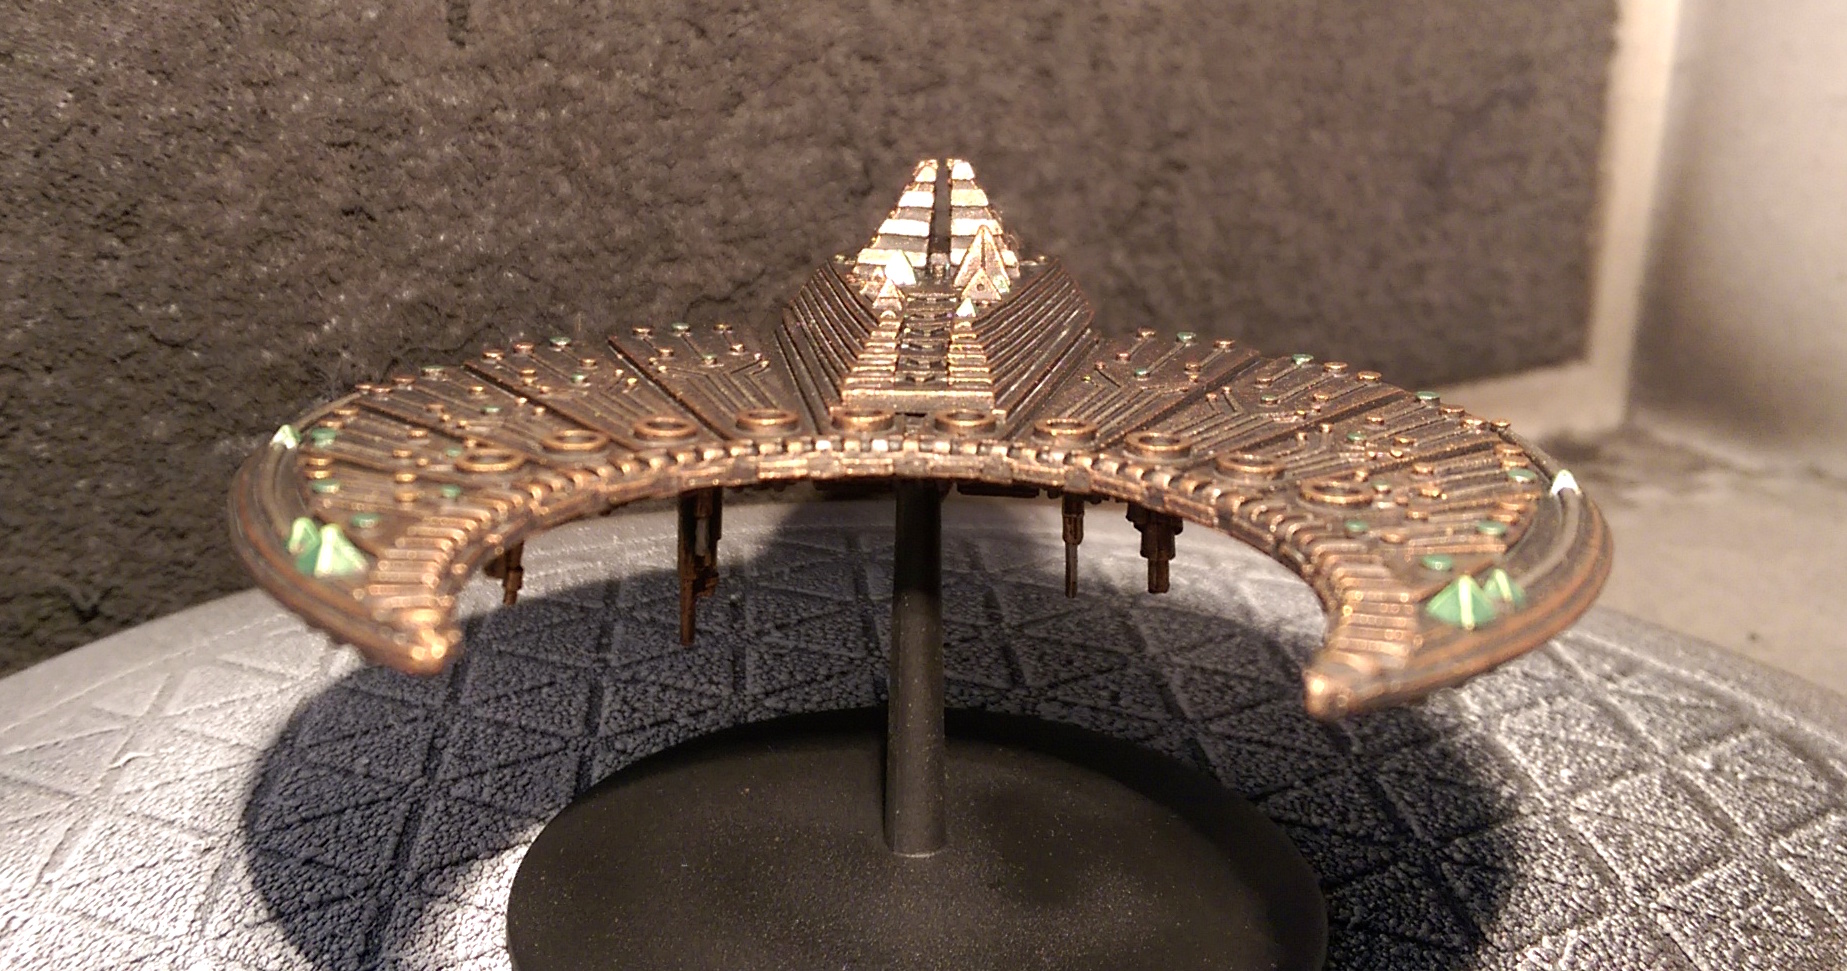
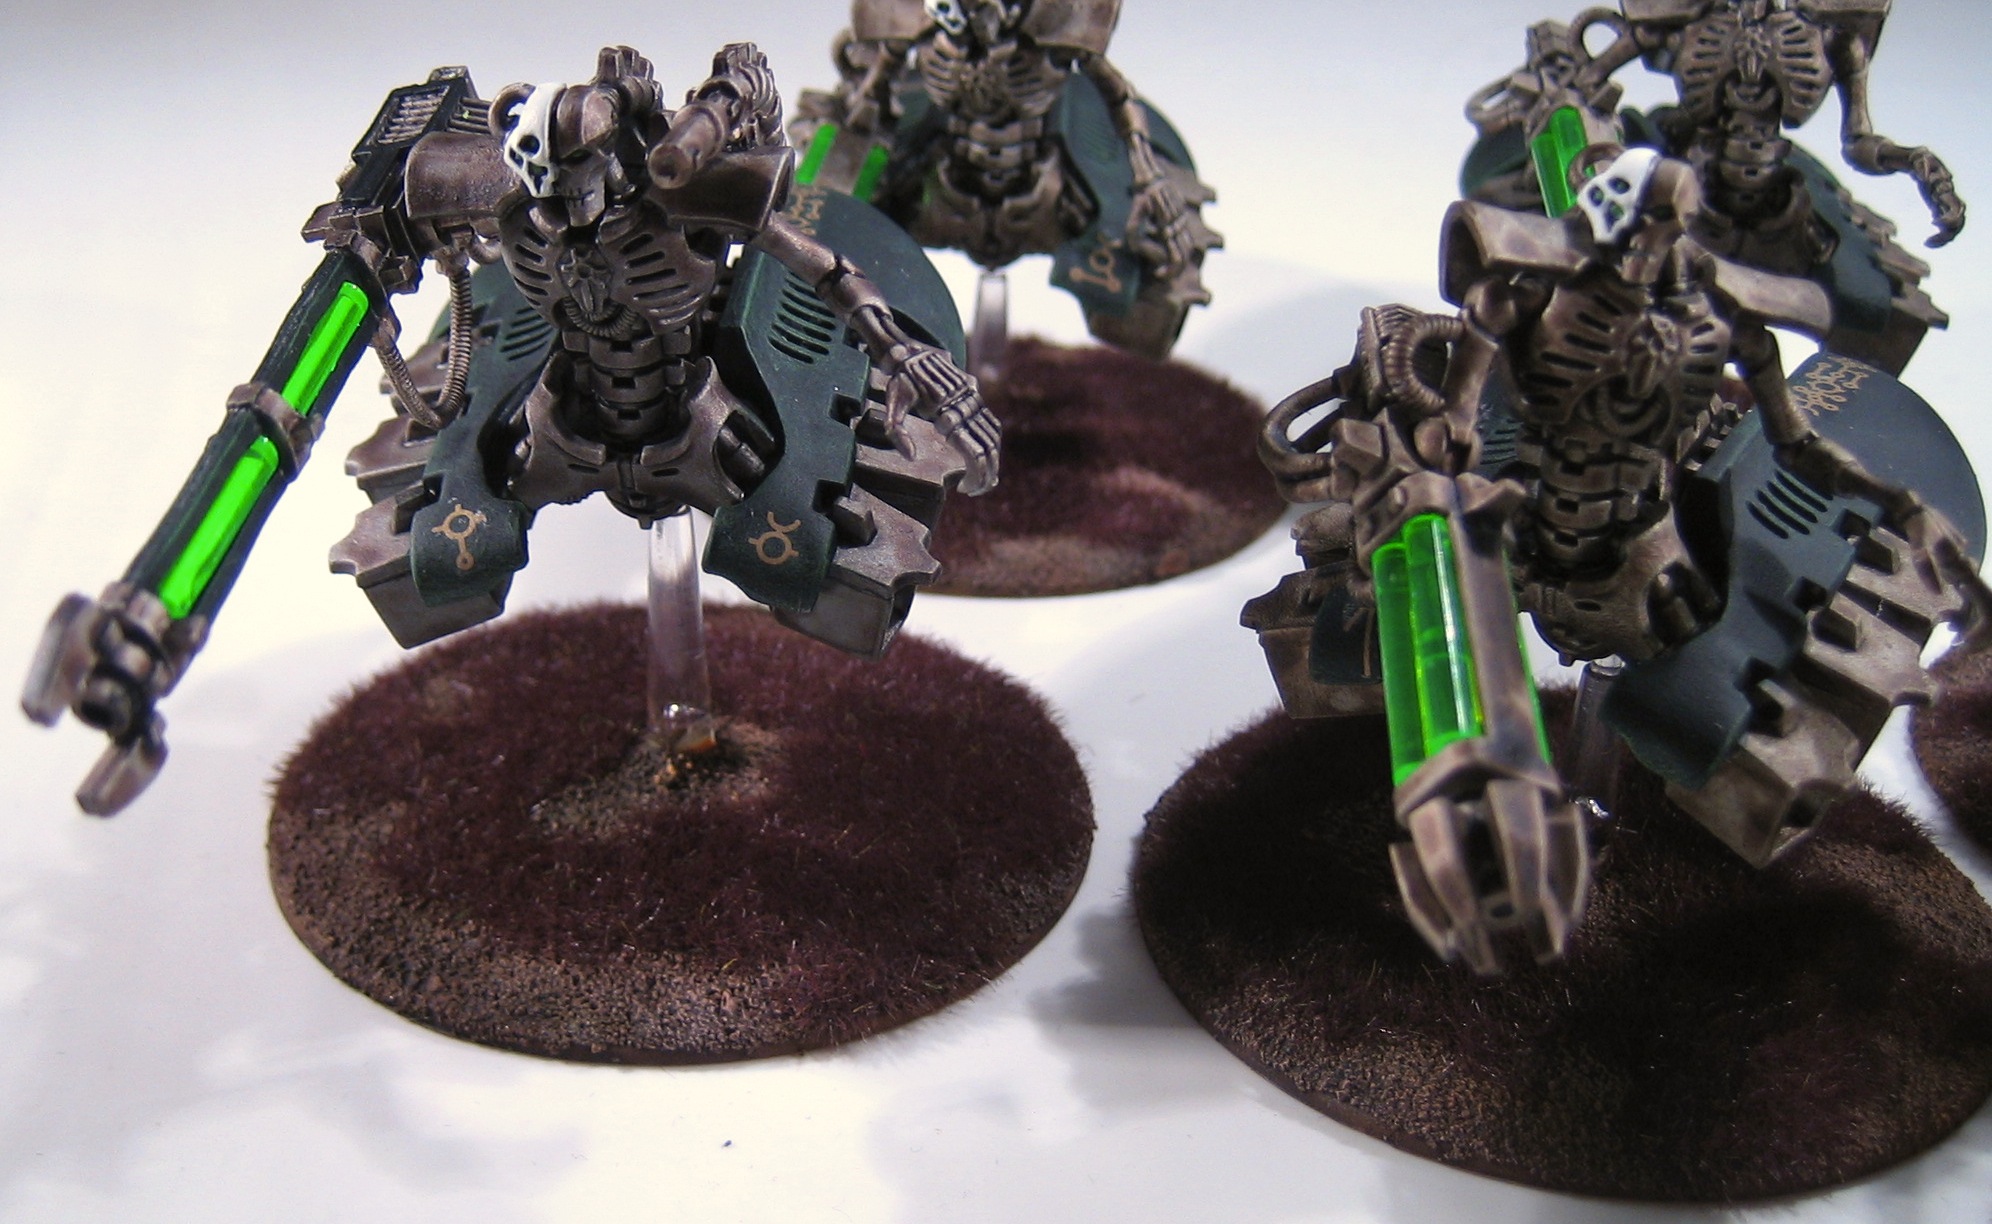
C'tan Shard of the Void Dragon
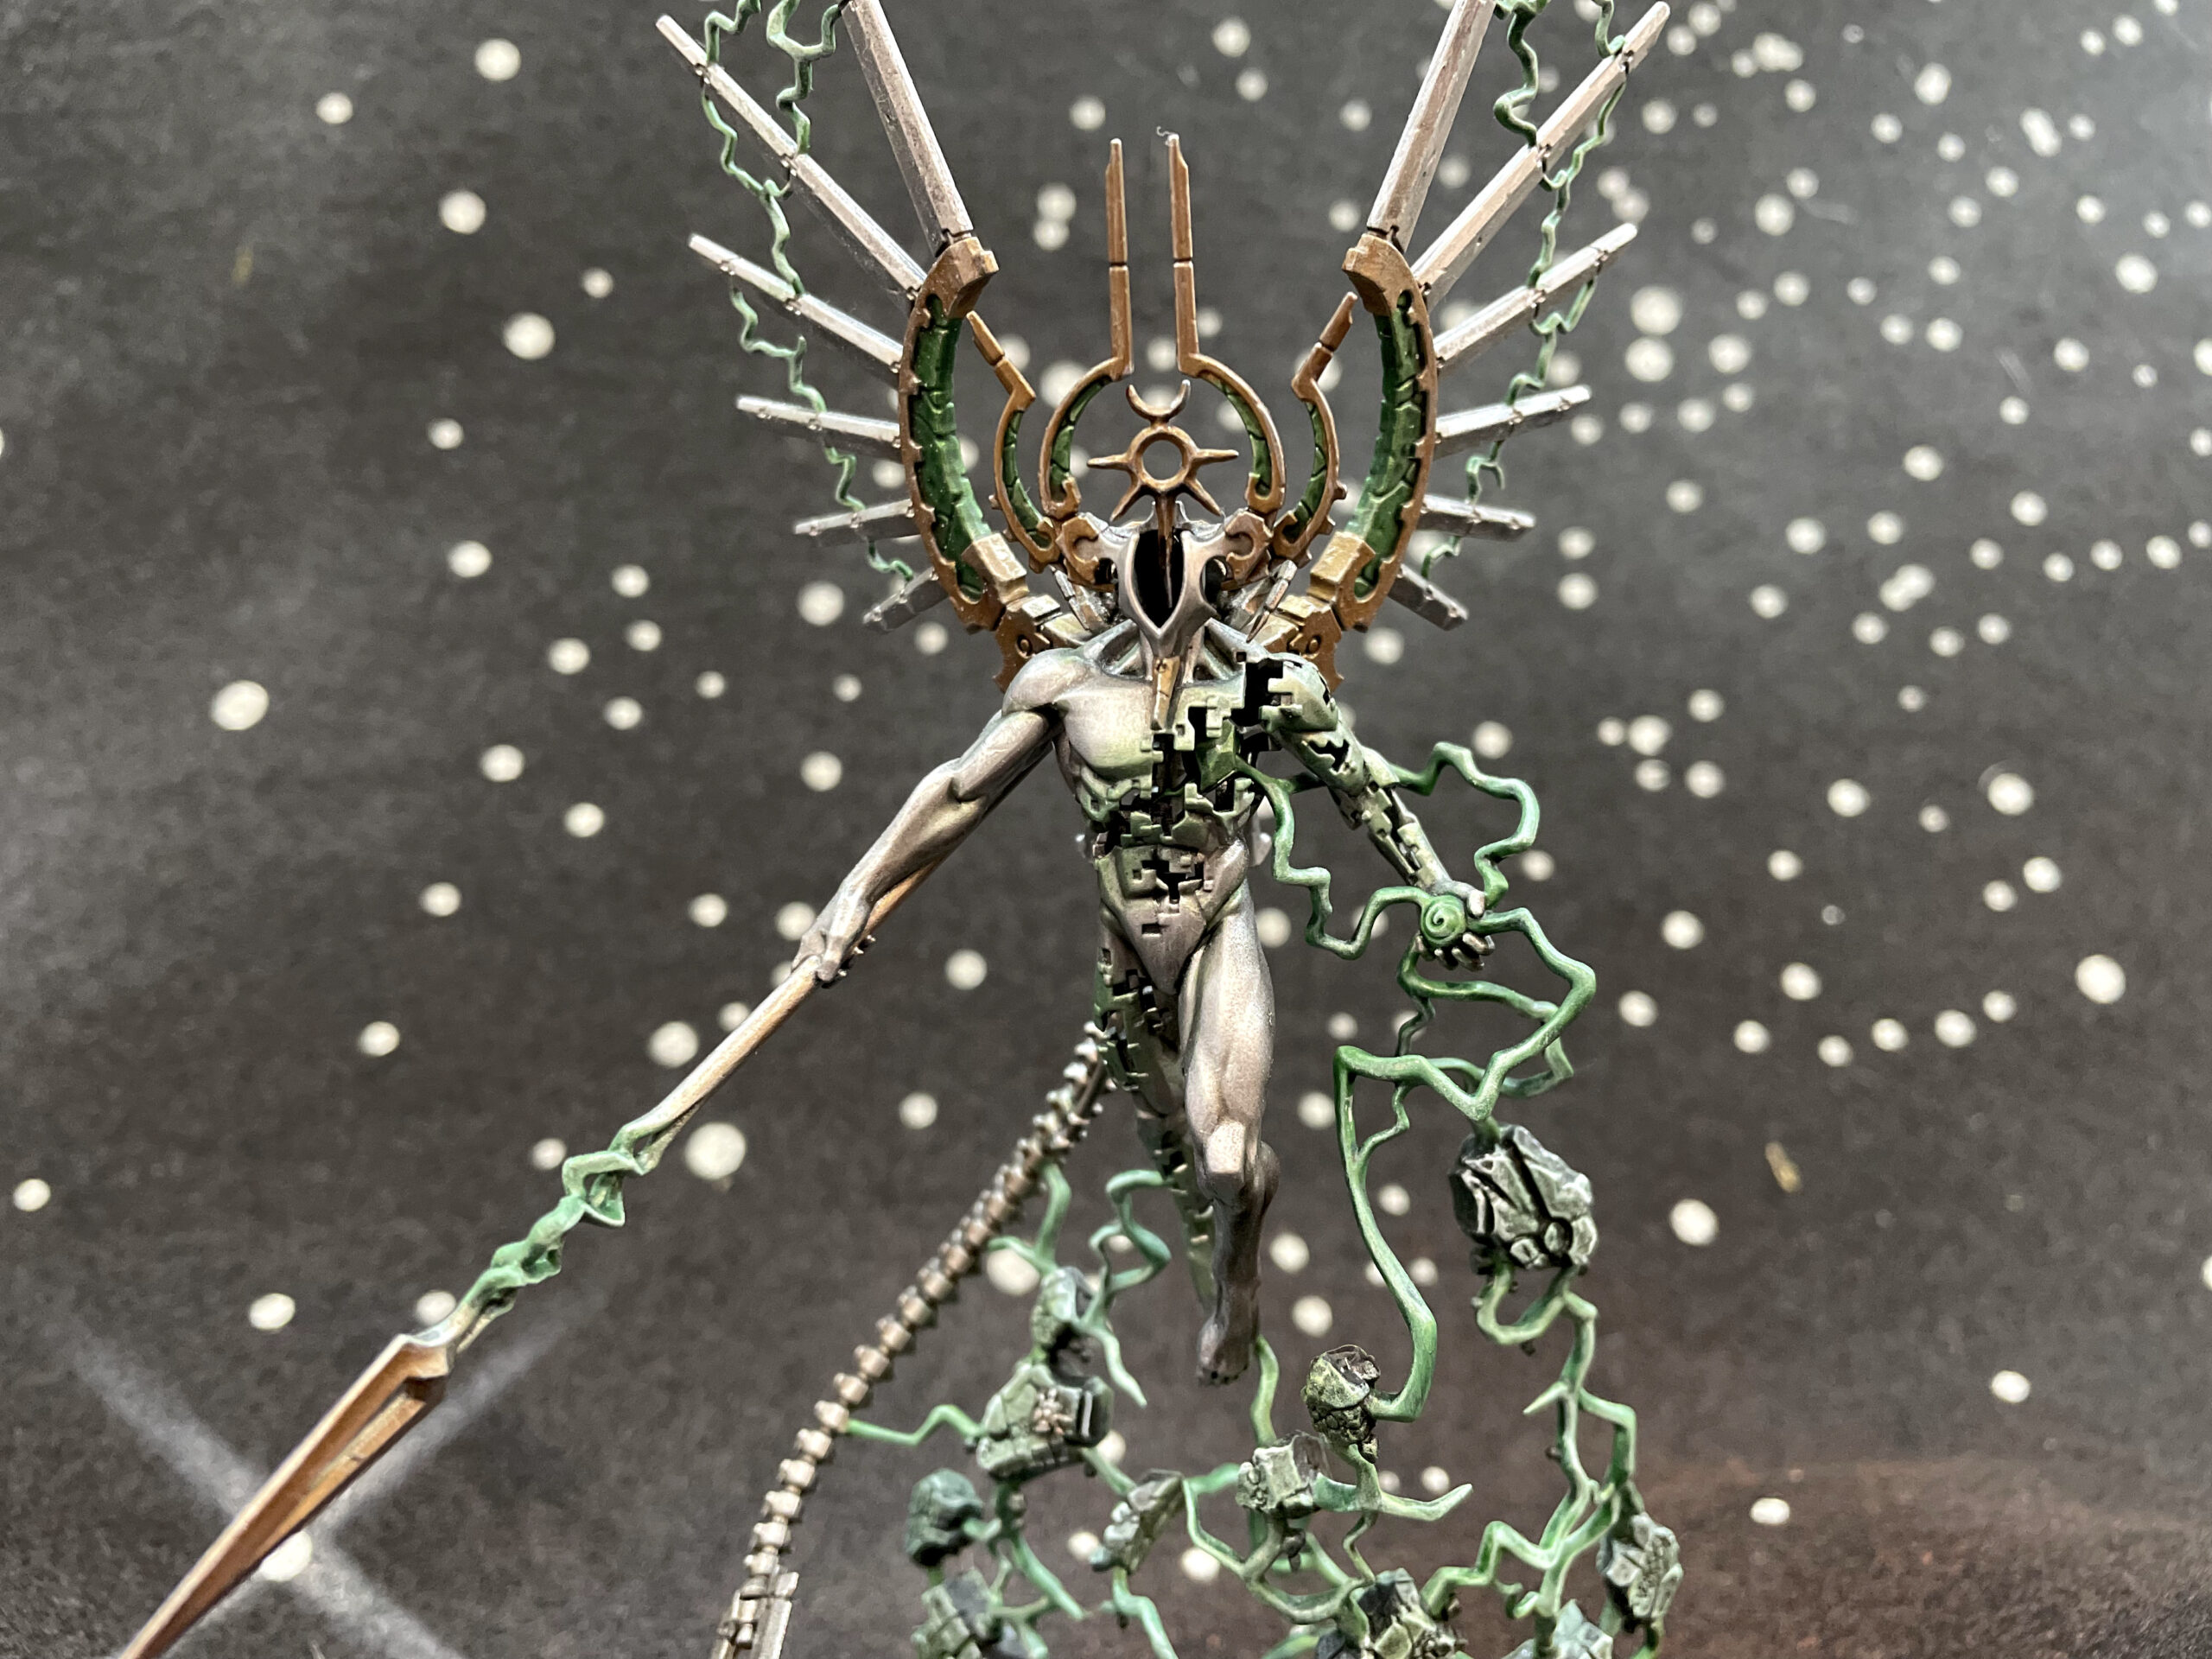
This is just an extraordinary model, and the perfect exemplar of just how damn good Games Workshop's designers have become at sculpting using modern techniques. This miniature literally could not have existed five years ago!
It was also surprisingly easy to paint to a level that I didn't think I'd achieve given the amount of effort I put in. It's not much more than a zenithal basecoat with a rattle can, some pin washes, and a bit of drybrushing.
More pictures below the fold.
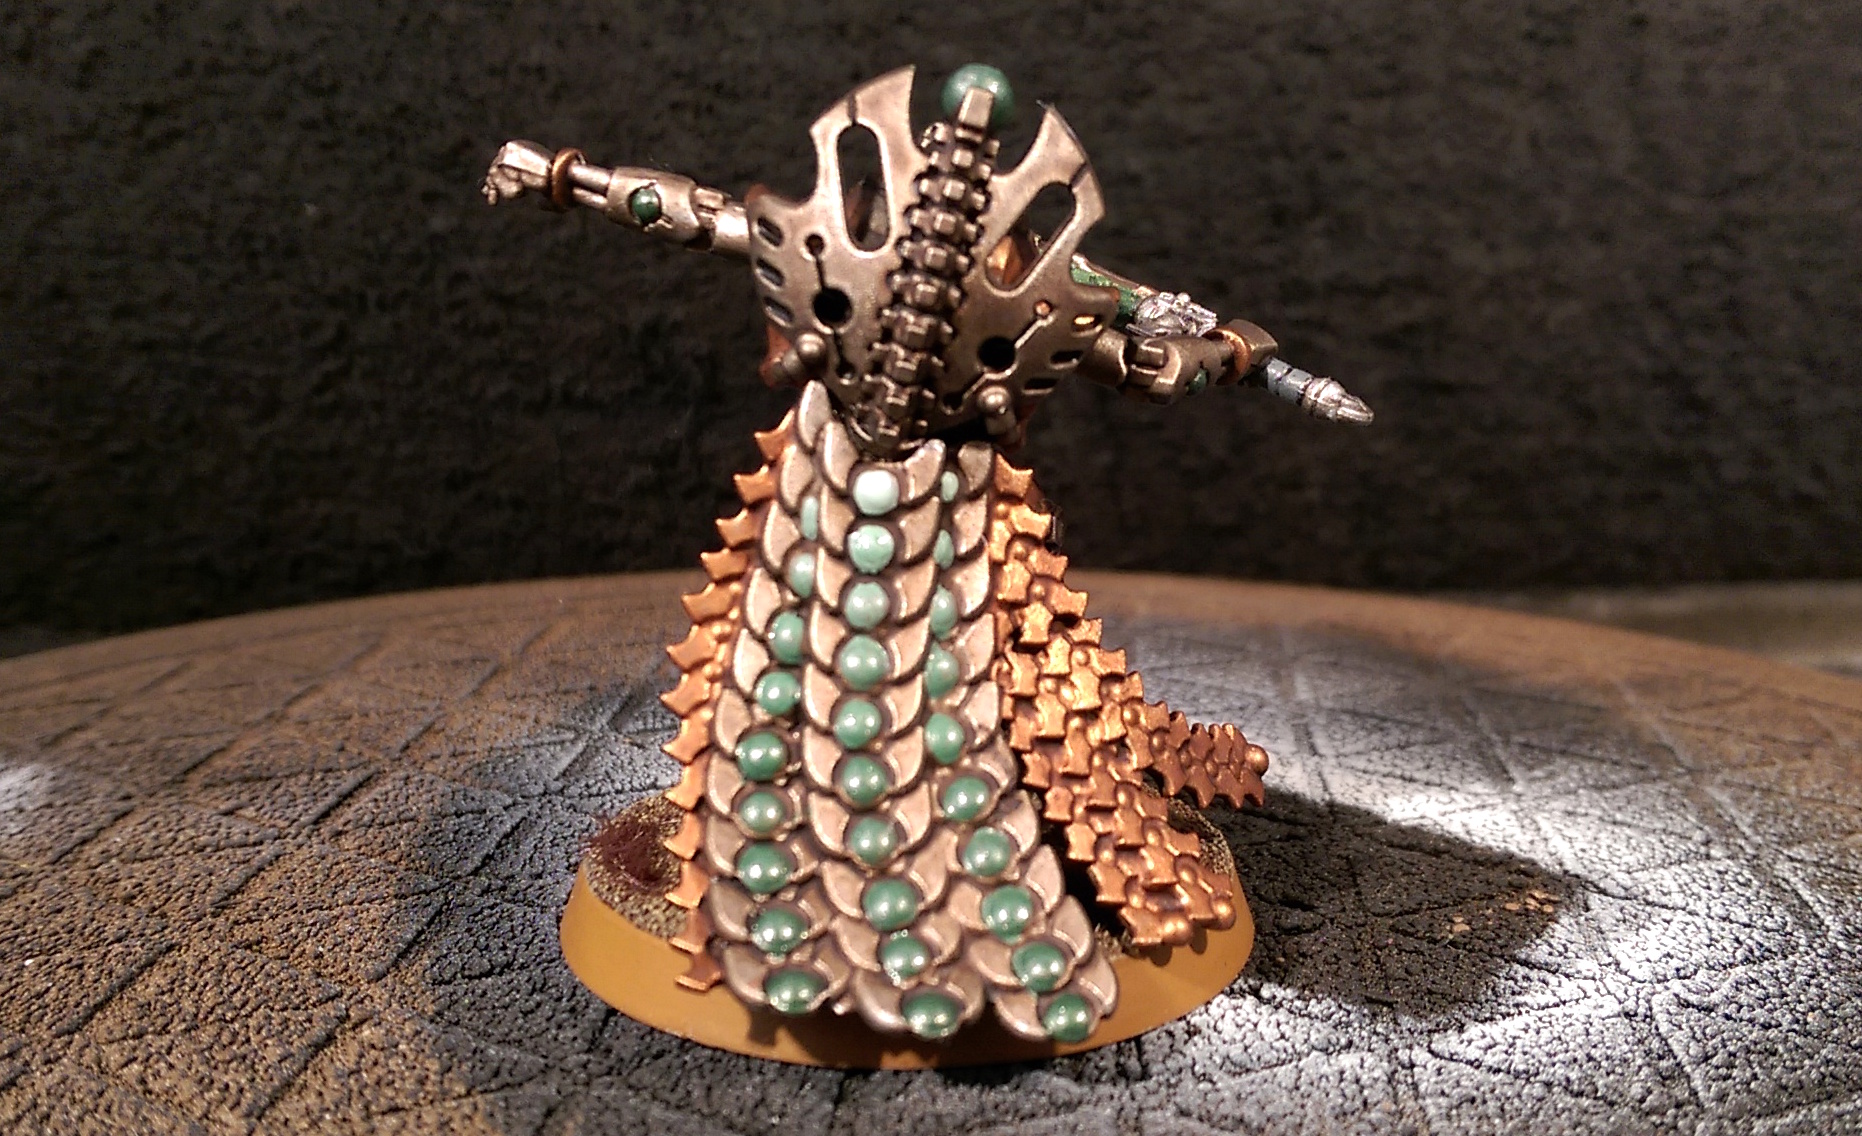
Necron Overlord & Royal Warden by The Unrelenting Brush
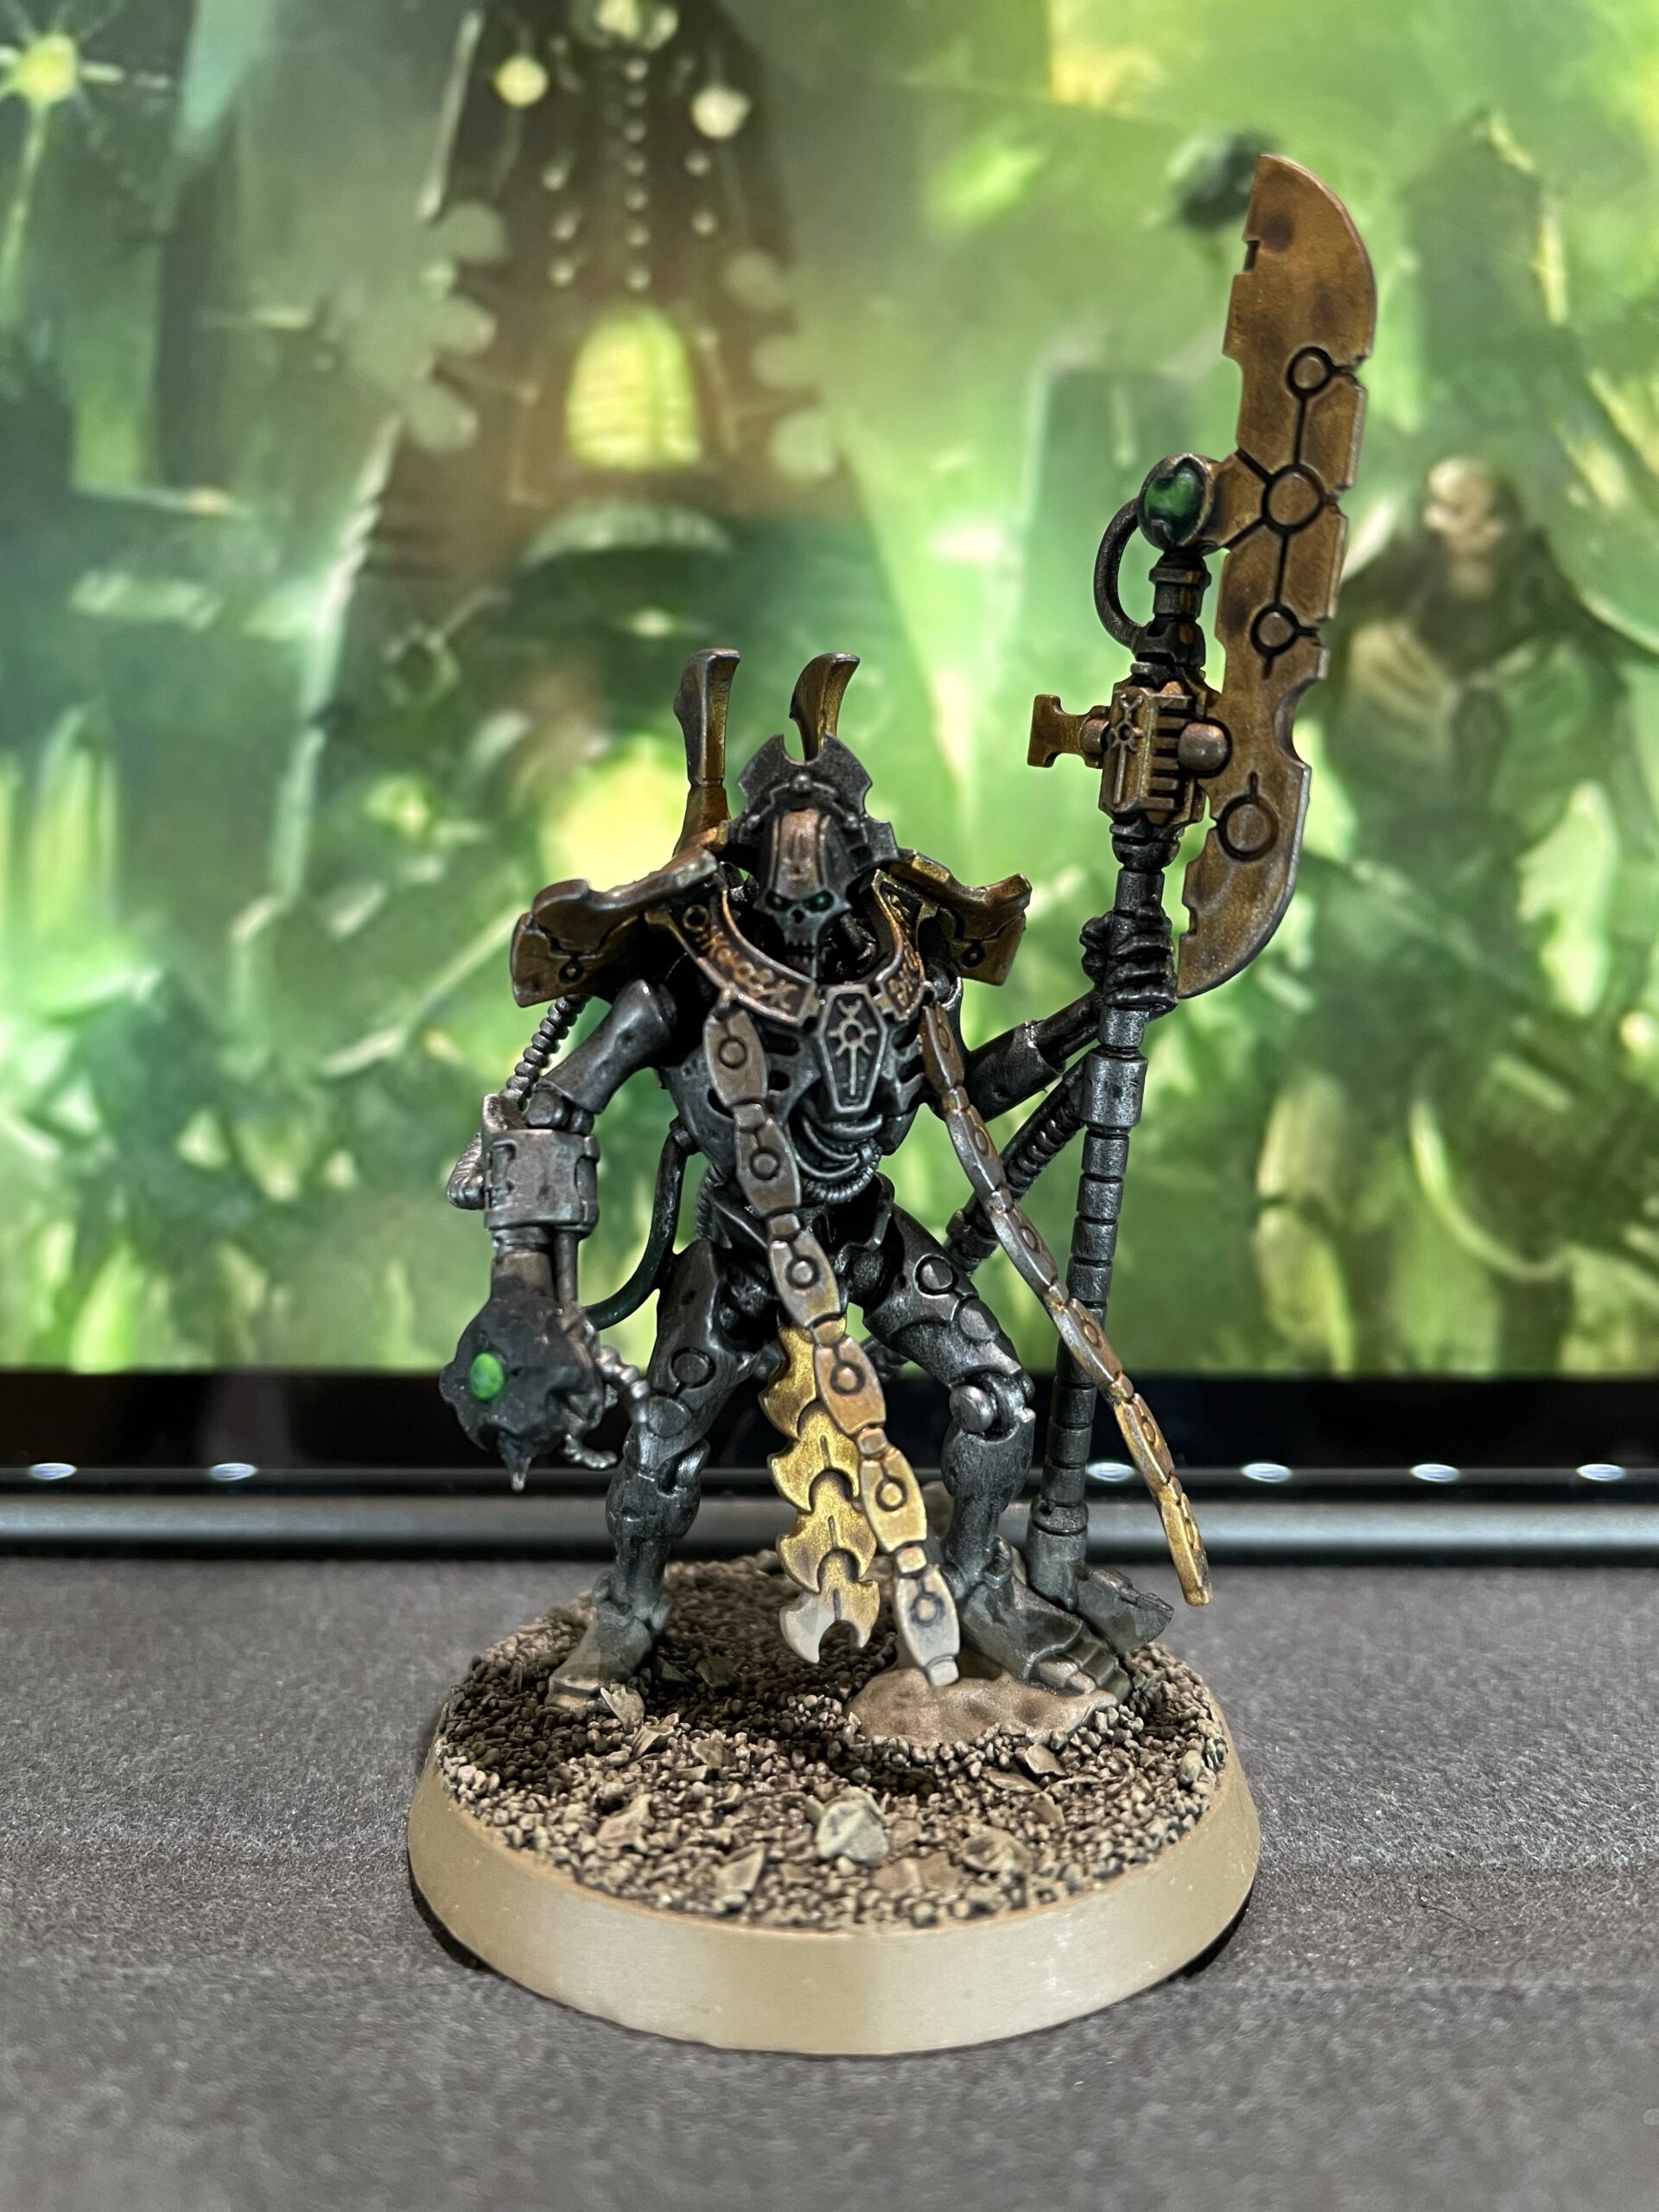

Two of the characters from the Indomitus box set painted by The Unrelenting Brush. I have lots of Overlords but I really like this model - like the Royal Warden, it's a very macho pose, and a lot more intimidating than the other versions of this character.
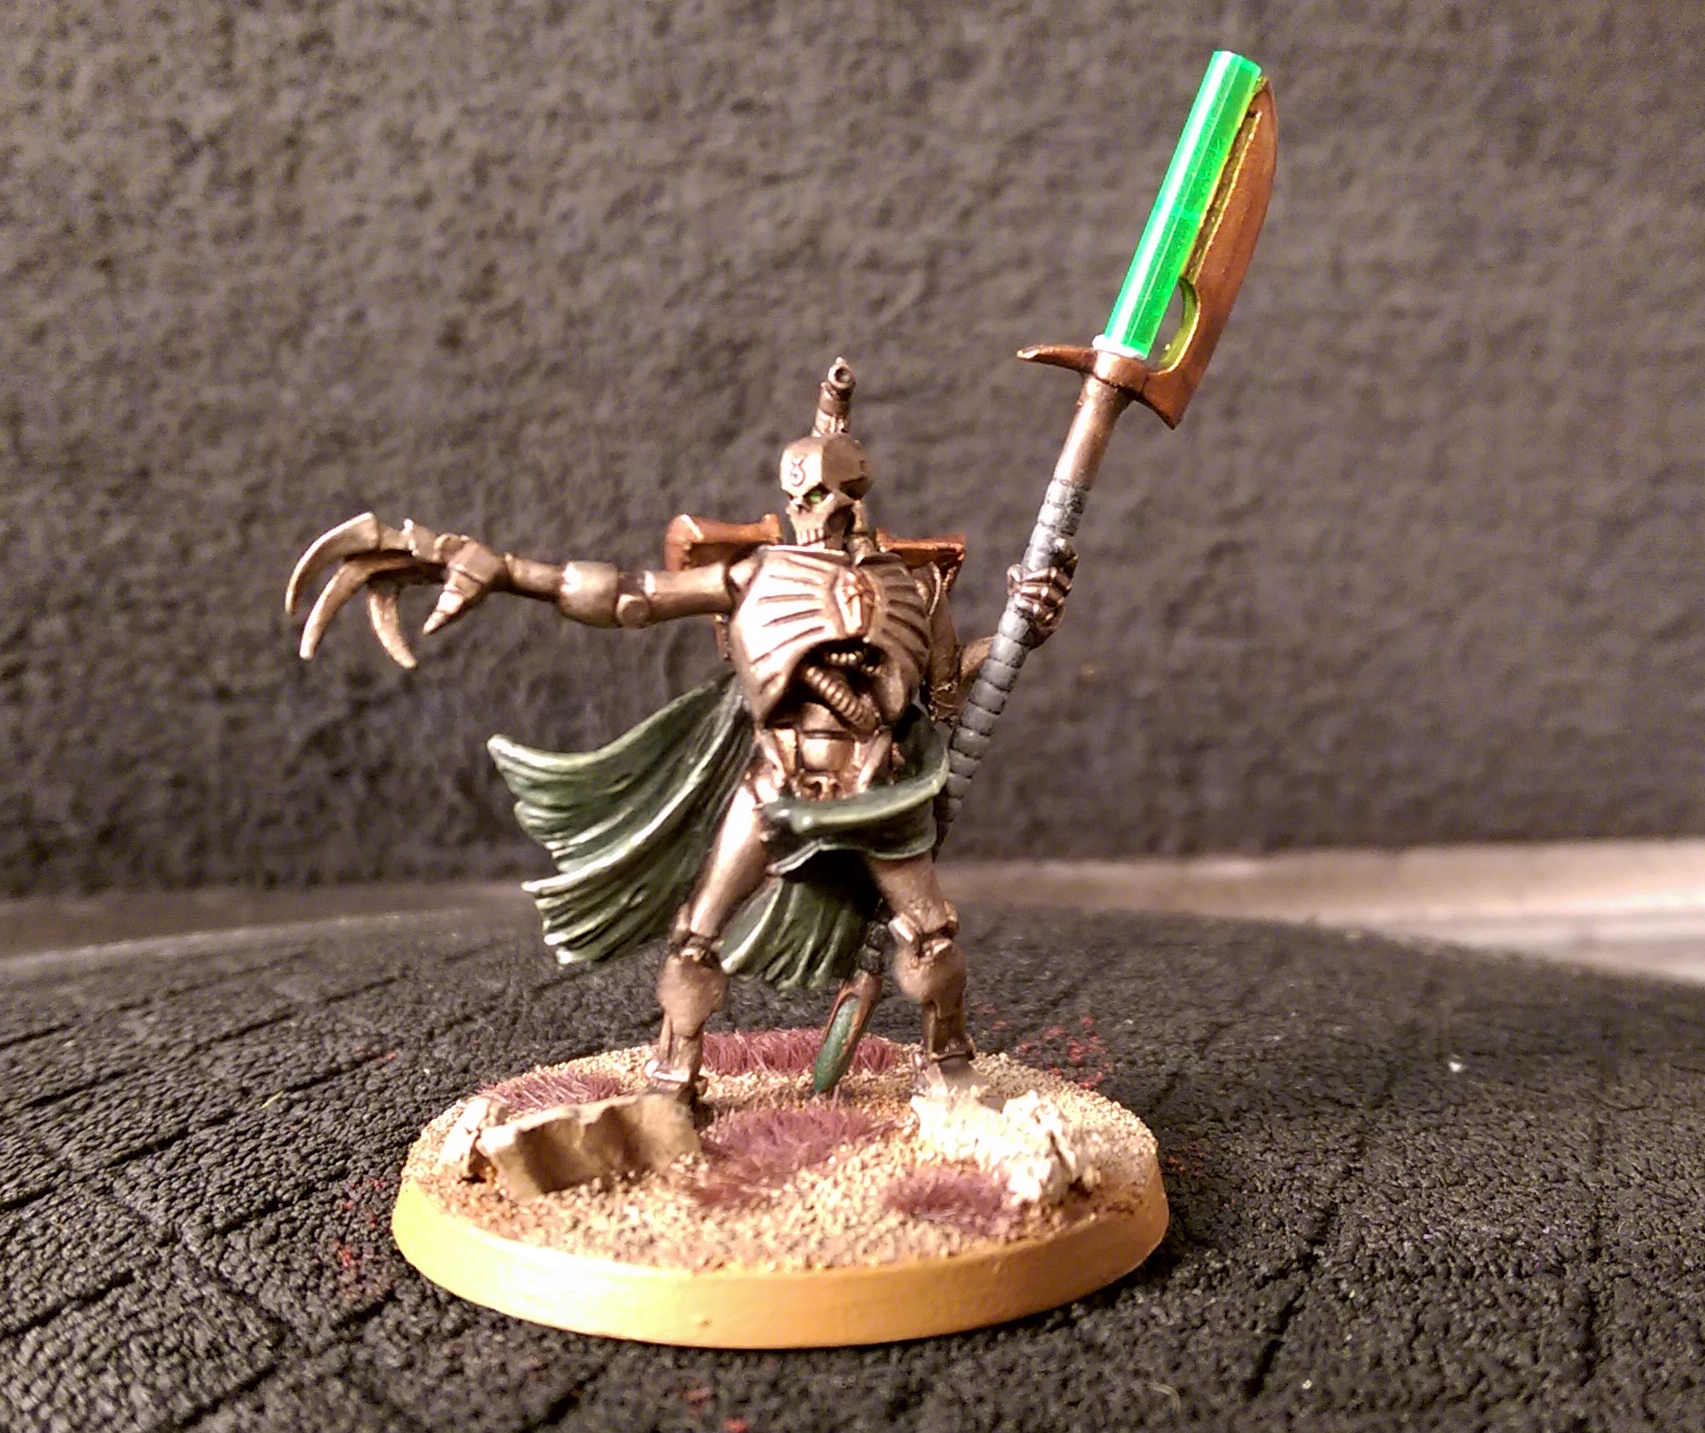
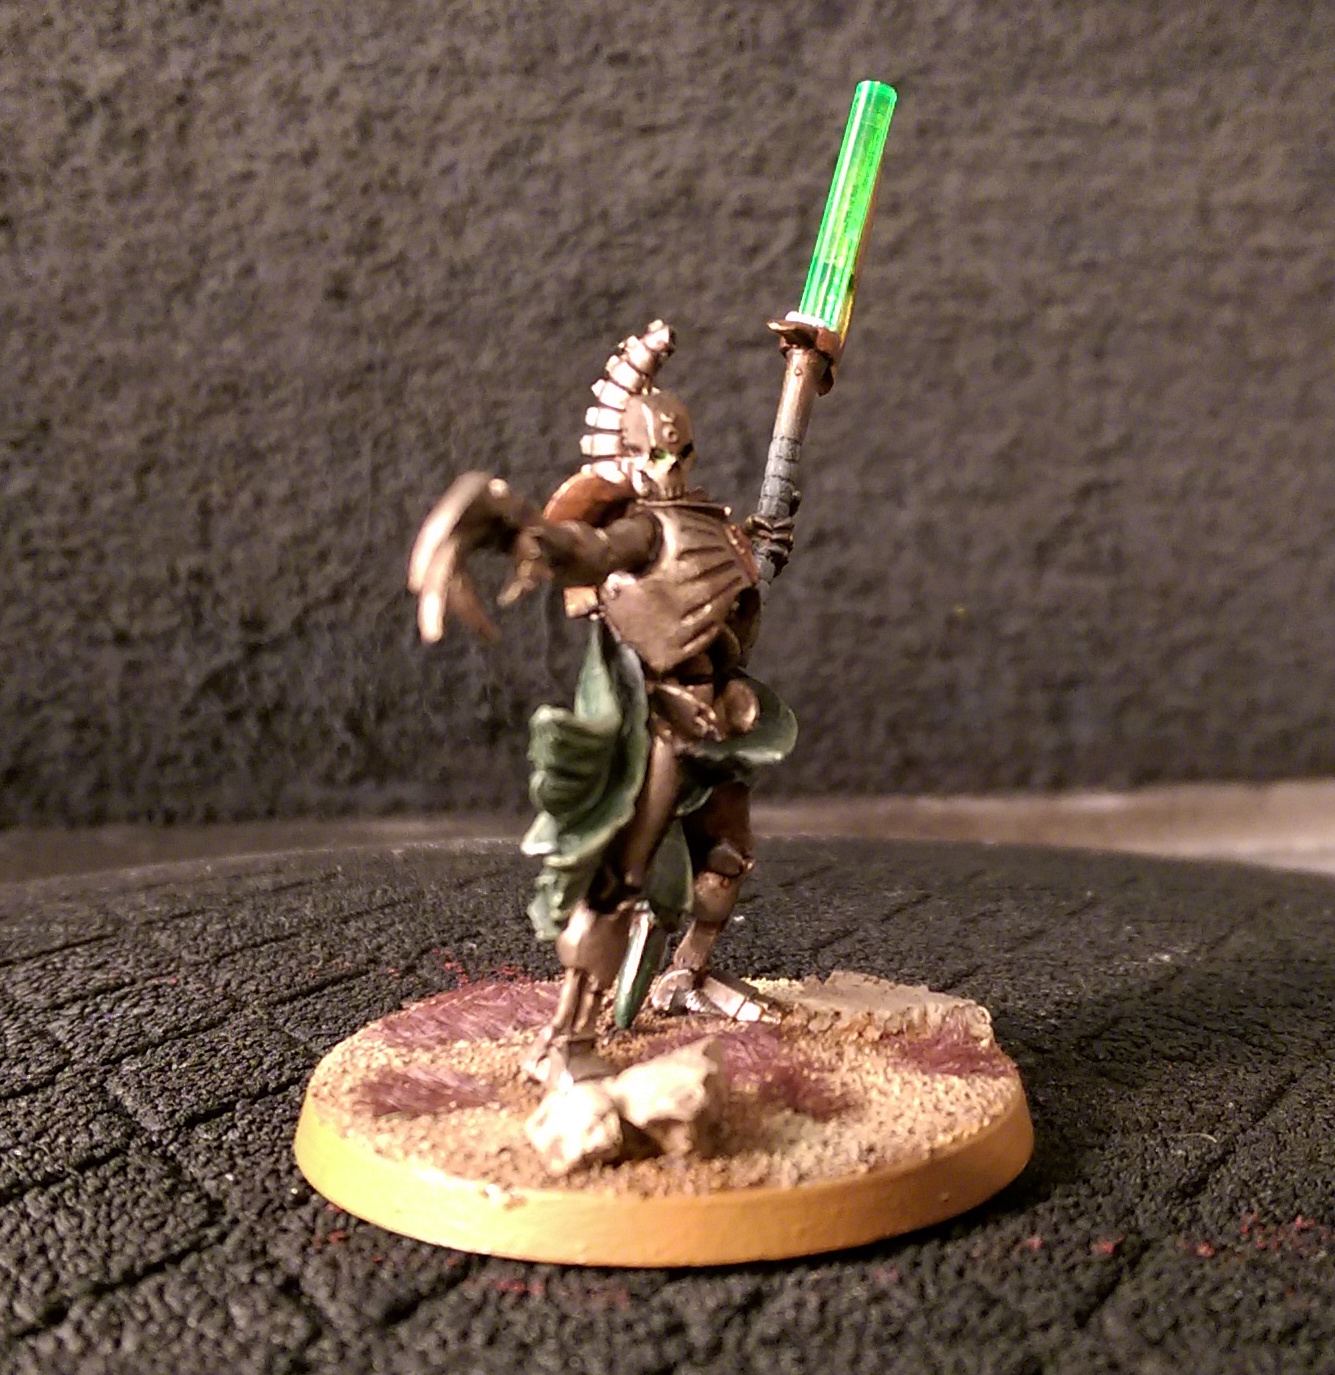
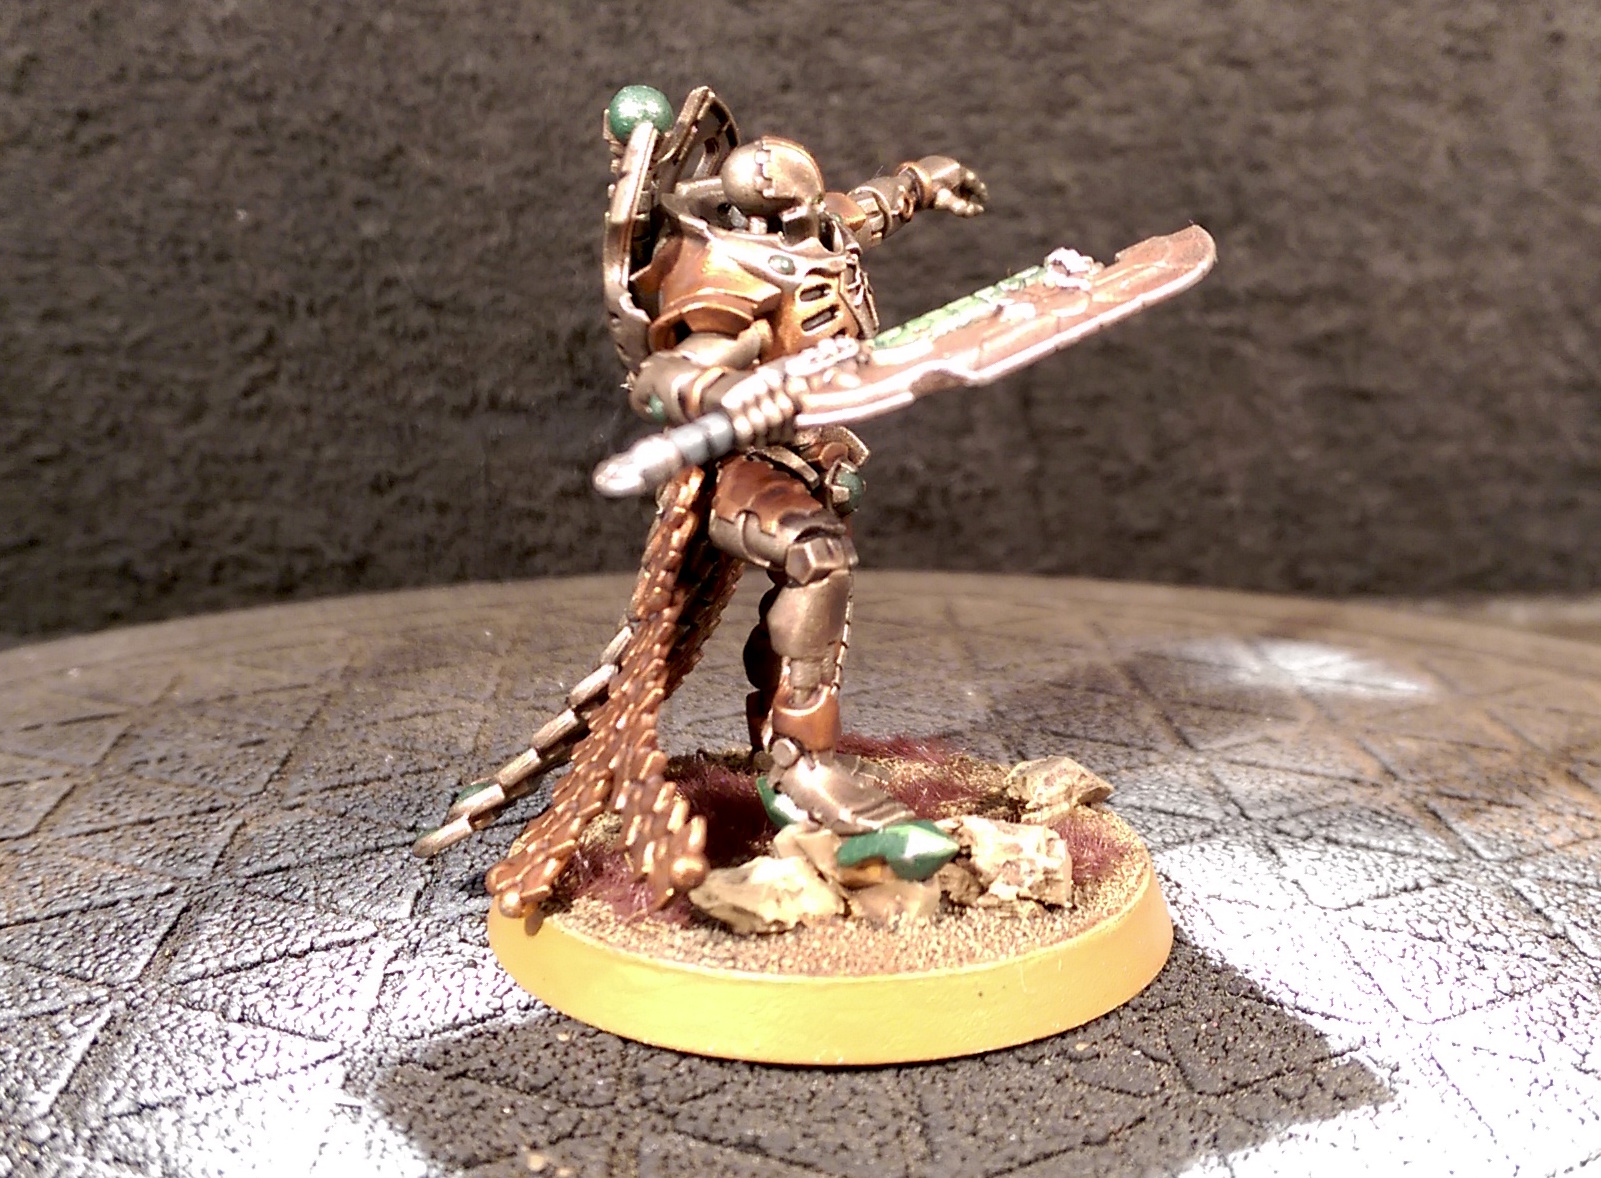
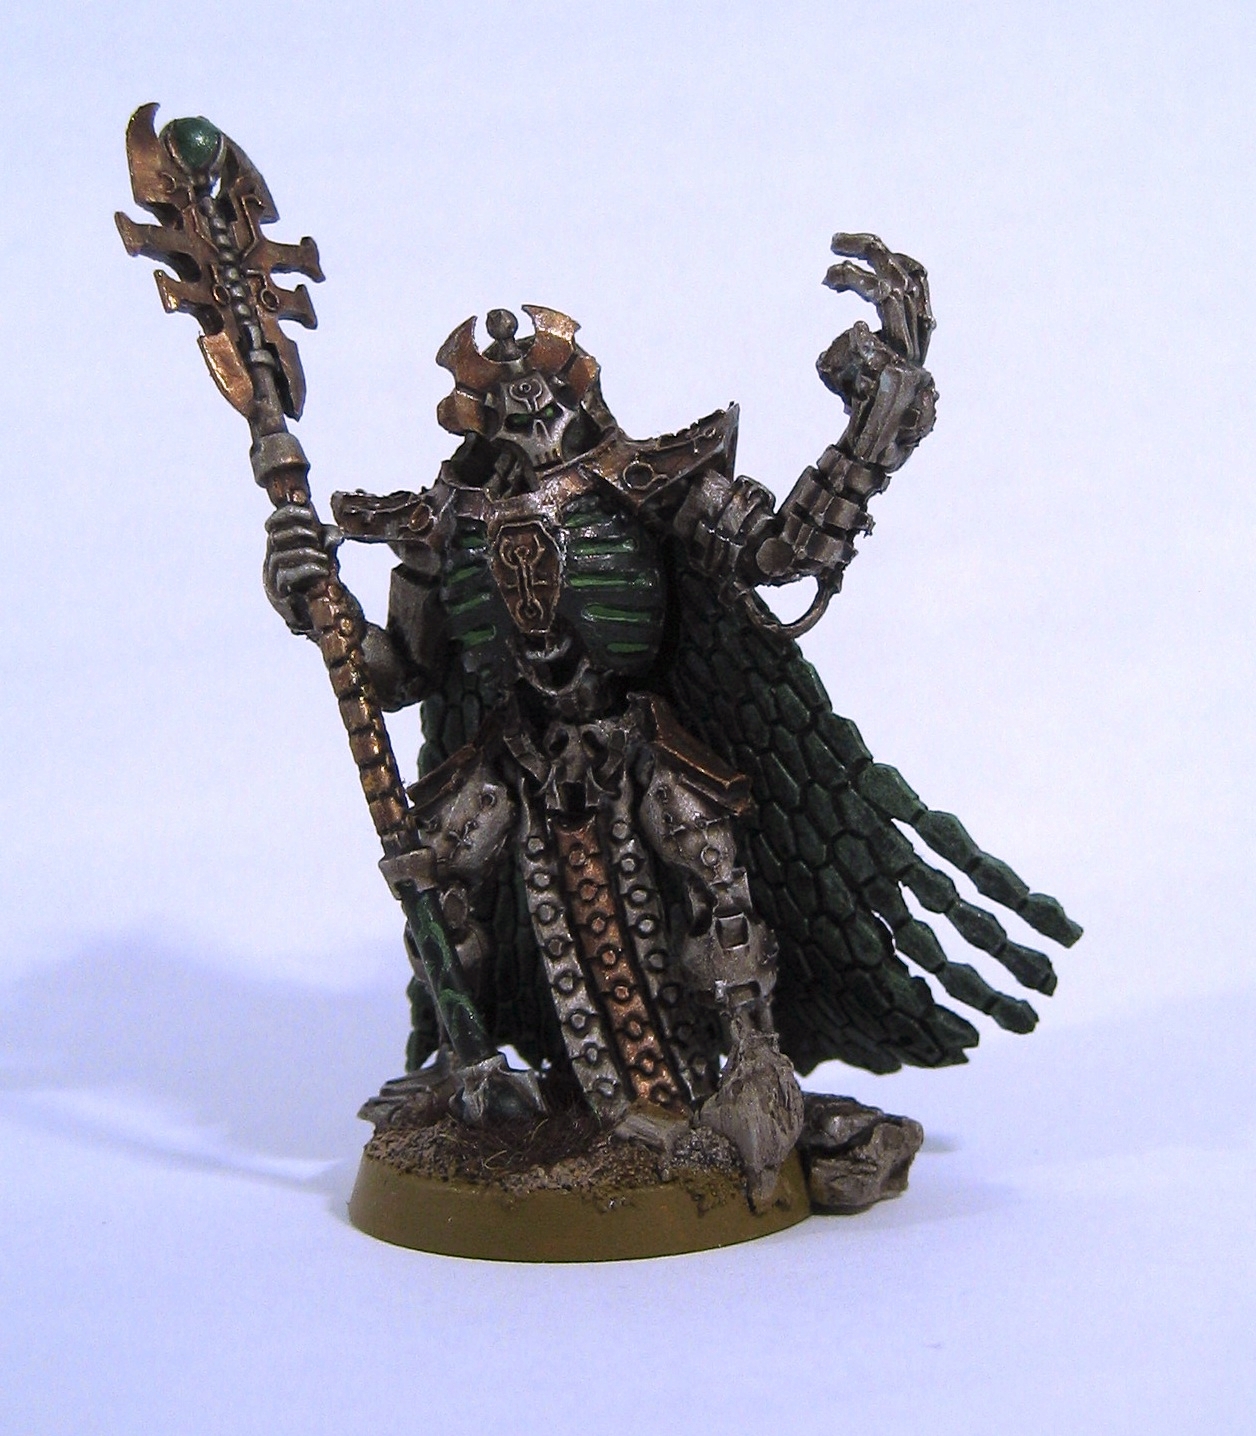
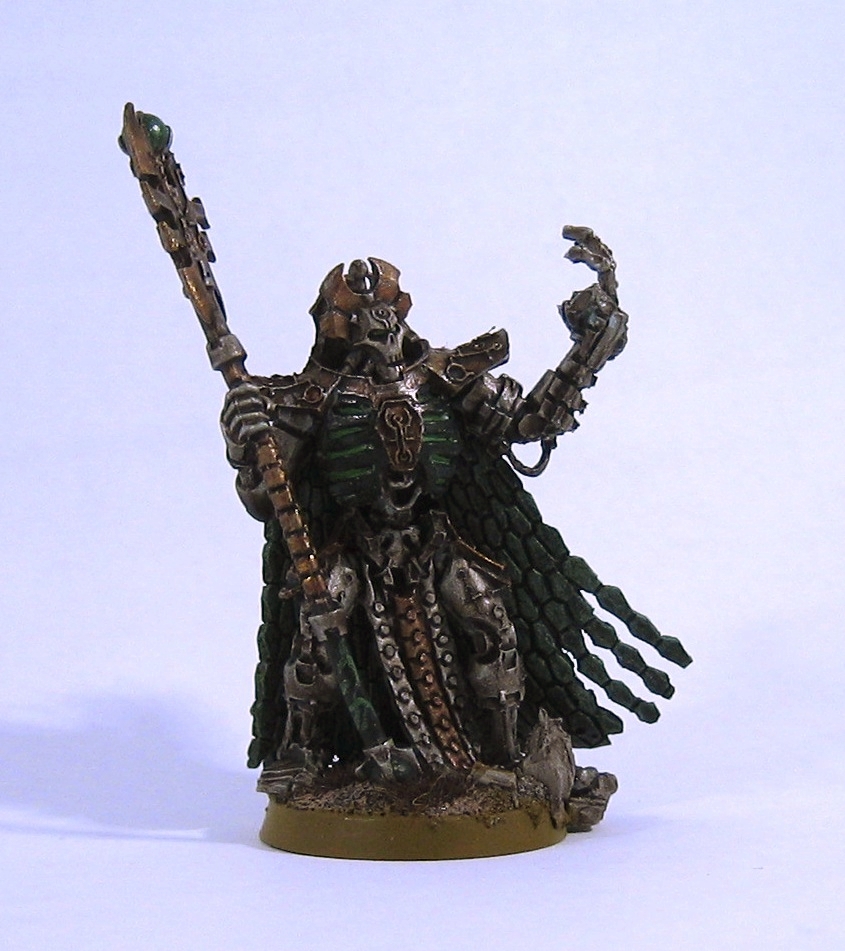
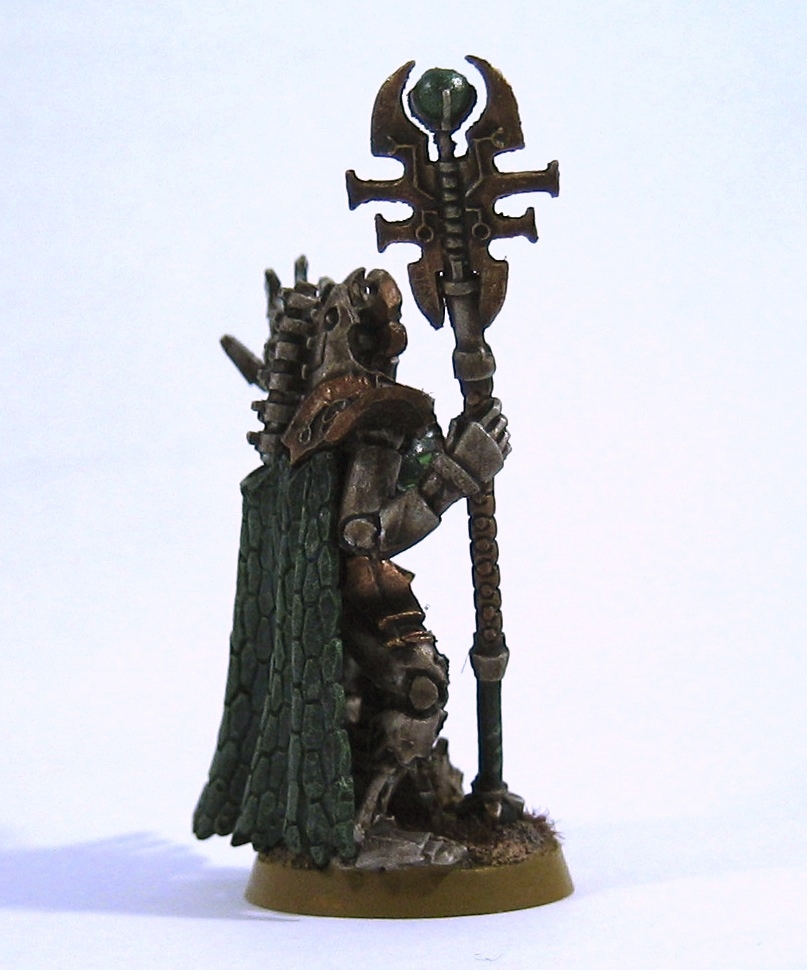
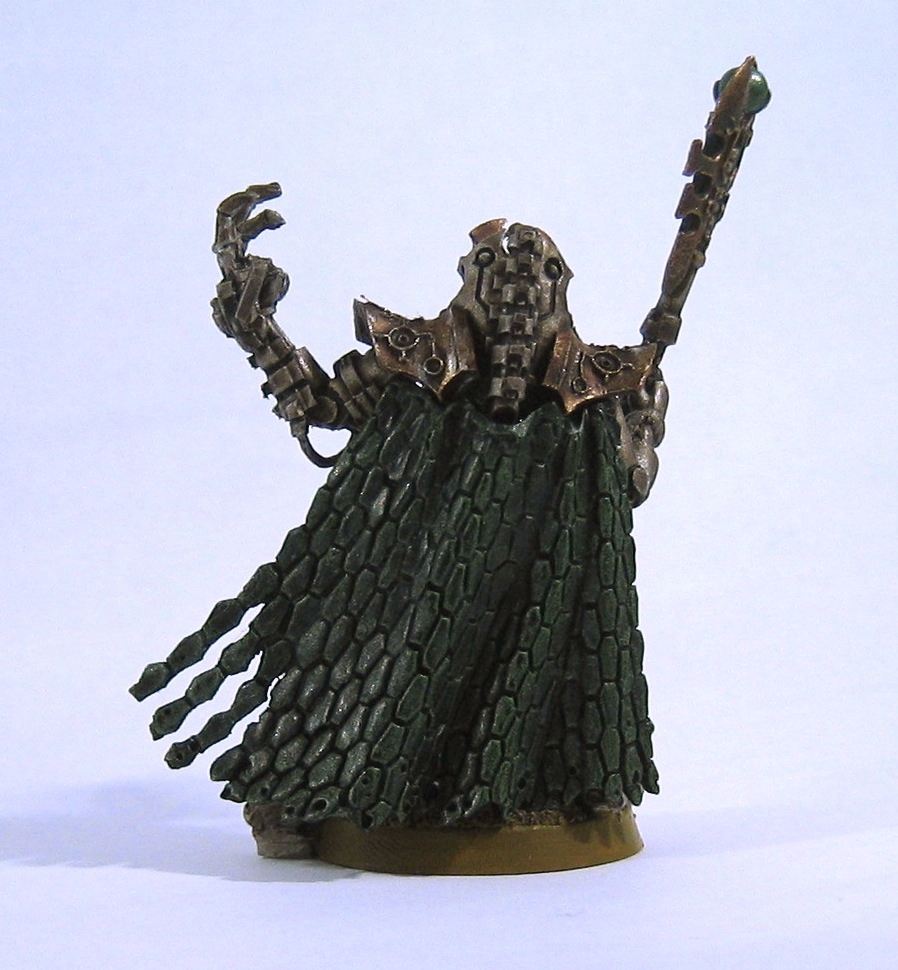
Necron Skorpekh Lord by The Unrelenting Brush
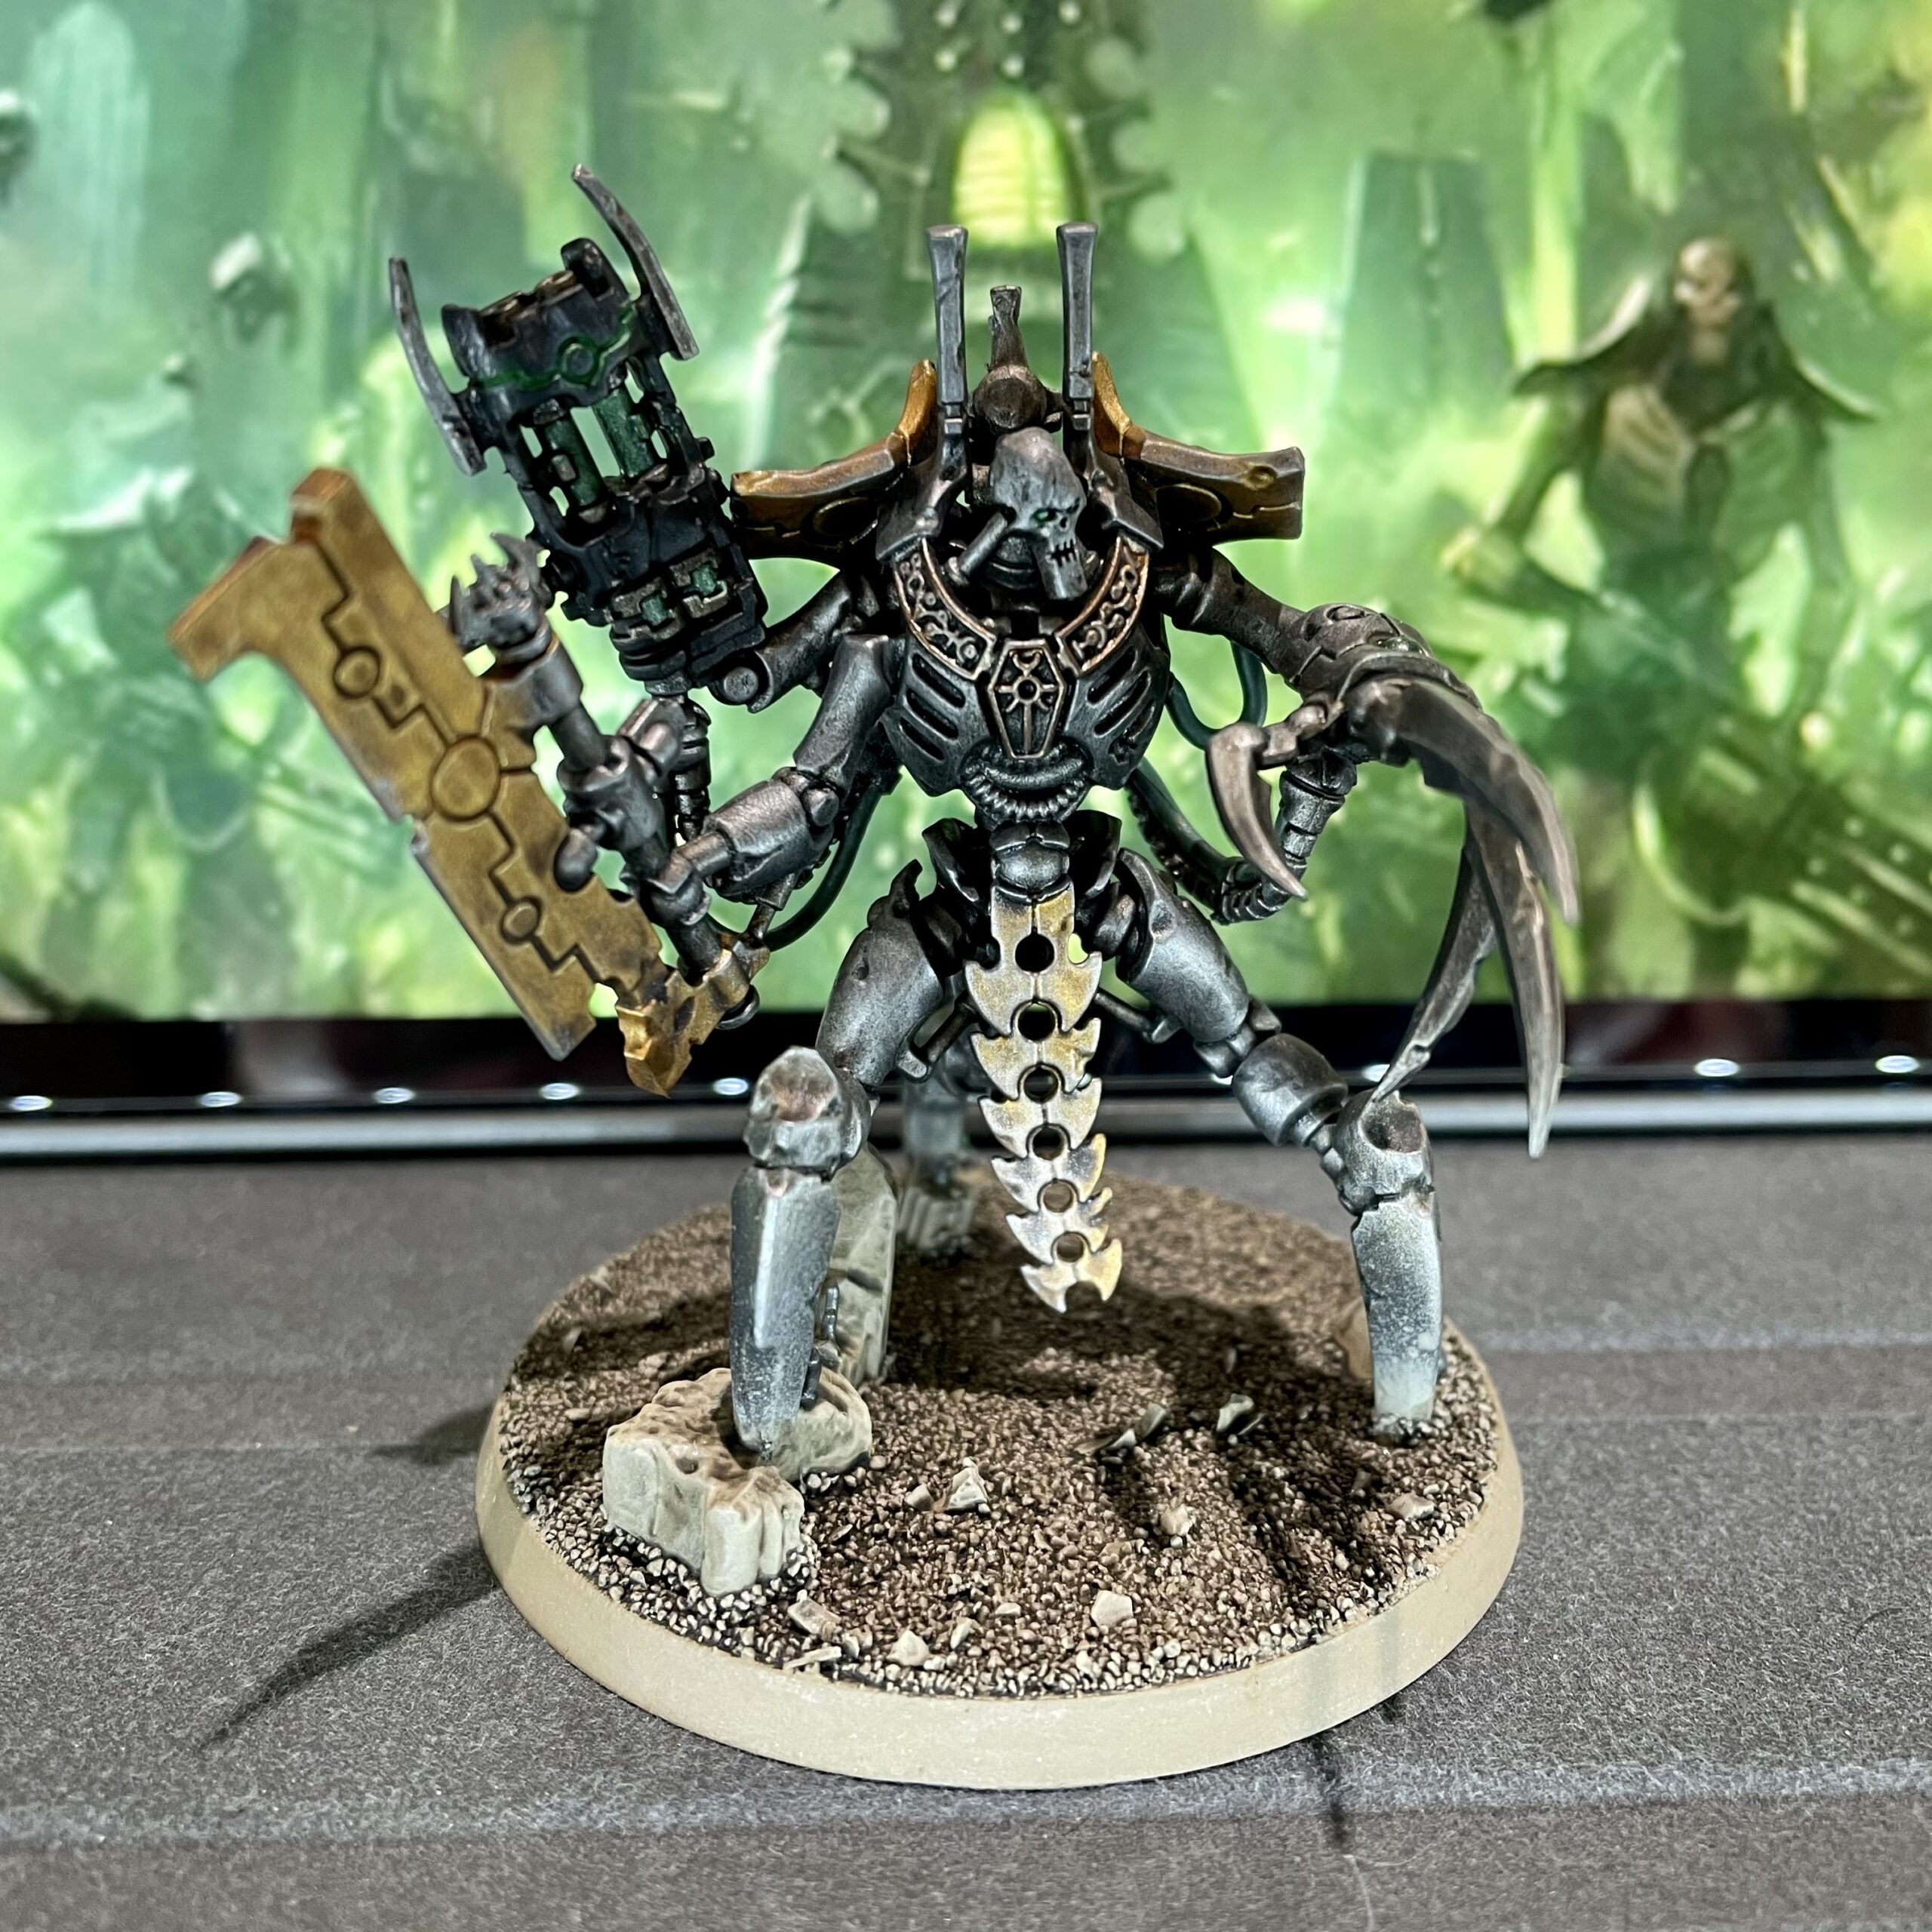
Another model from Indomitus, this time the Skorpekh Lord, as painted by The Unrelenting Brush. I love this model, possibly even more than I love Illuminor Szeras. It’s hefty in a way many necron models aren’t, while still being extremely necrony. Looking forward to getting it into the table!
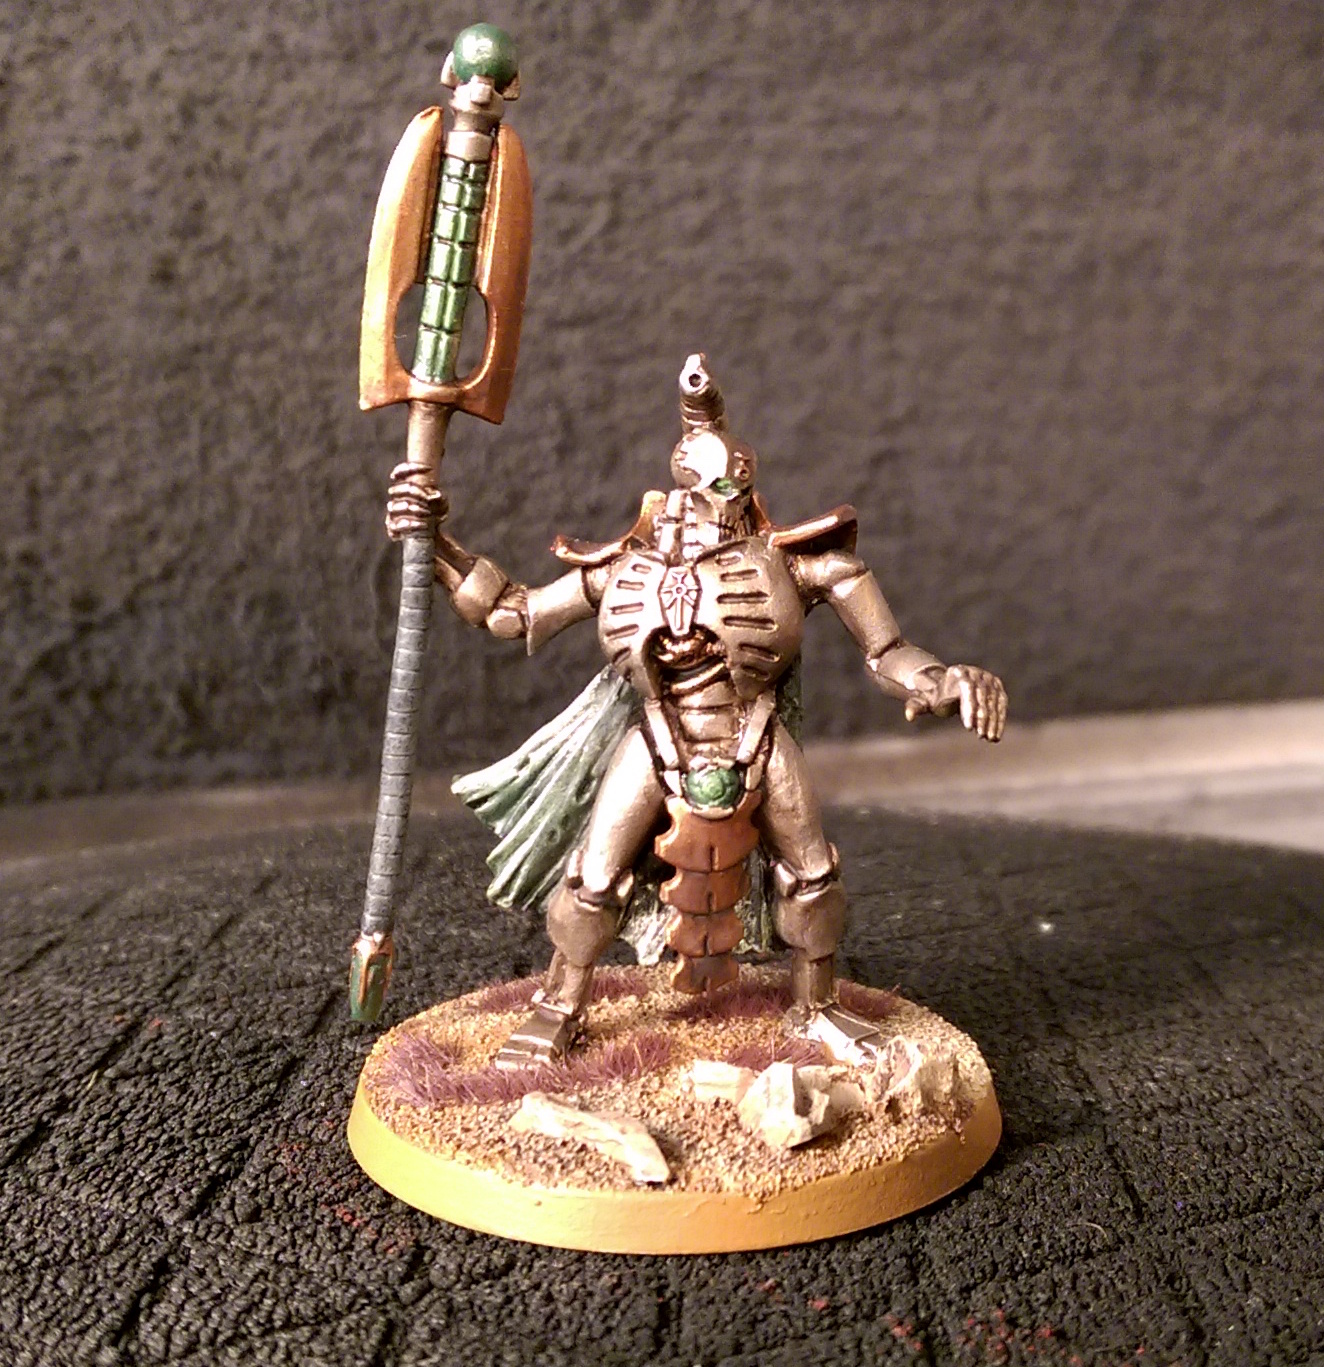
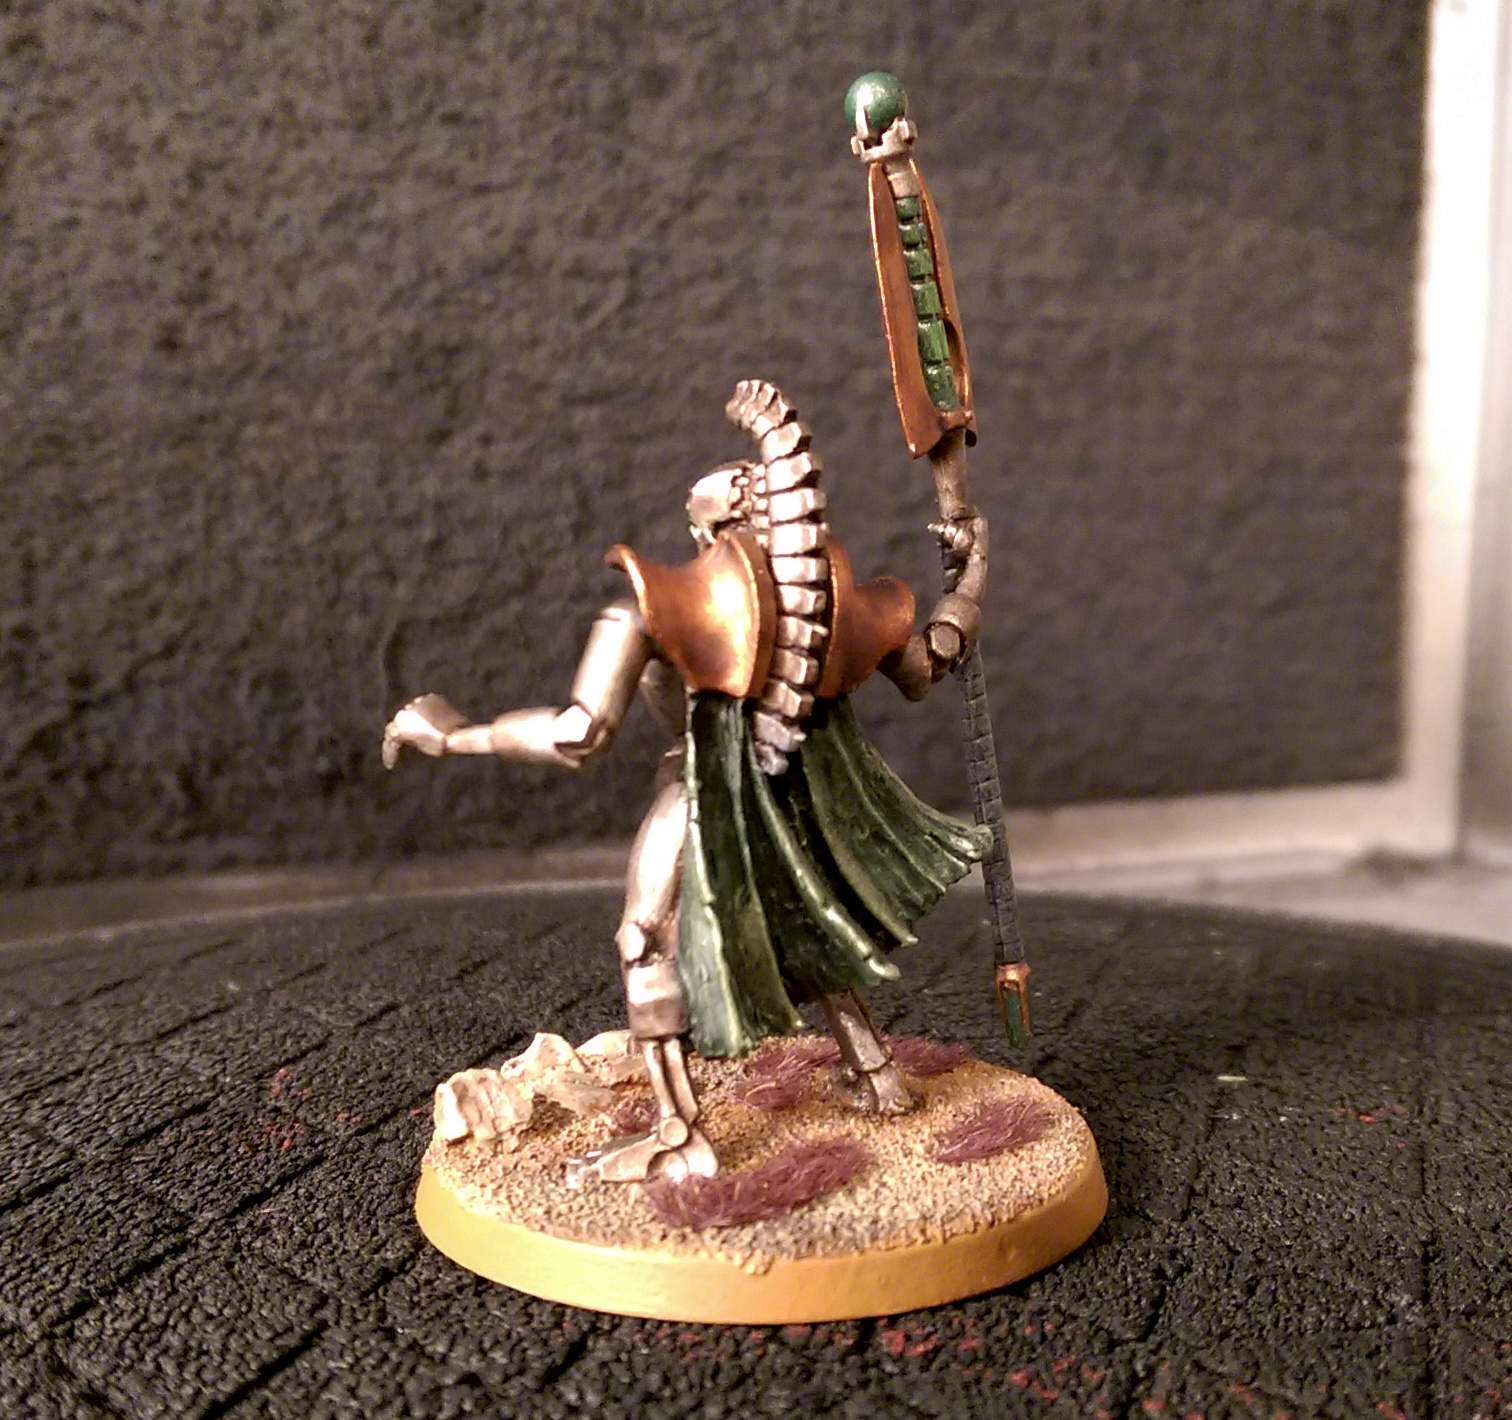
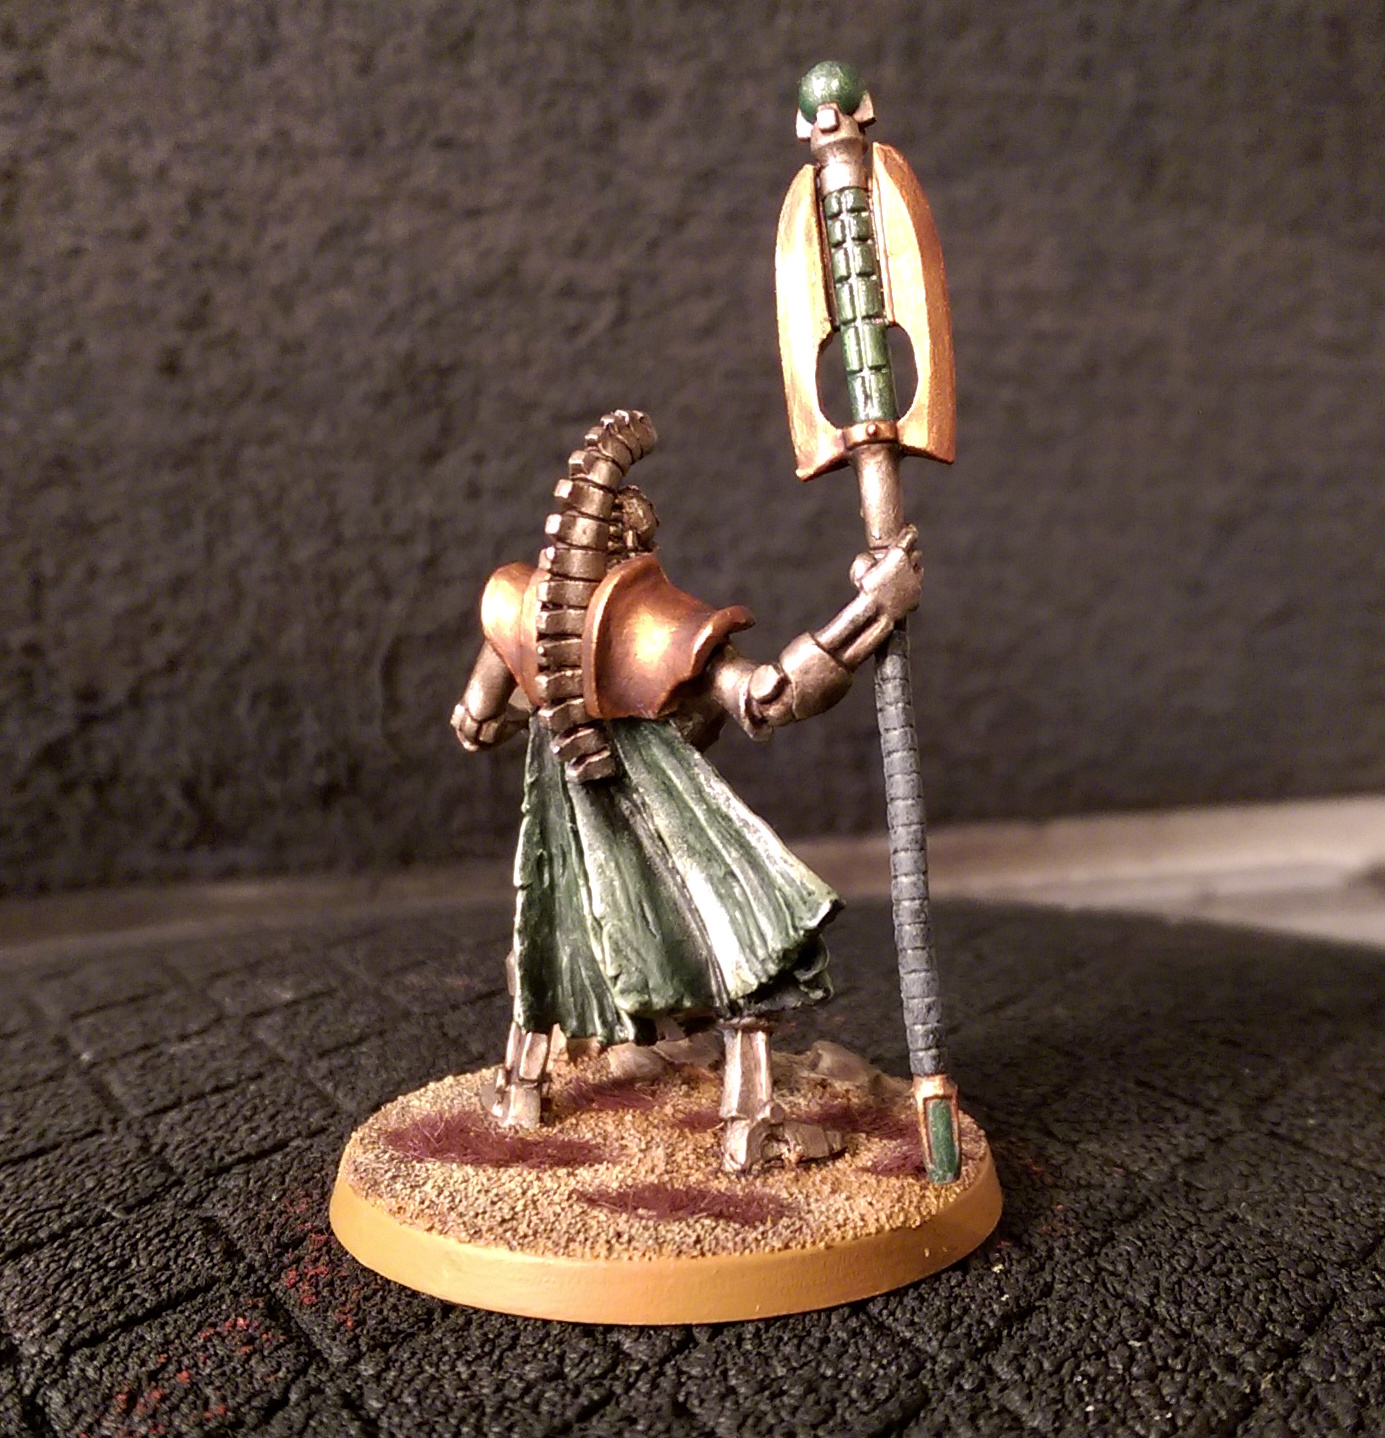
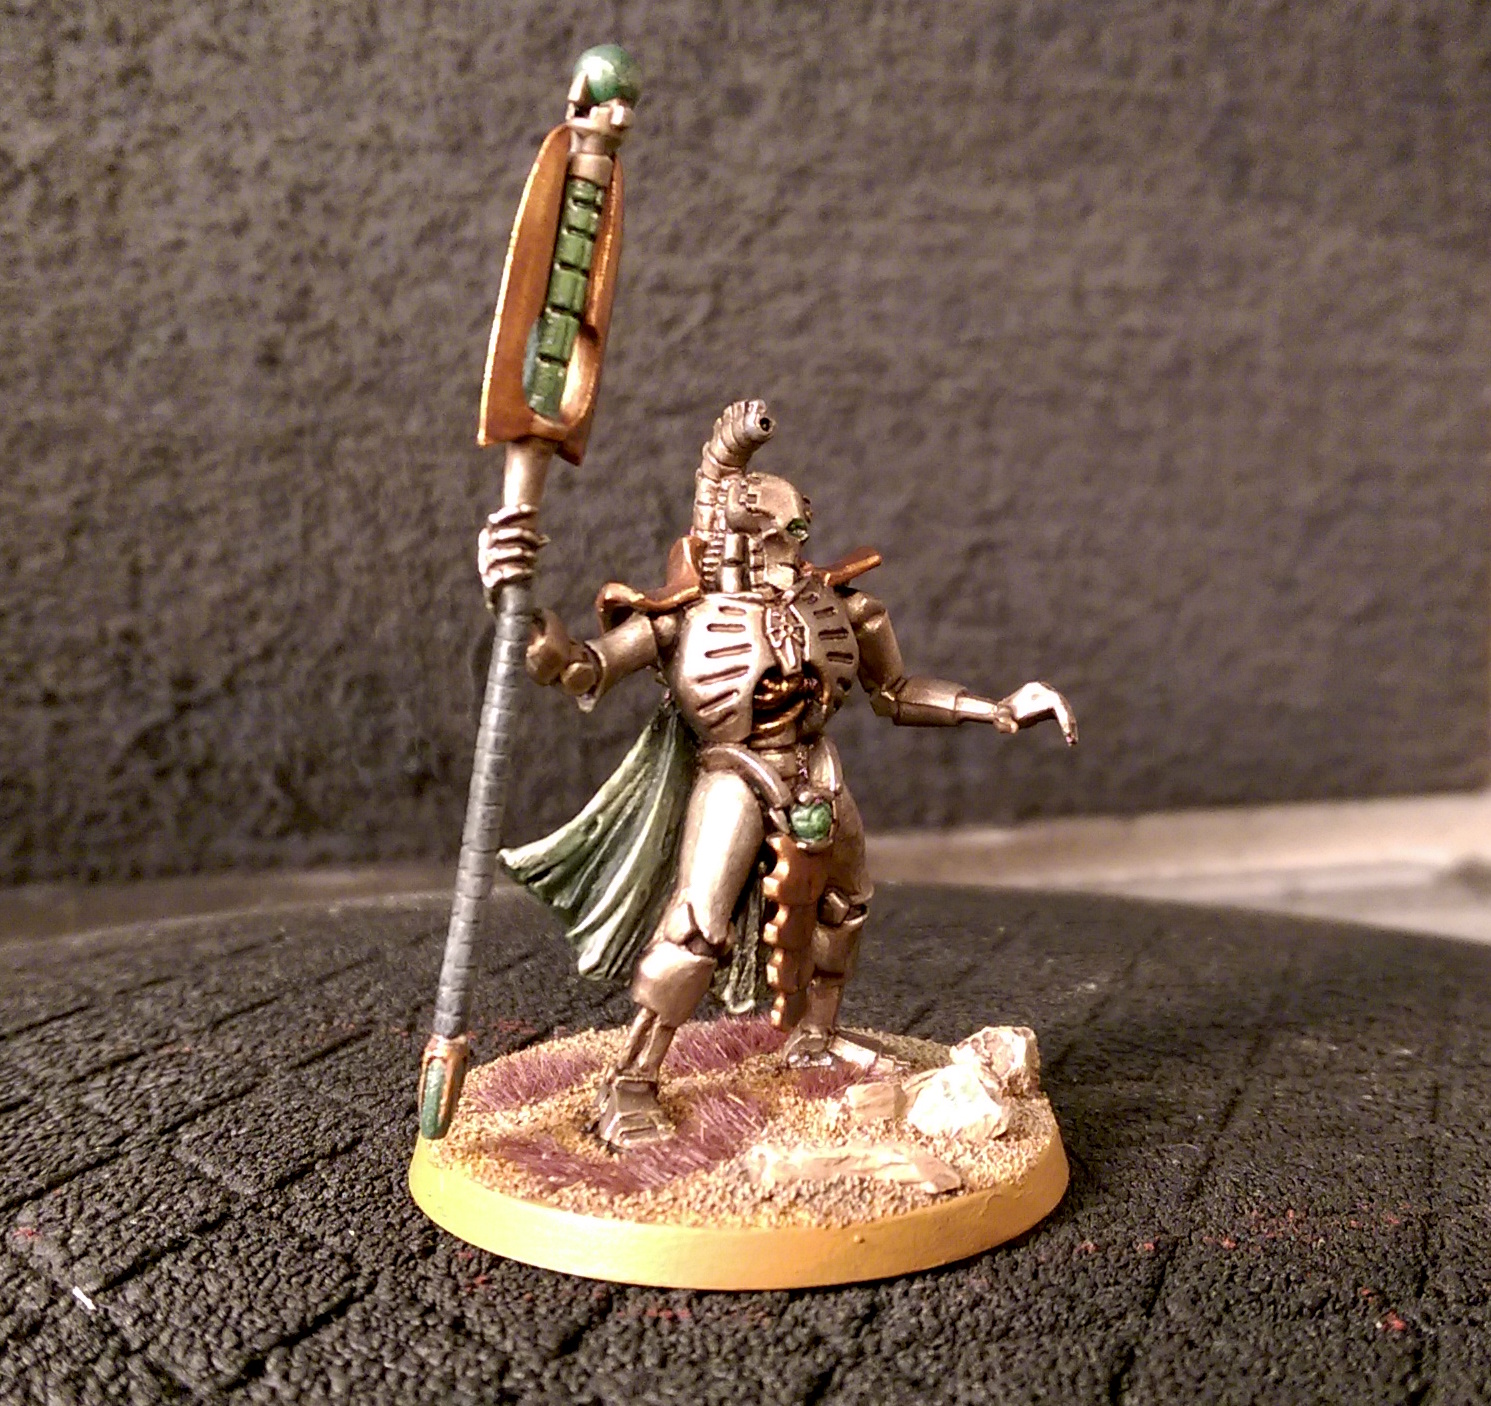
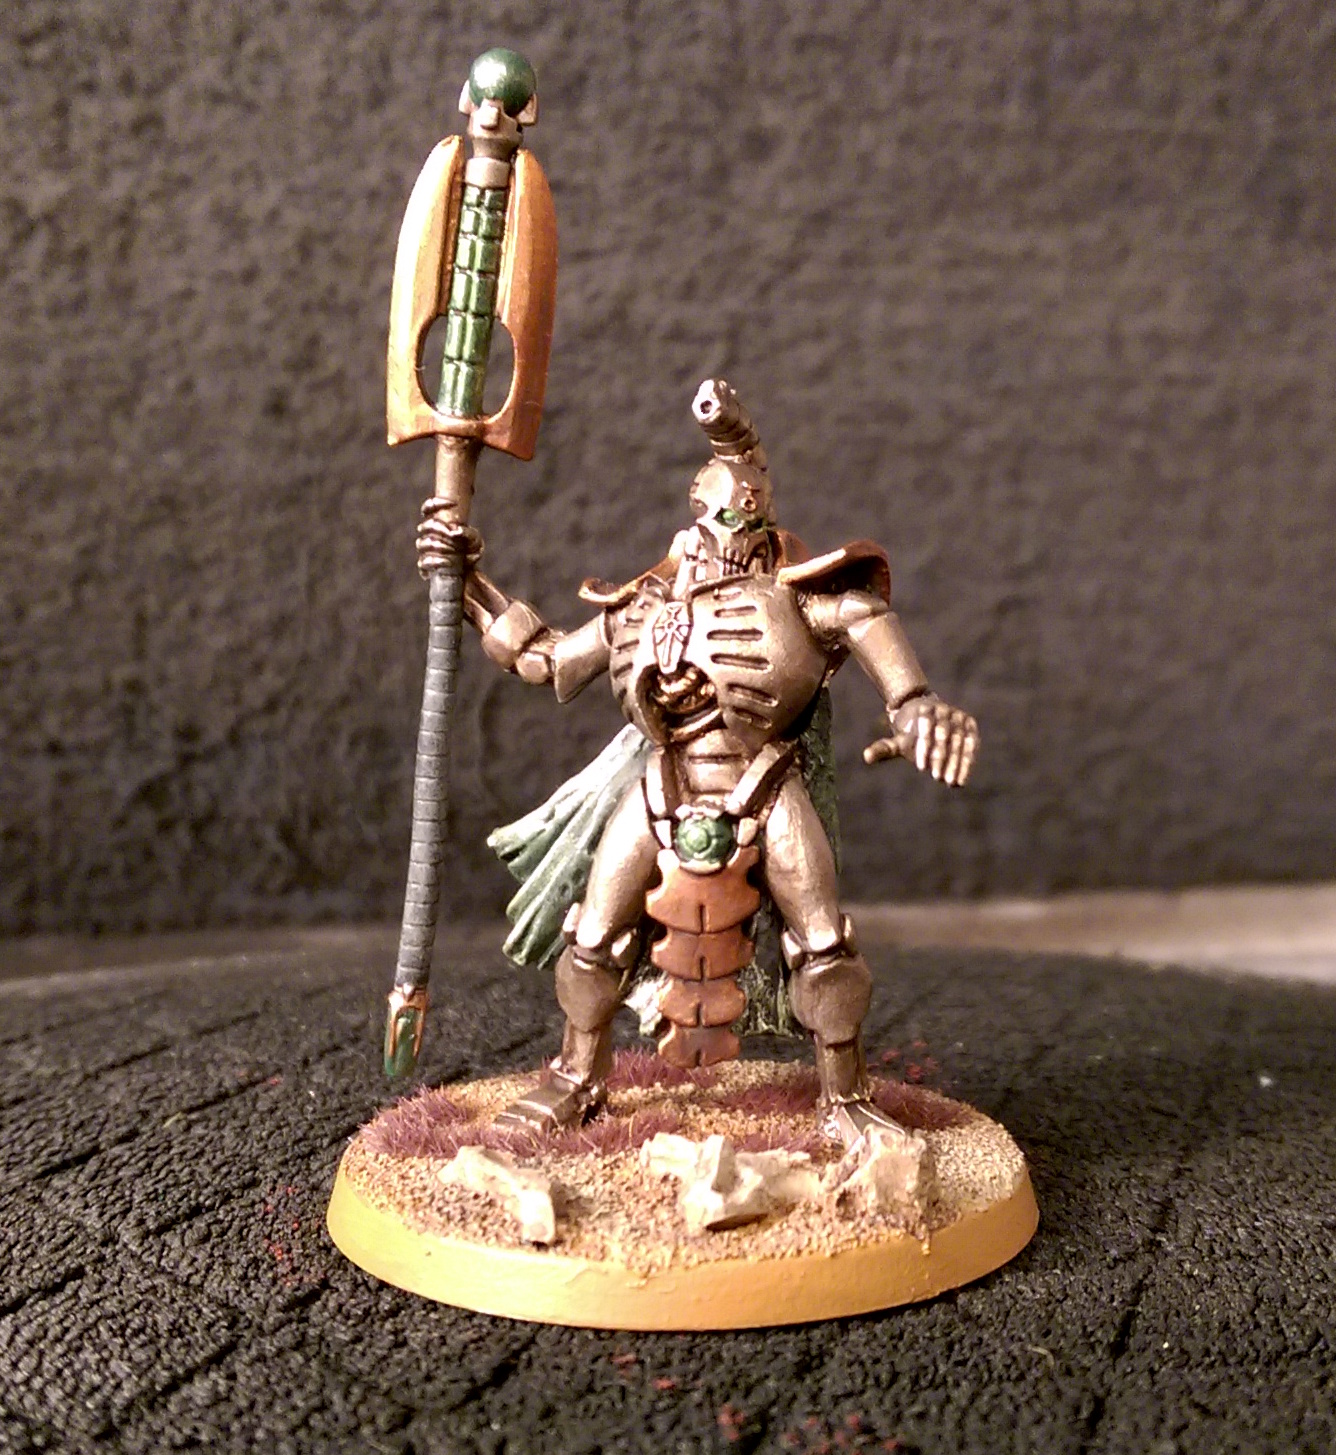
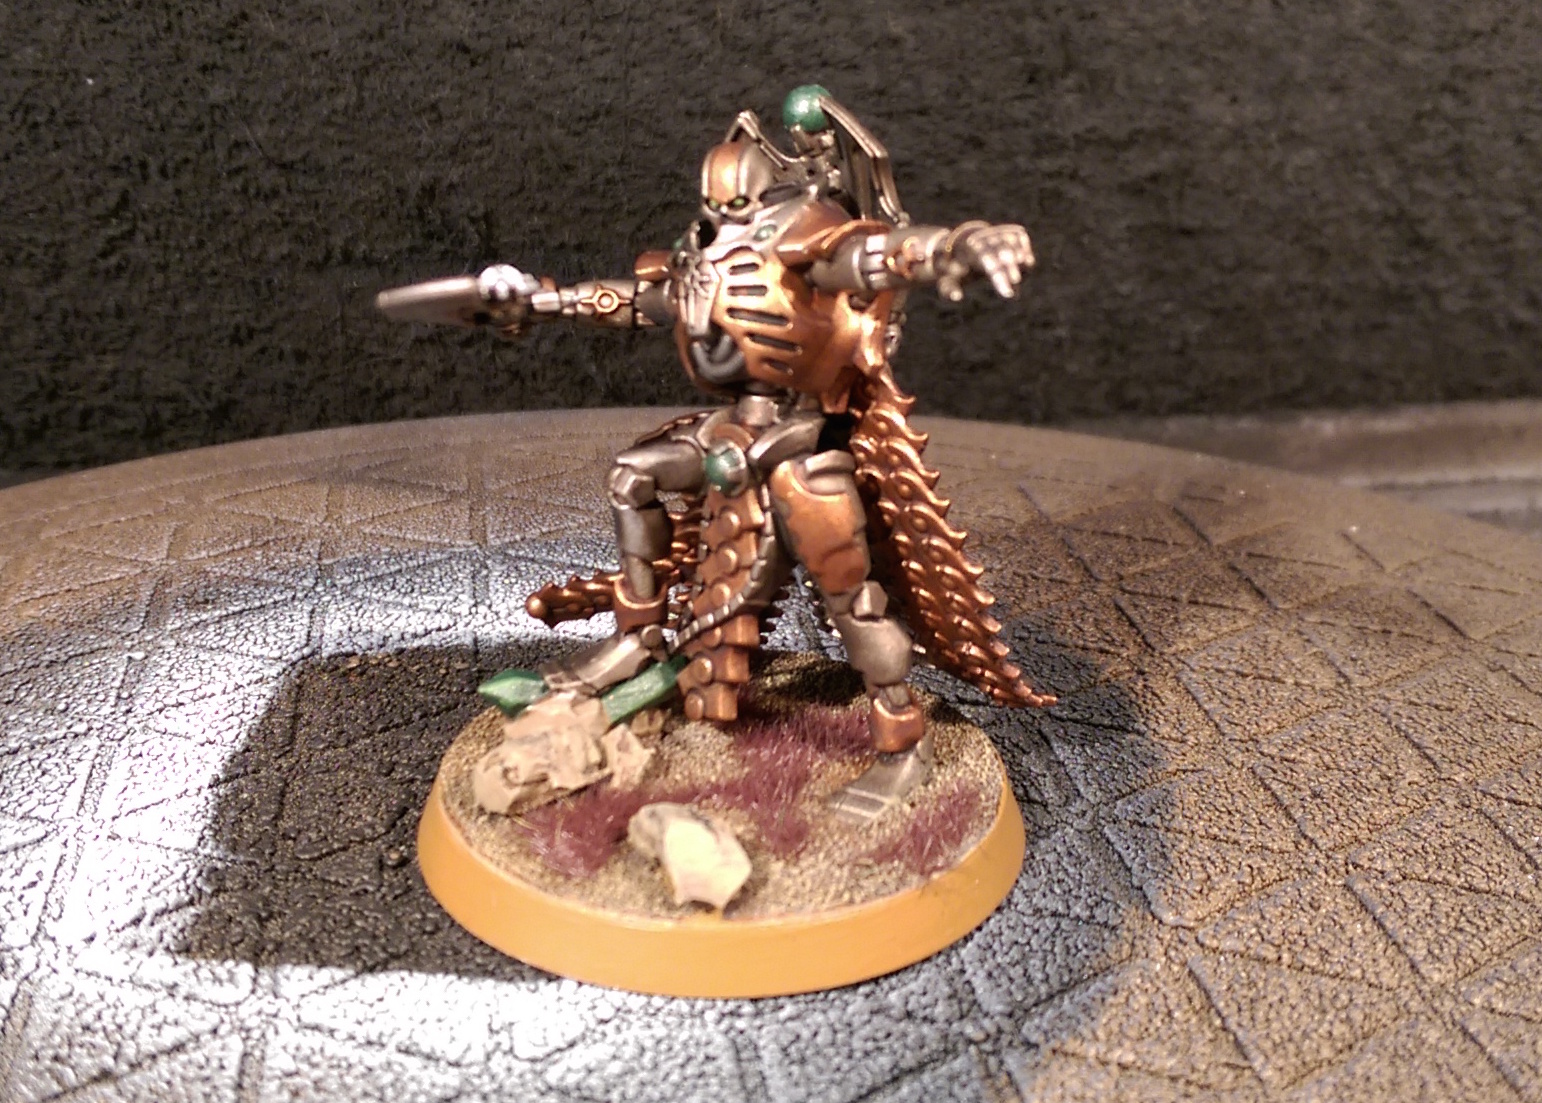
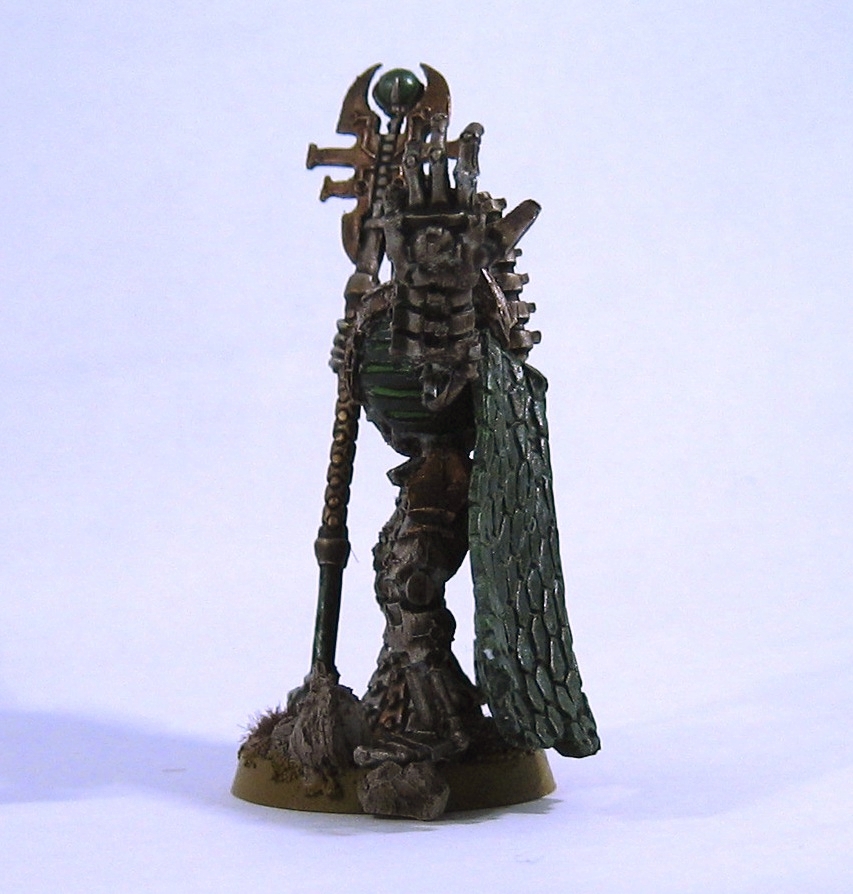
Illuminor Szeras by the Unrelenting Brush
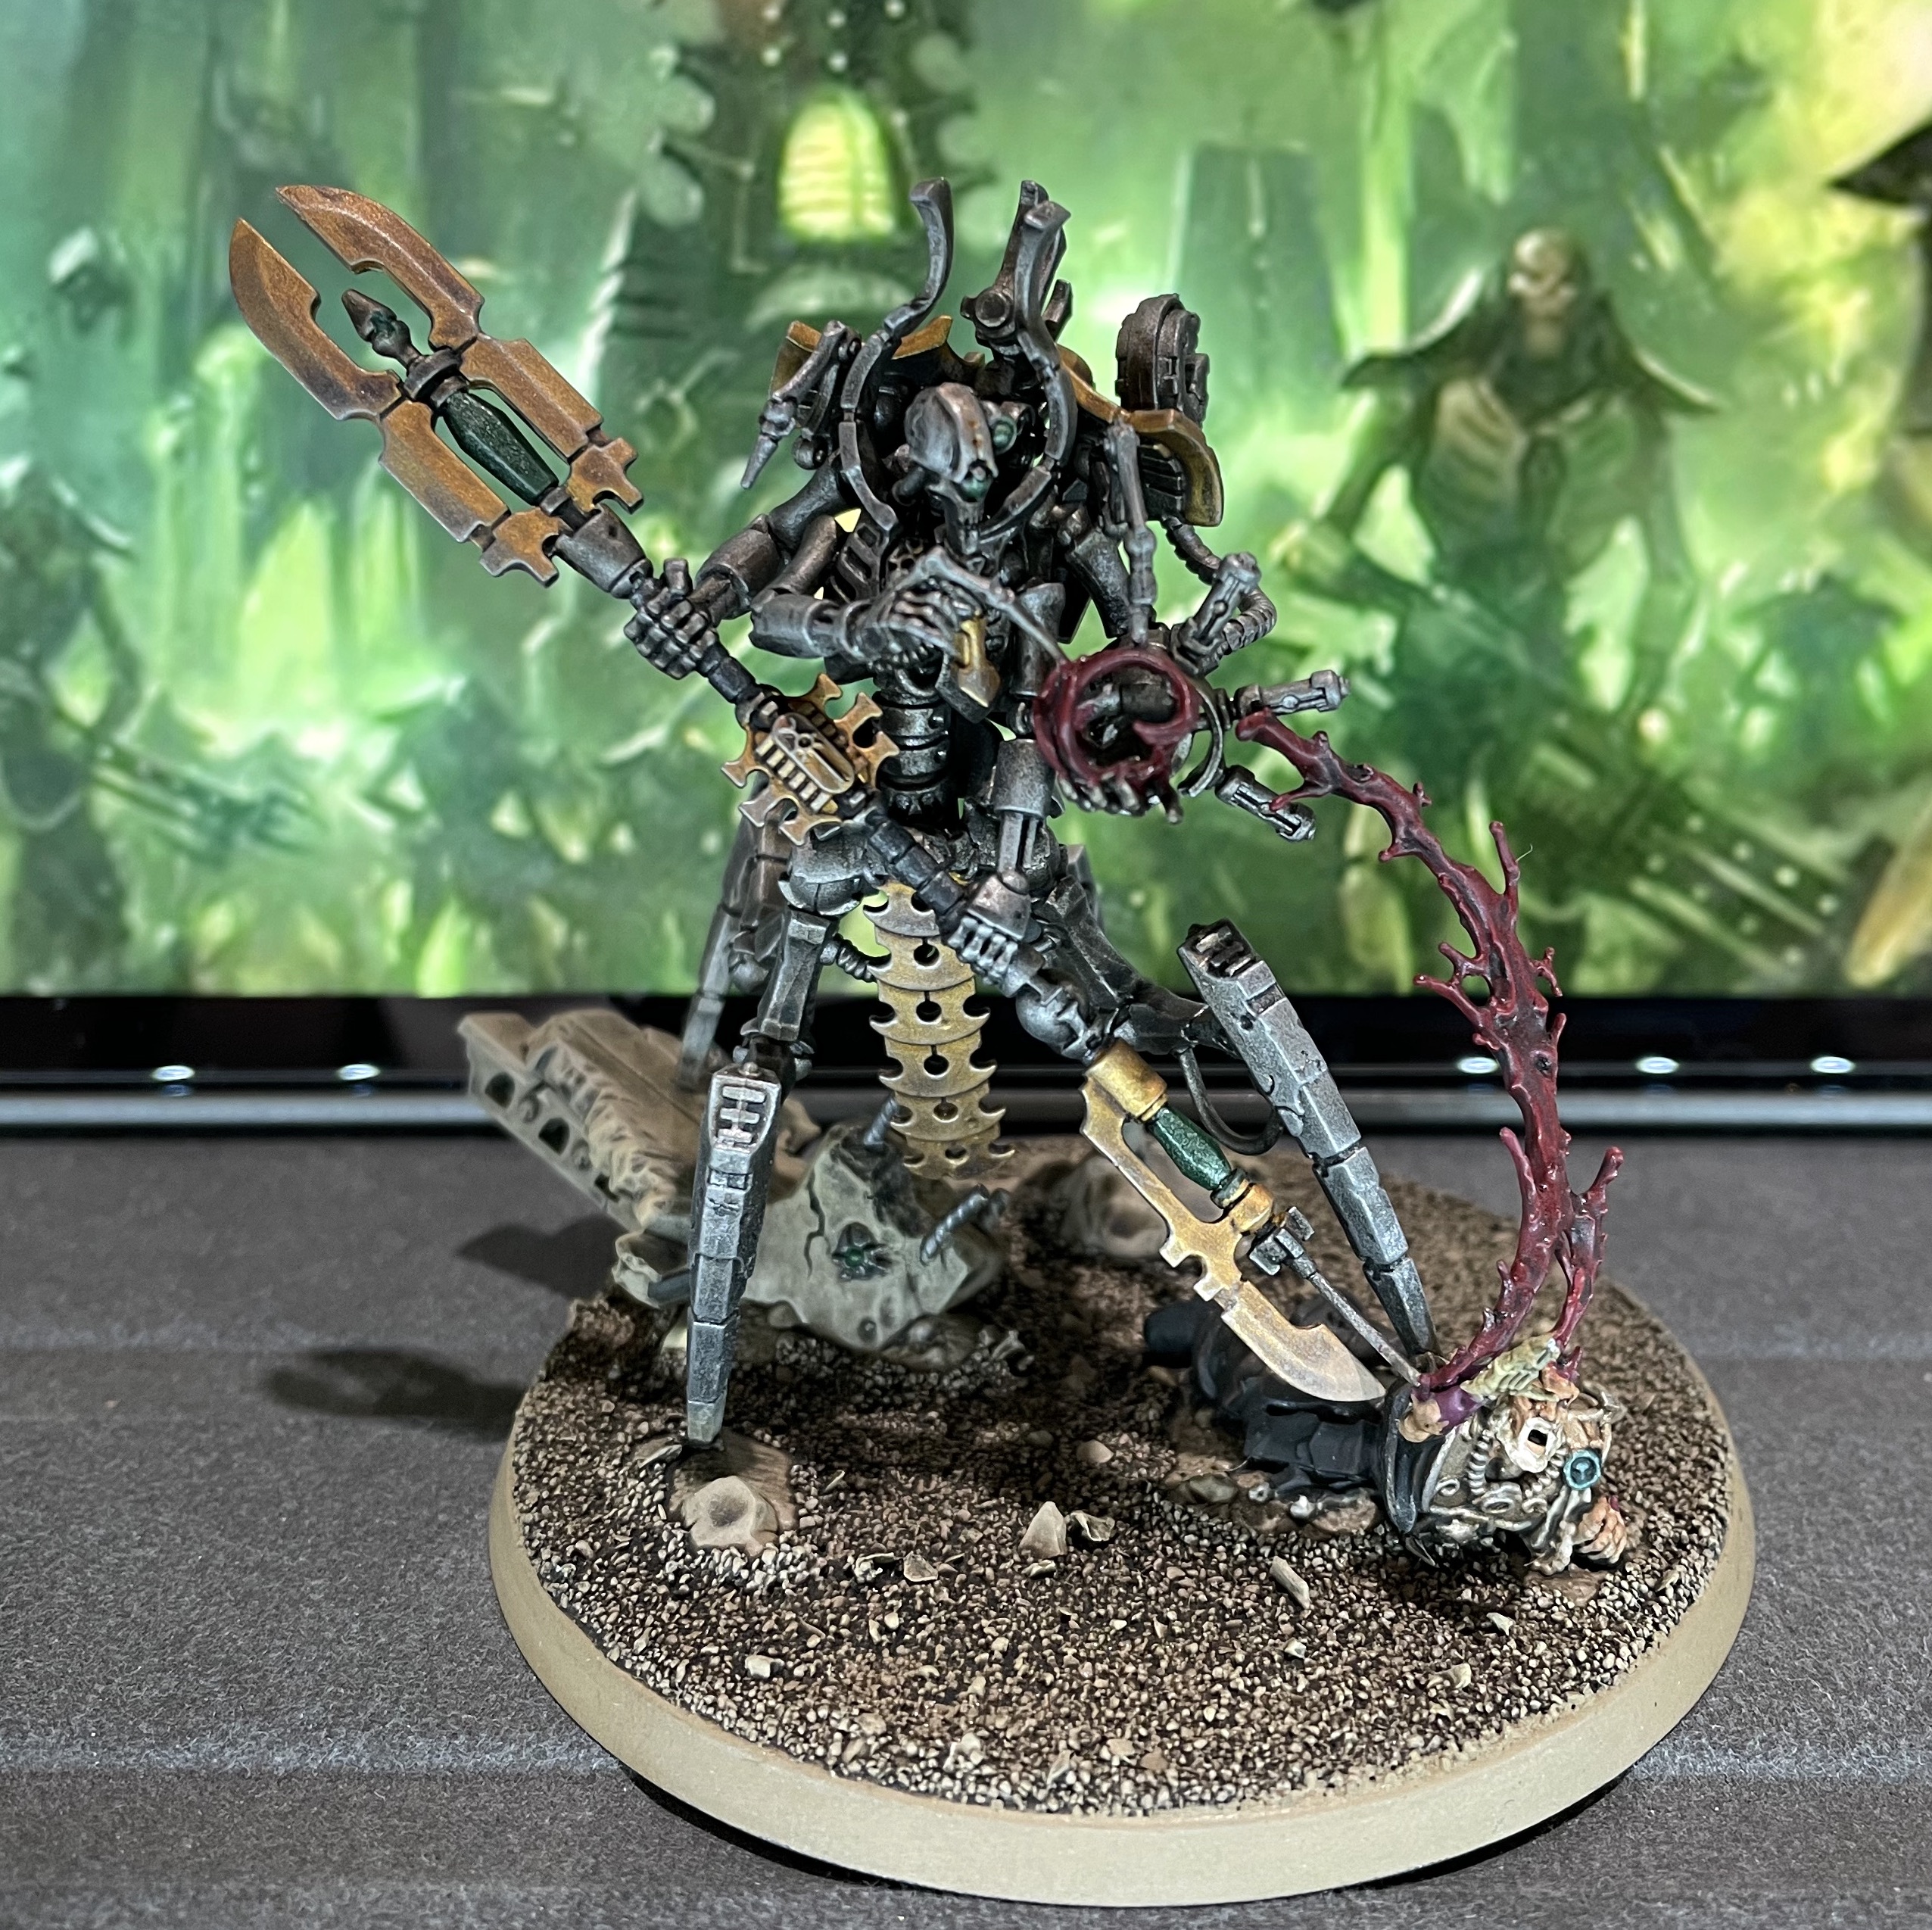
The Illuminor Szeras is a truly spectacular model, and a substantial improvement on the old Finecast version. As with the Terminators in my last post, I outsourced the painting of this mini, this time to The Unrelenting Brush. Check out his website!
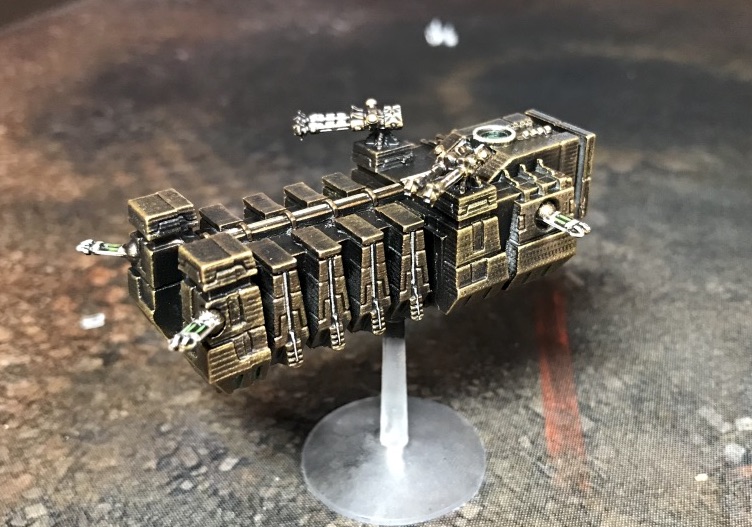
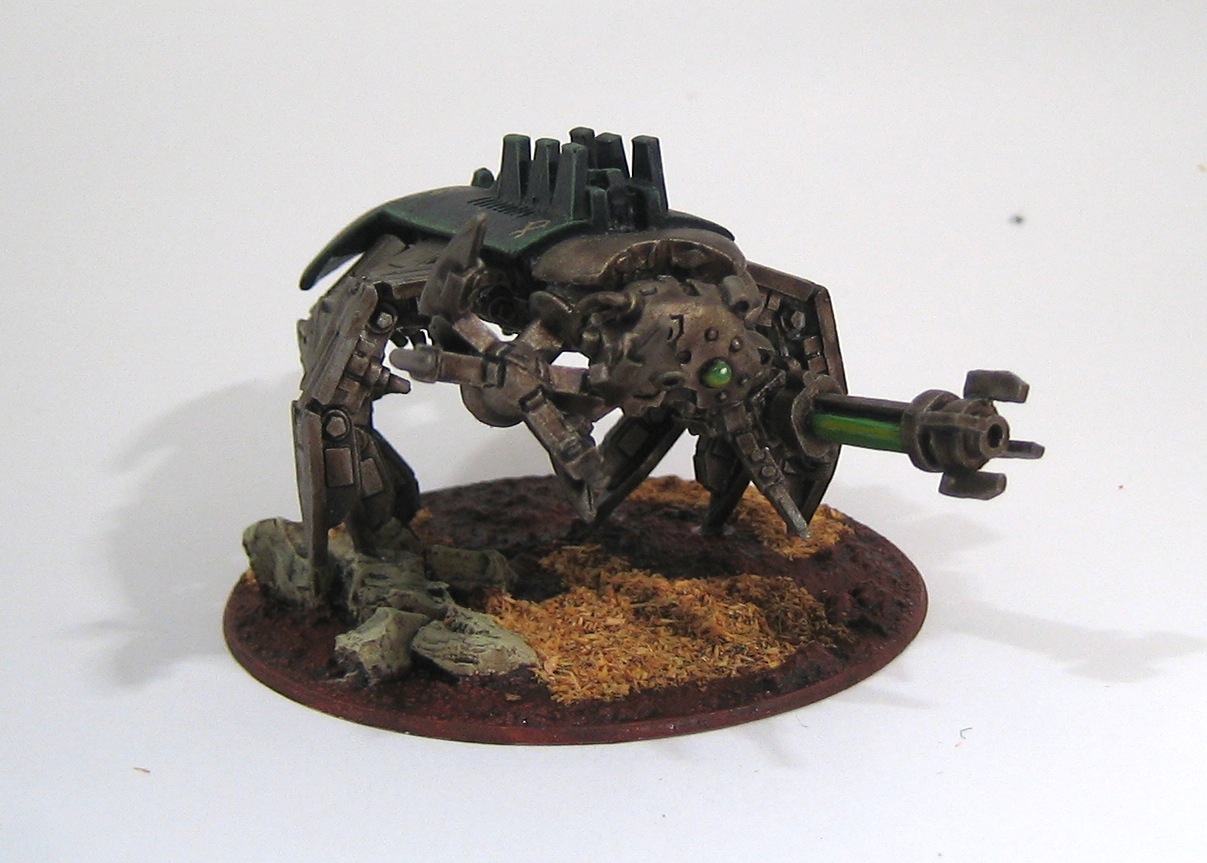
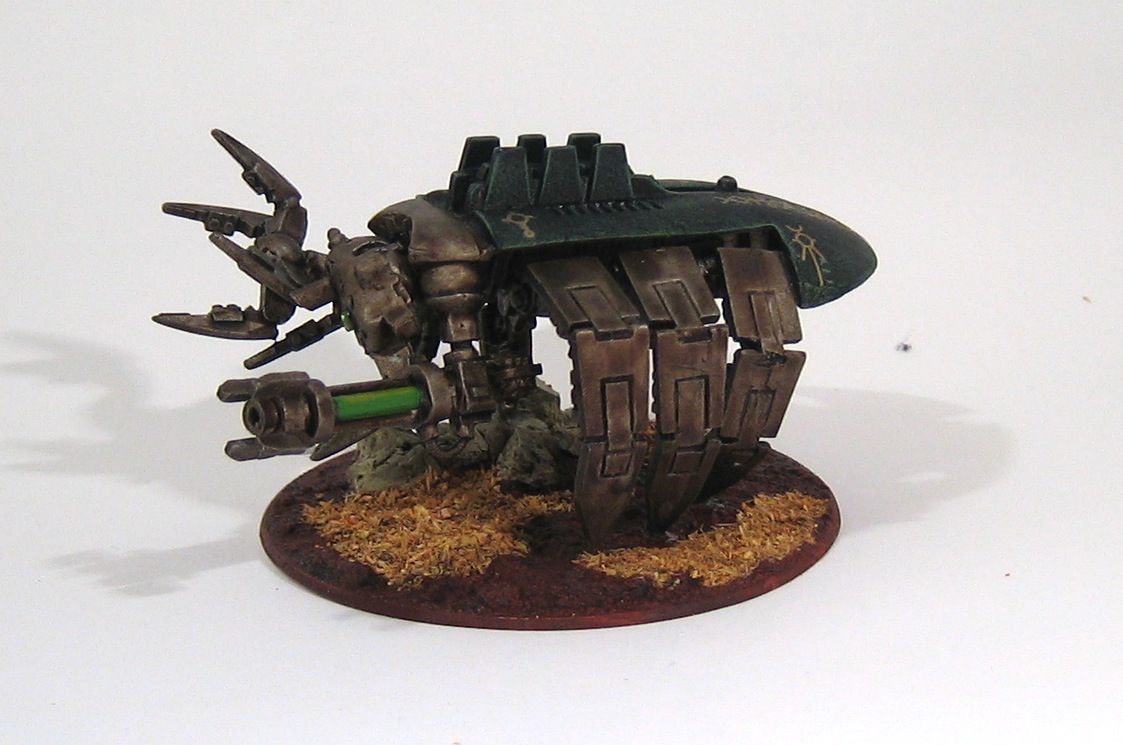
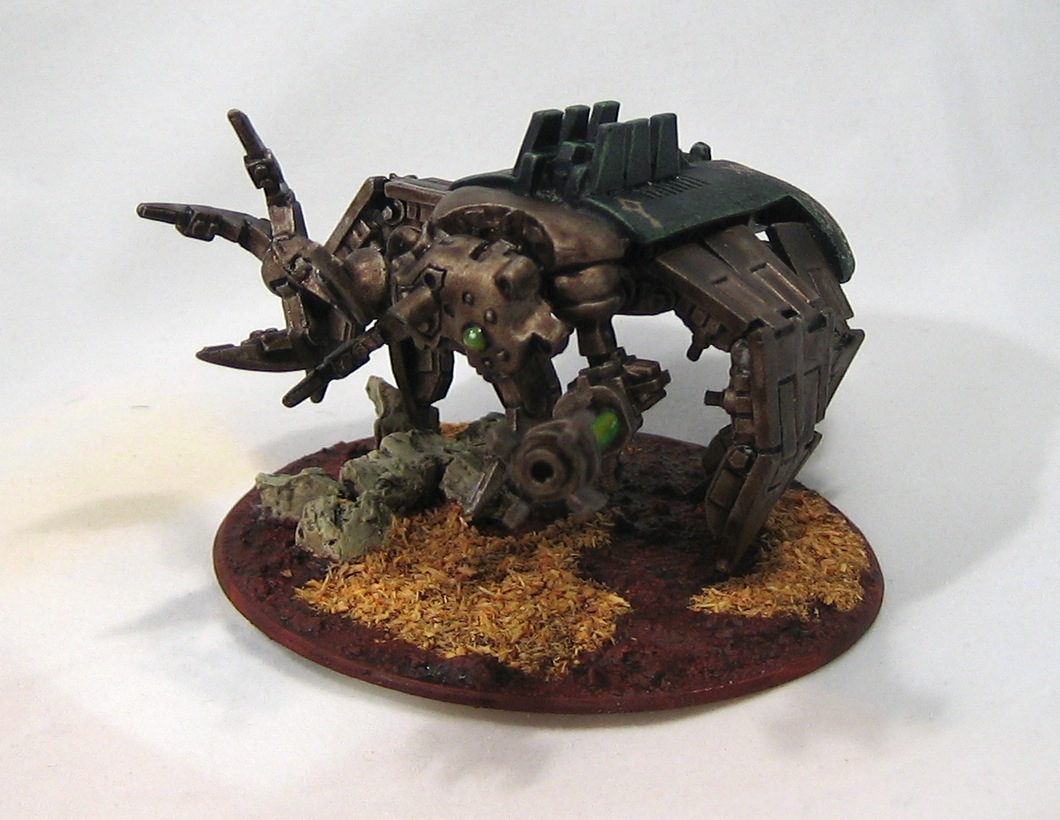
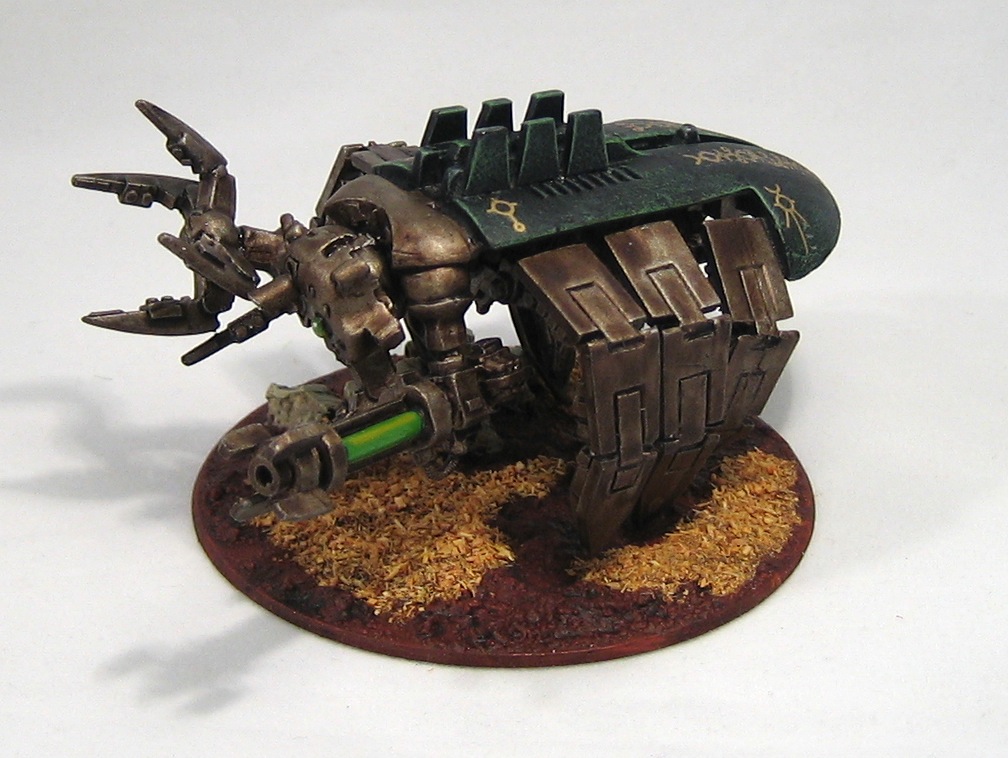
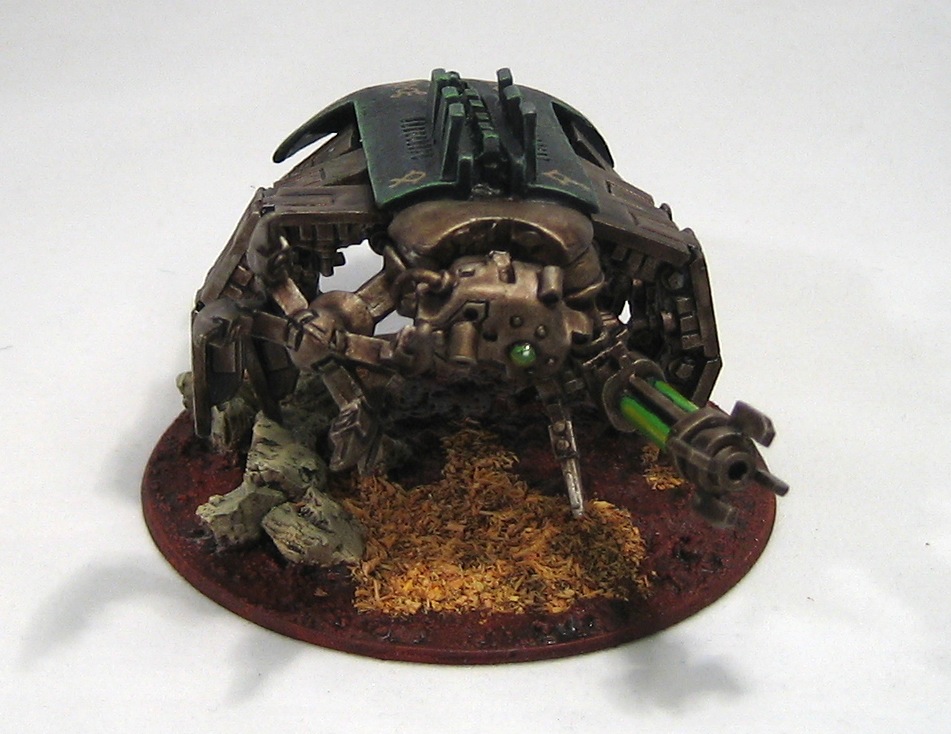
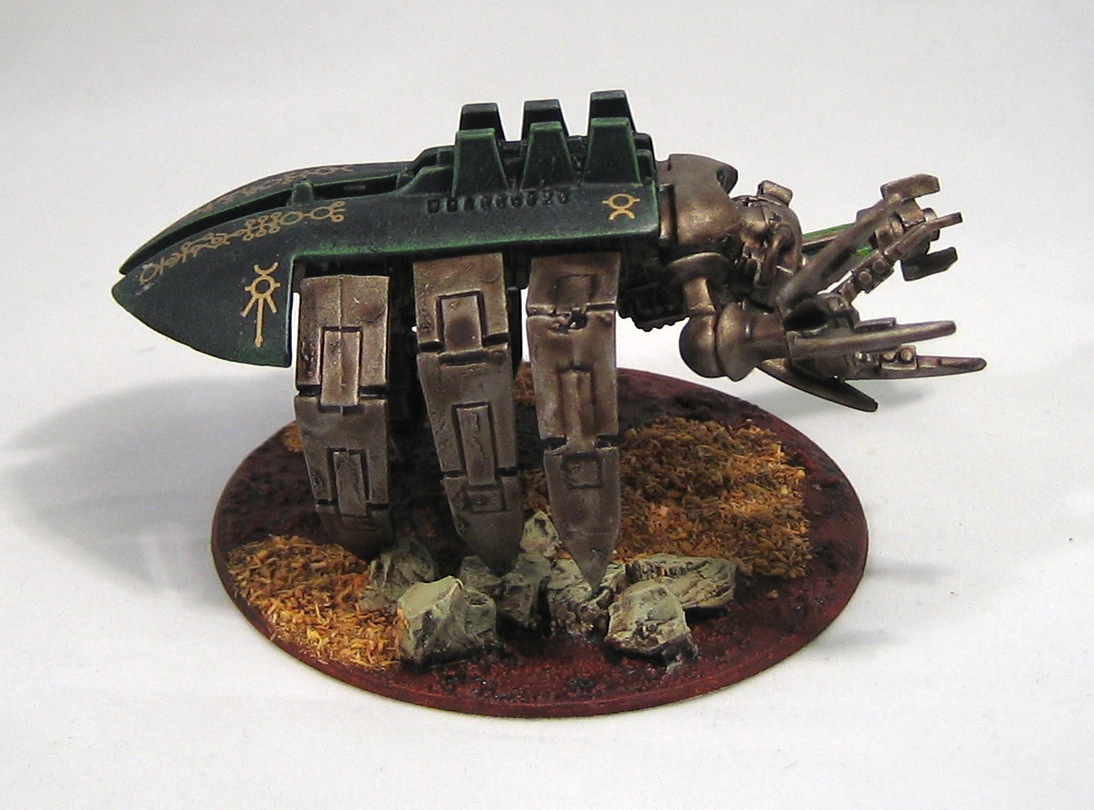
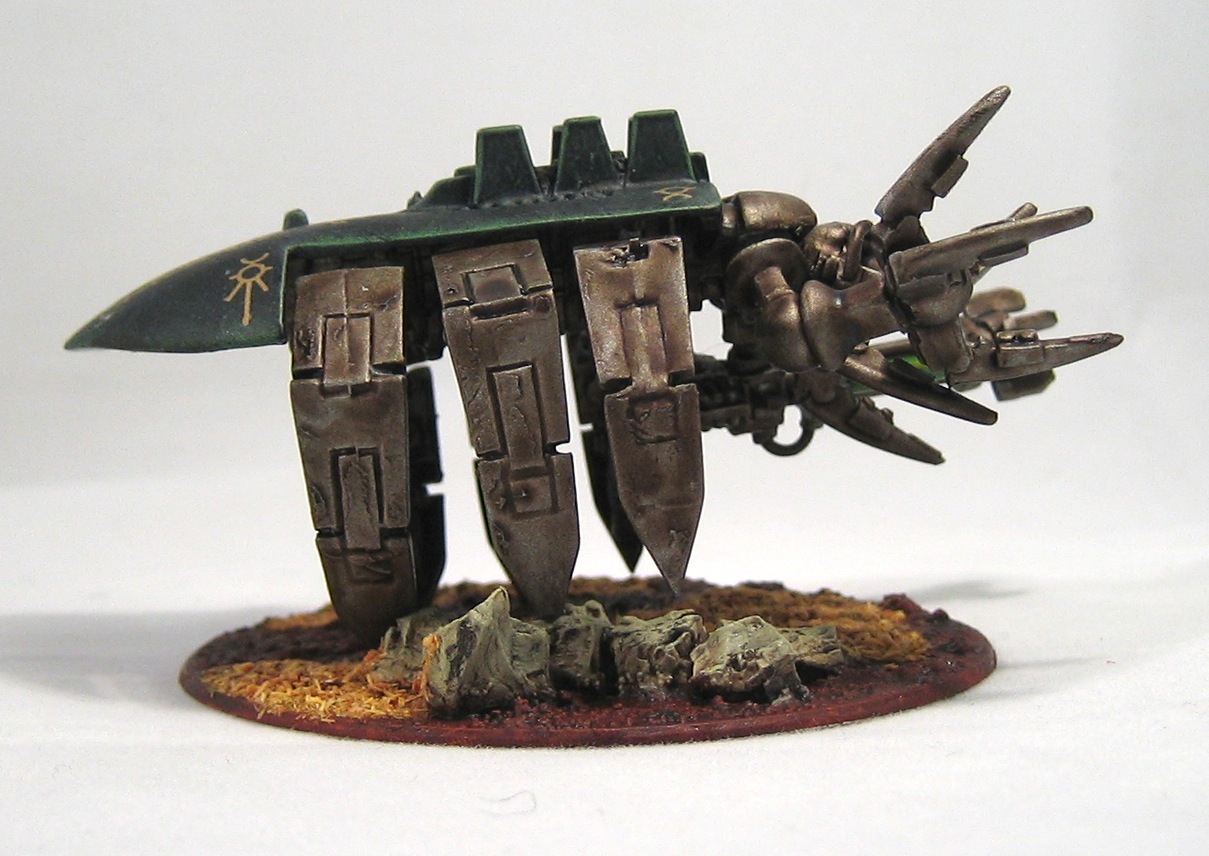
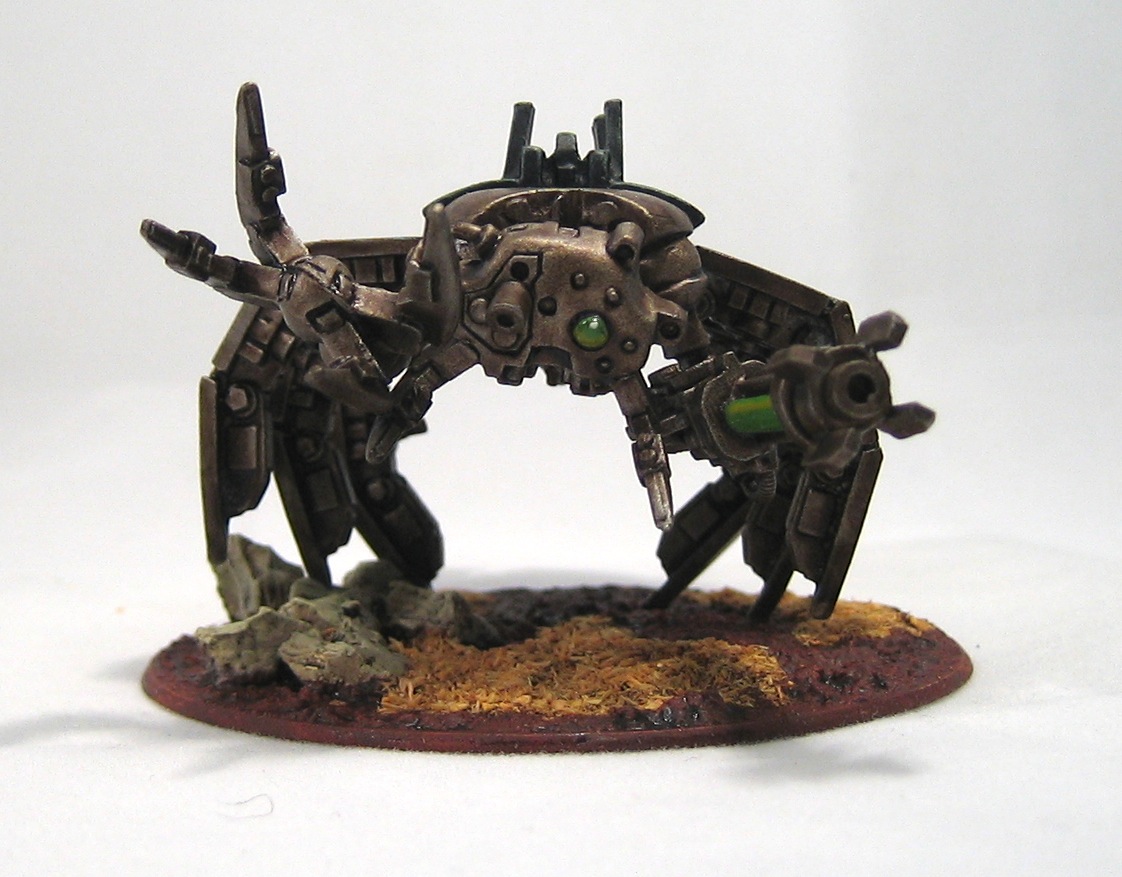
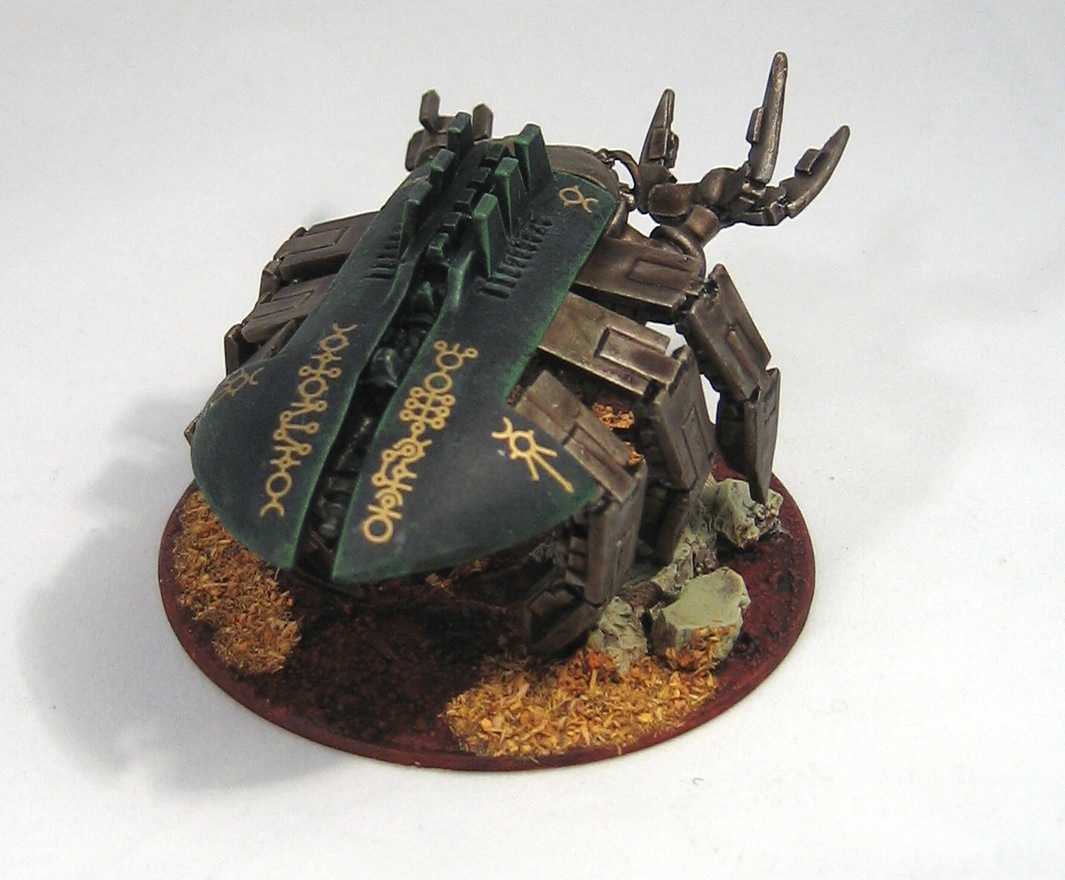
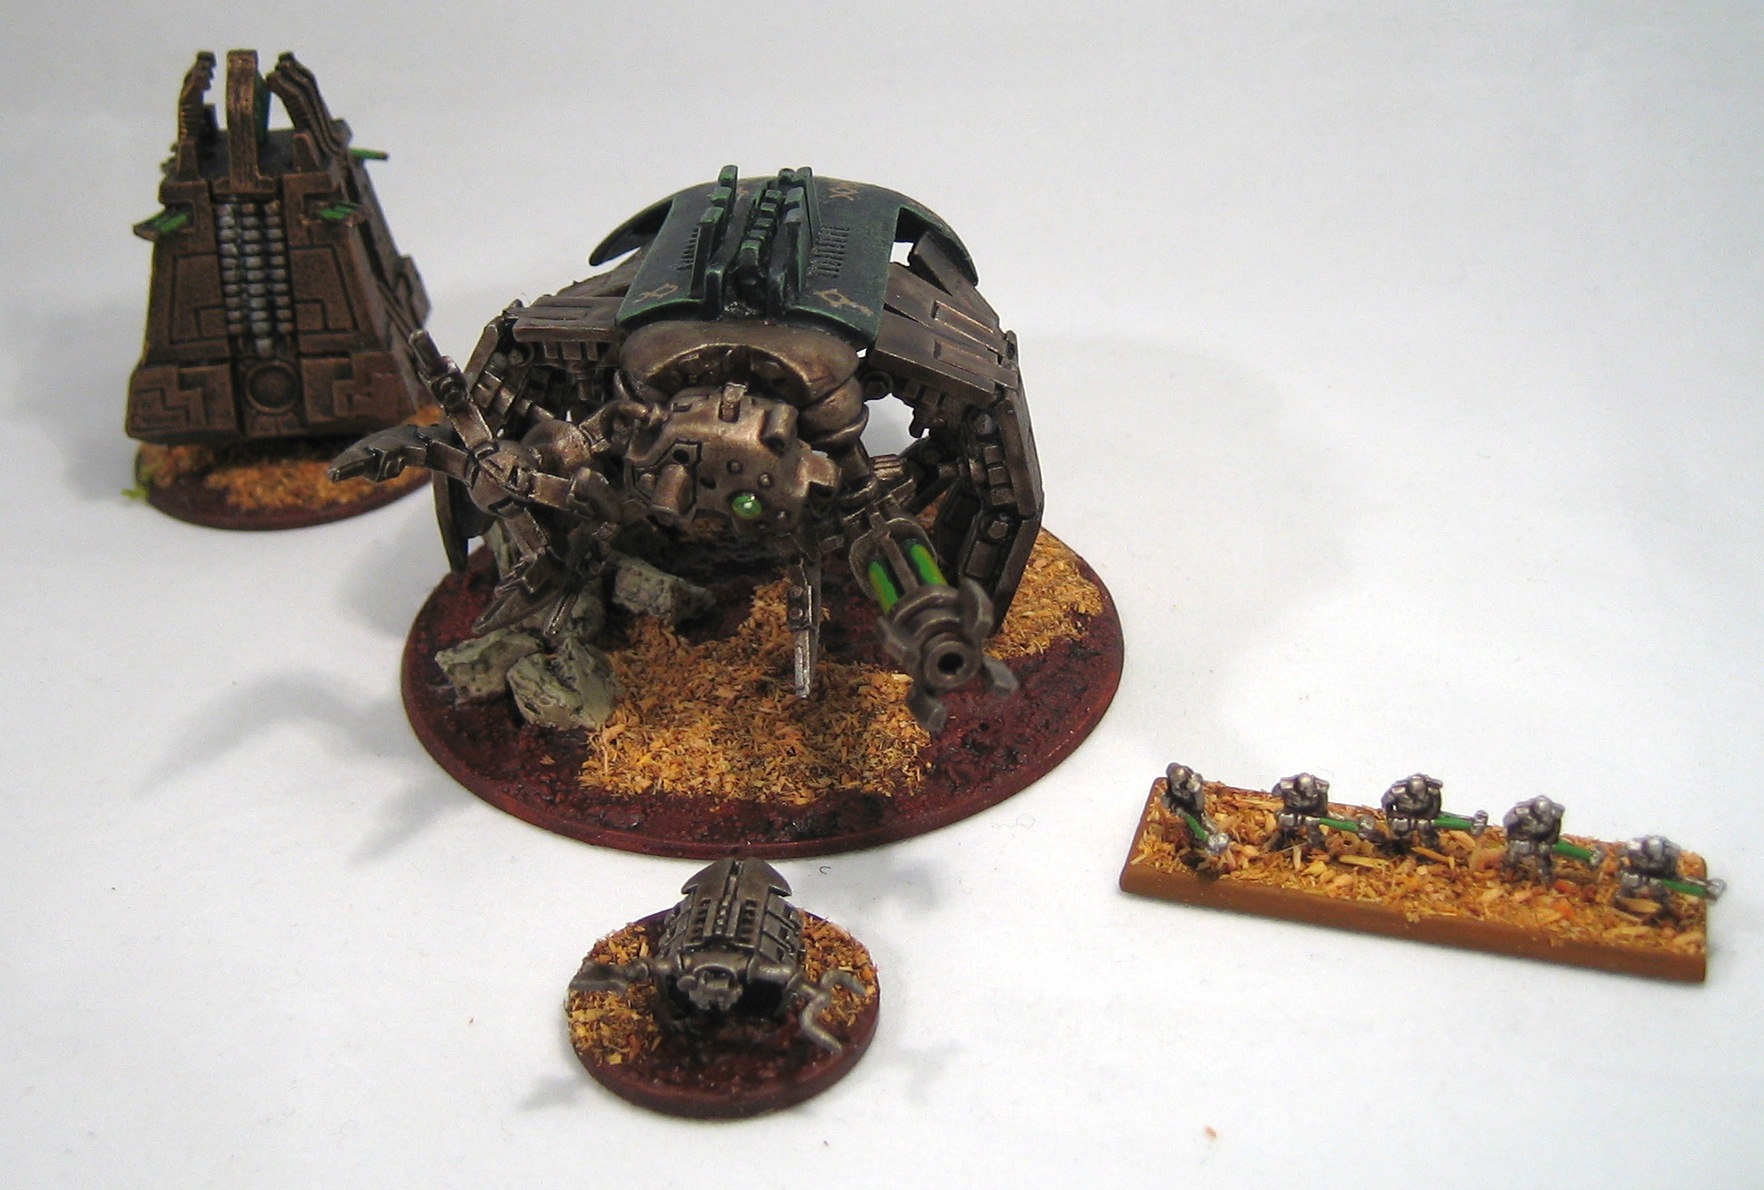
Necron Seraptek Heavy Construct
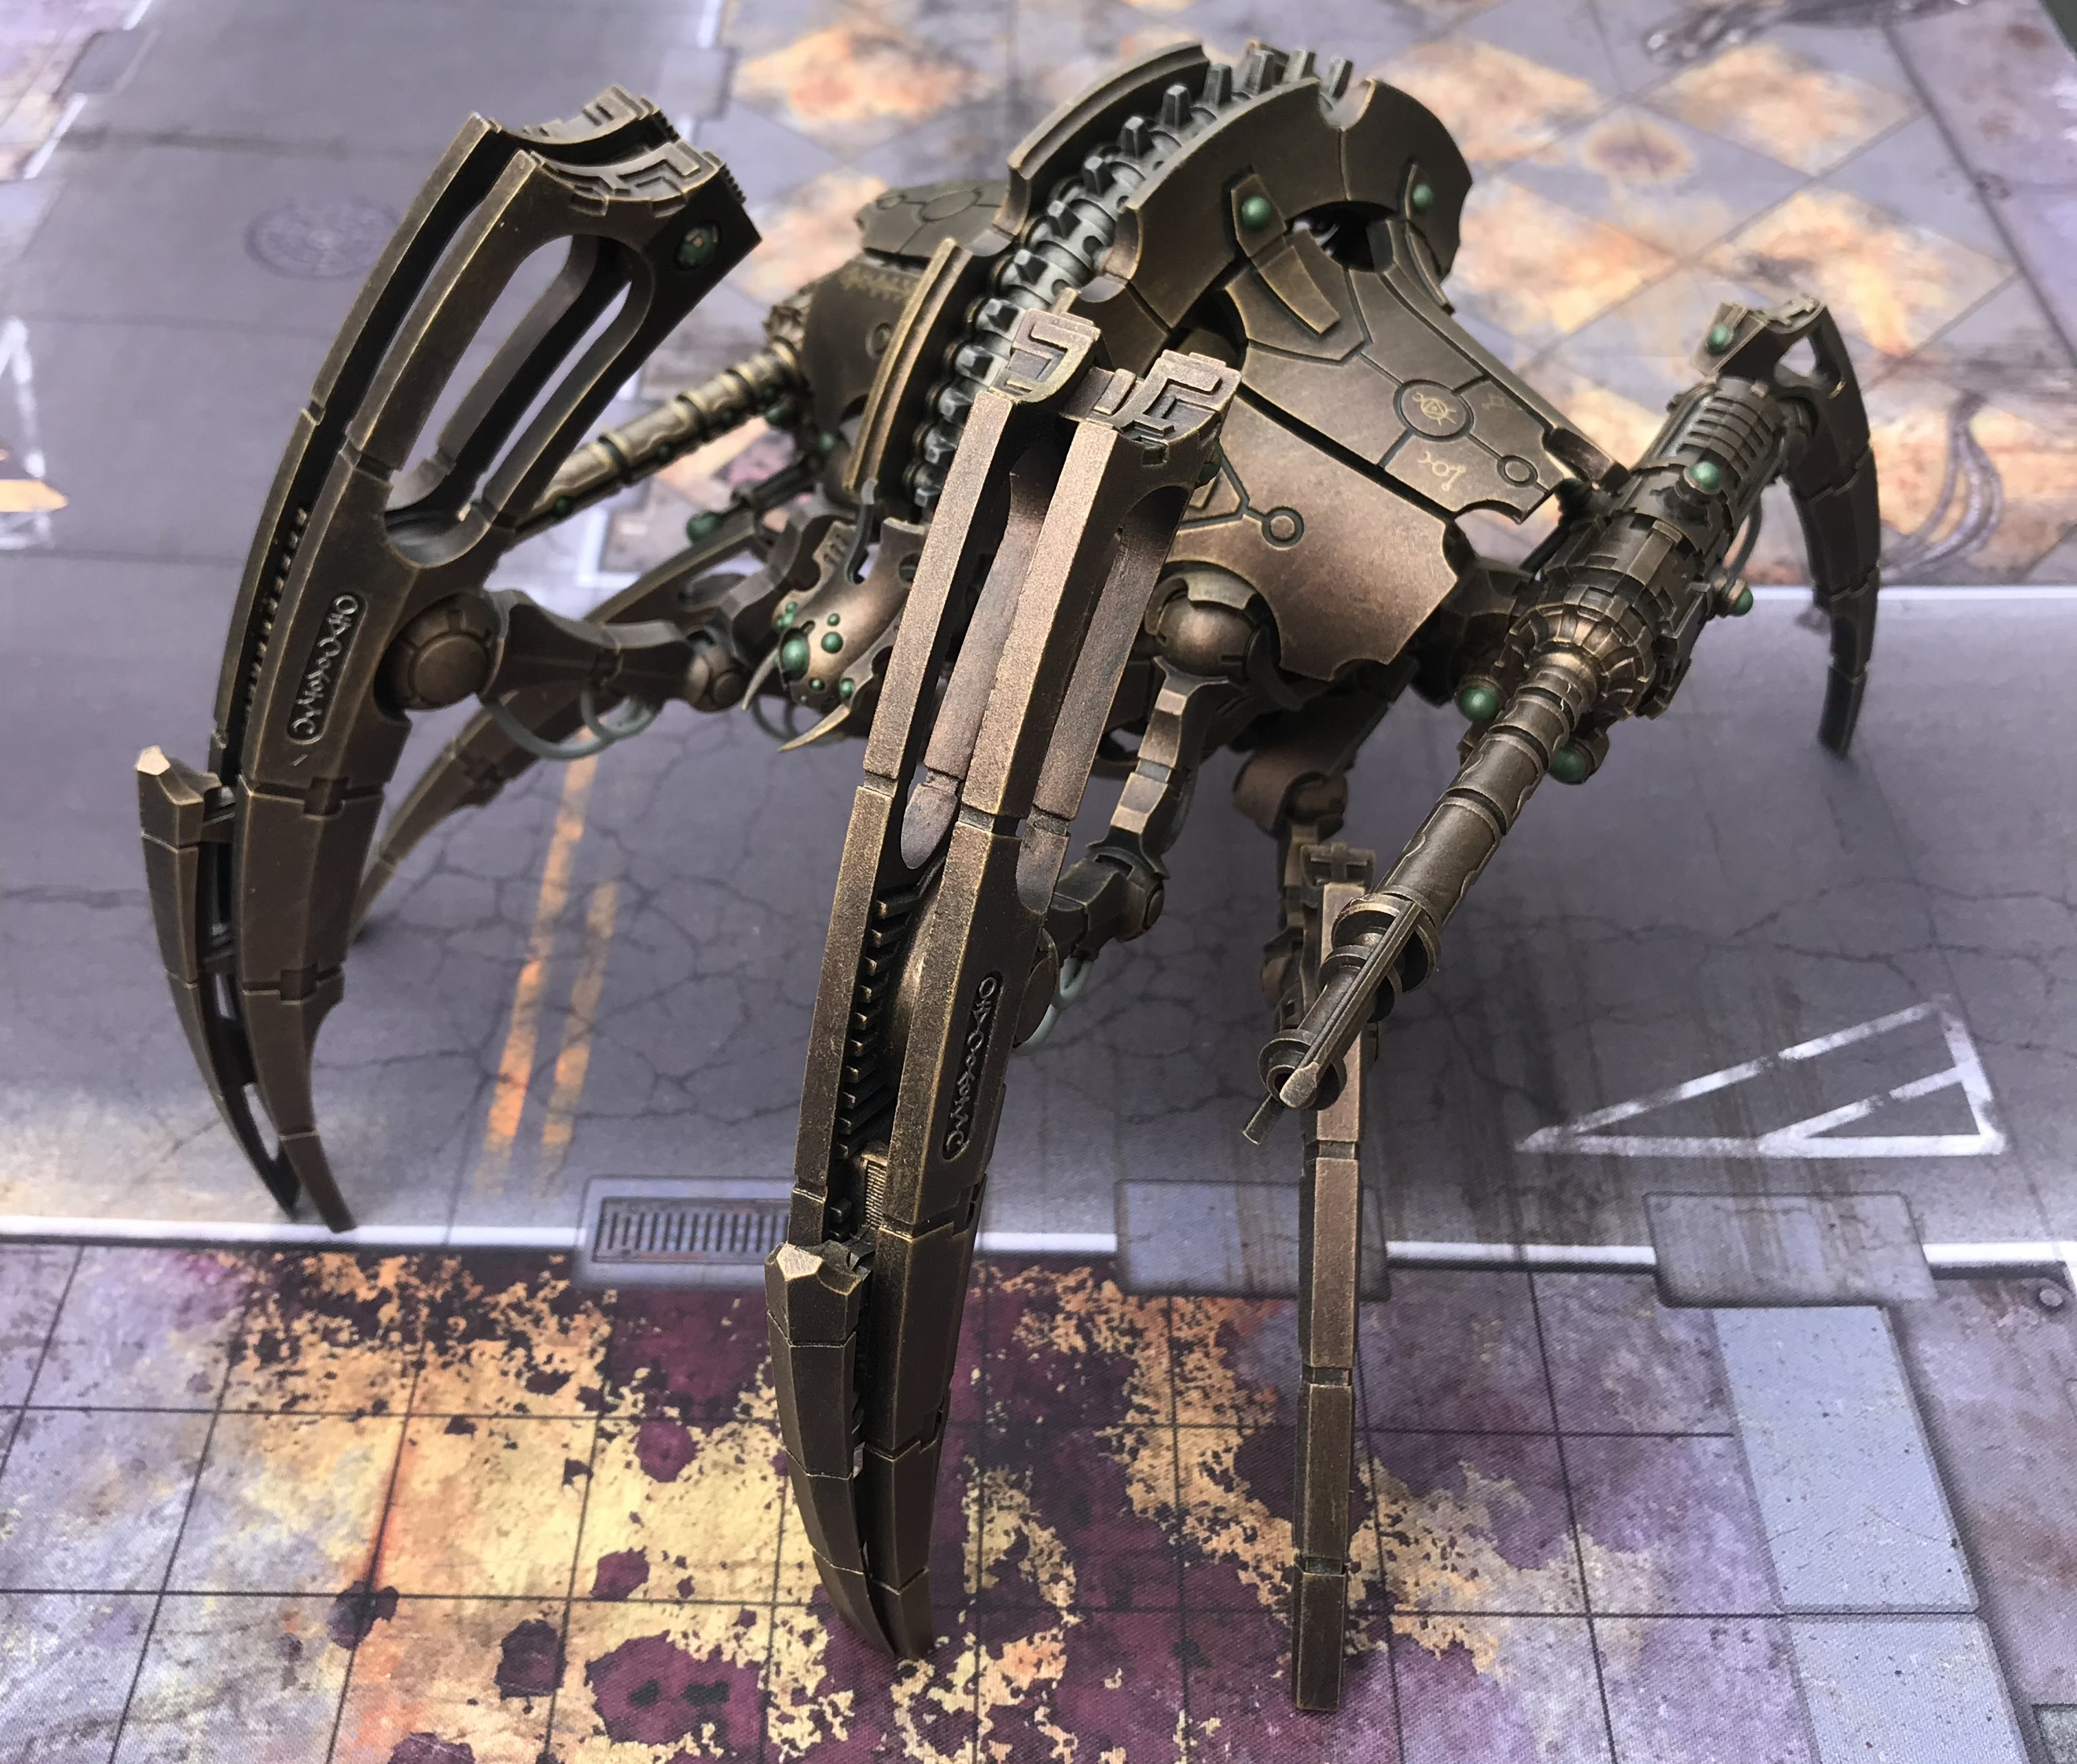
As soon as Forge World released this model I knew I wanted one! My amazing other half bought me one for Christmas, and I've just finished it.
It has the same basic colour scheme as my other large Necron models: I used a piece of firm sponge to stipple Warpstone Bronze over a black undercoat, and then drybrushed with Brass Scorpion, finished with a highlight of Vallejo brass. Simple but very effective!
More photos below the fold.
A new NetEpic Army Book for Necrons

I've long been a fan of Kotrin's alternative NetEpic army book for Necrons, which I have always used when playing with my Epic necrons. The "official" Necron rules for NetEpic are bundled together with another set of rules for "Space Slann", and are a bit of an afterthought.
A few years ago, after GW and Forgeworld had produced a number of new models, I wrote some rules for them that were compatible with Kotrin's rules. However, since then, Kotrin appears to have disappeared, and his website has been broken for several years.
After I'd finished getting the new NetEpic website up and running I decided to bite the bullet, and I have now finished a new version of the Necron Army Book, based on Kotrin's original version (which I had to convert from PDF to Word in order to edit: cue hours of reformatting and rejigging). The new version includes the rules I wrote for the new models and I'll keep it updated as GW/FW release new models for my favourite robot zombies!
You can download the new book by clicking on the following link:
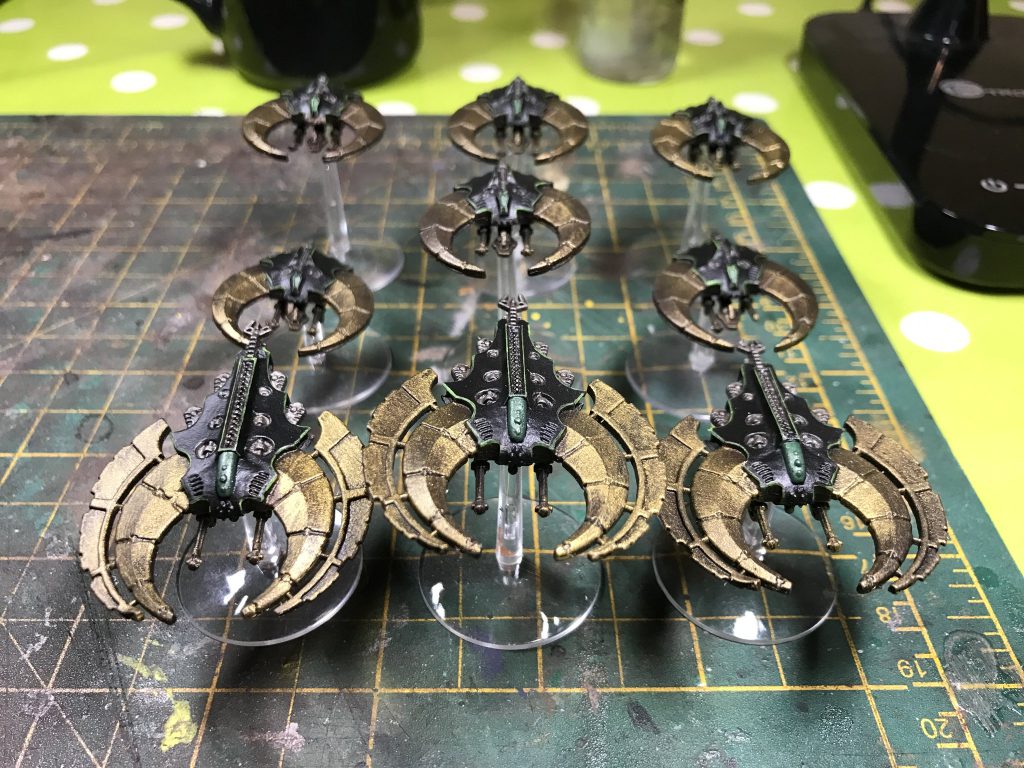
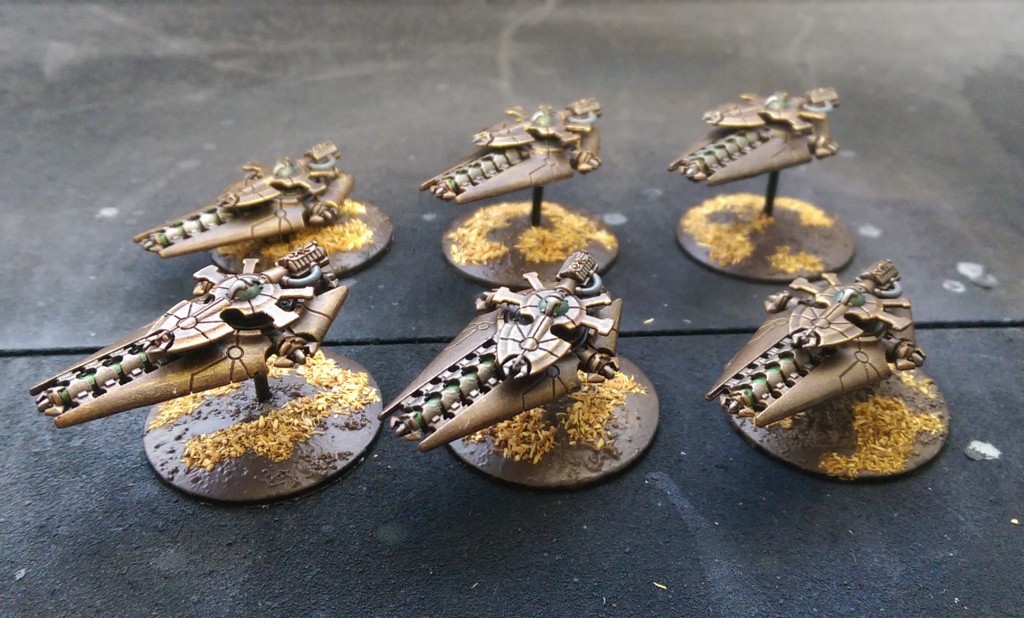
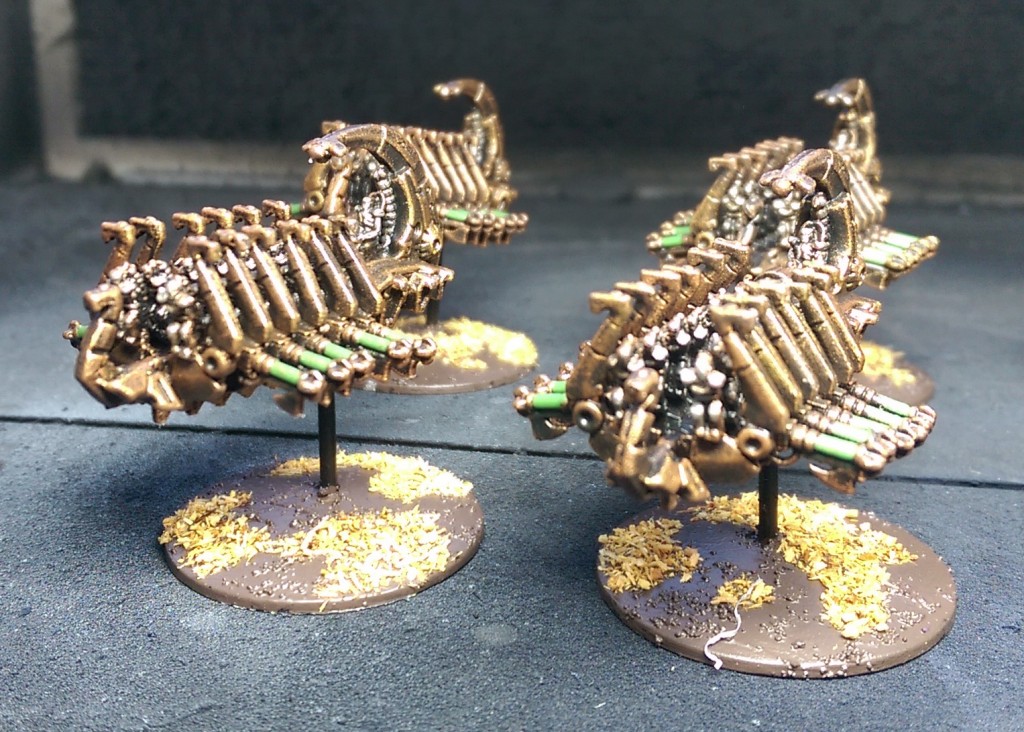
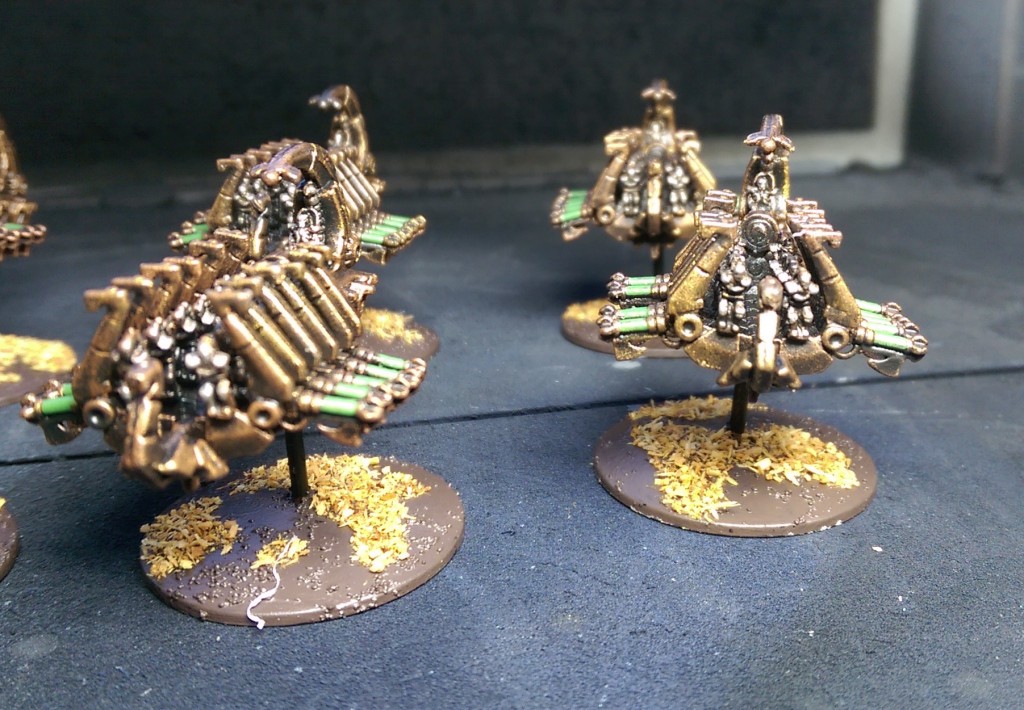
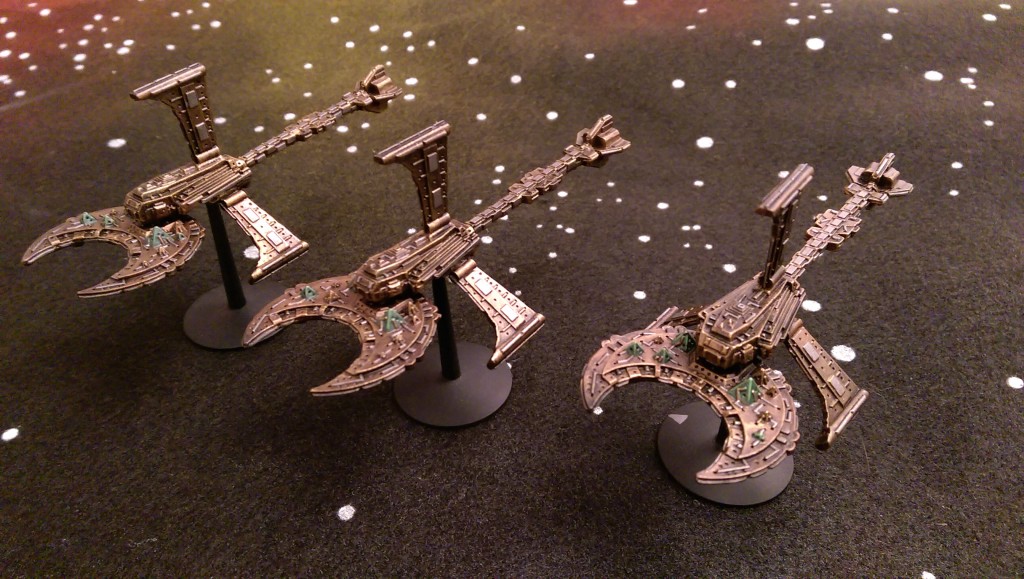
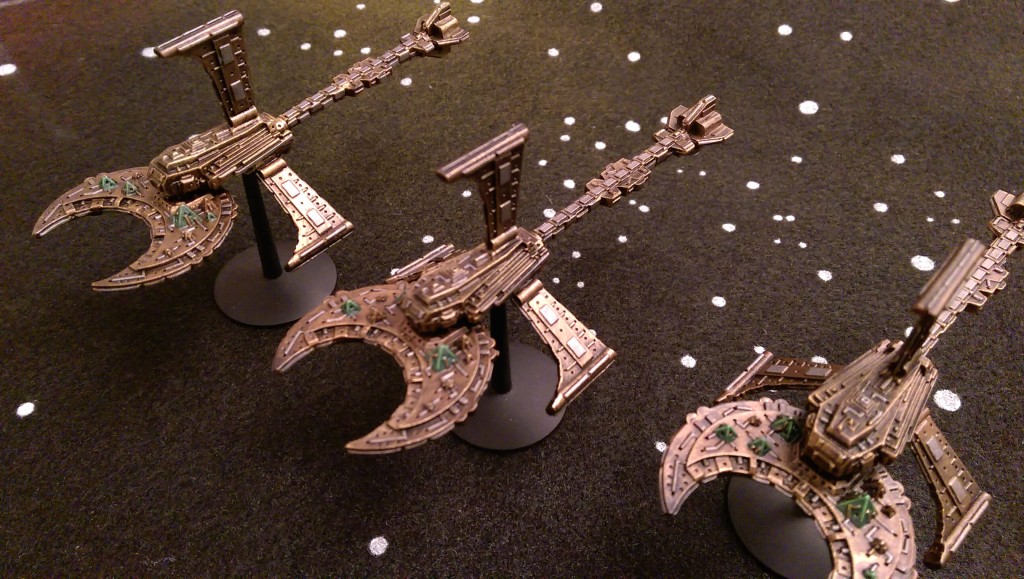
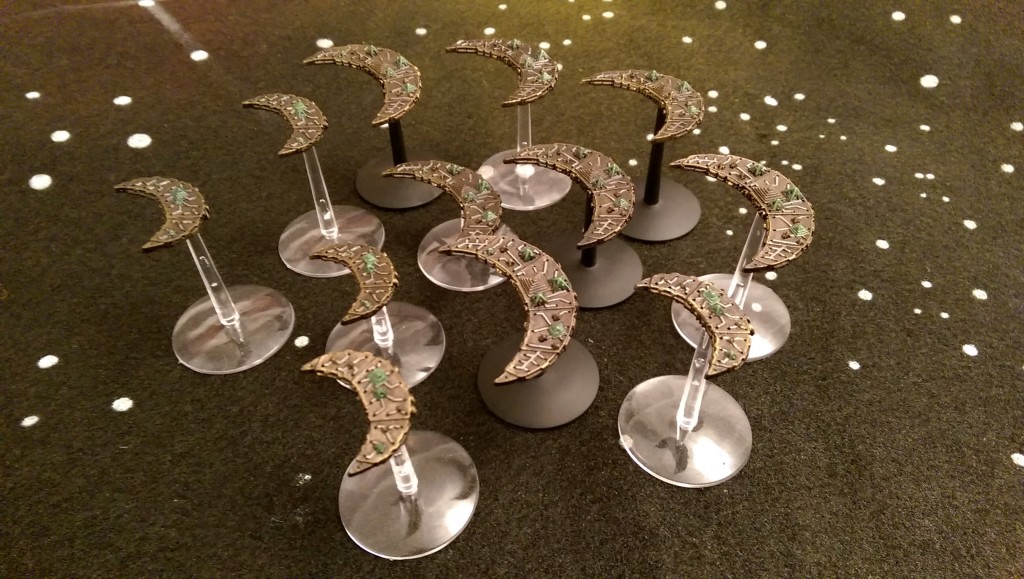
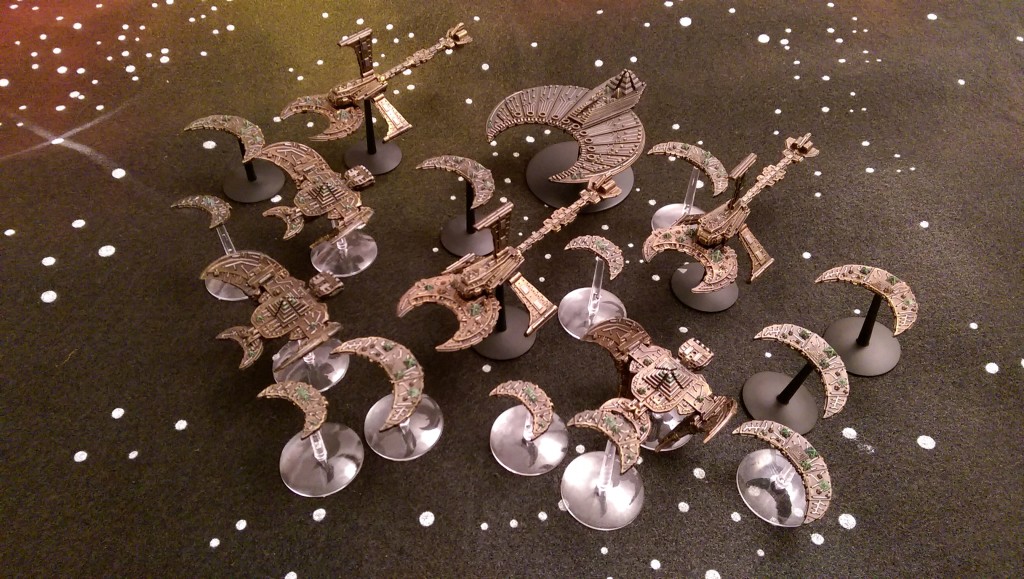
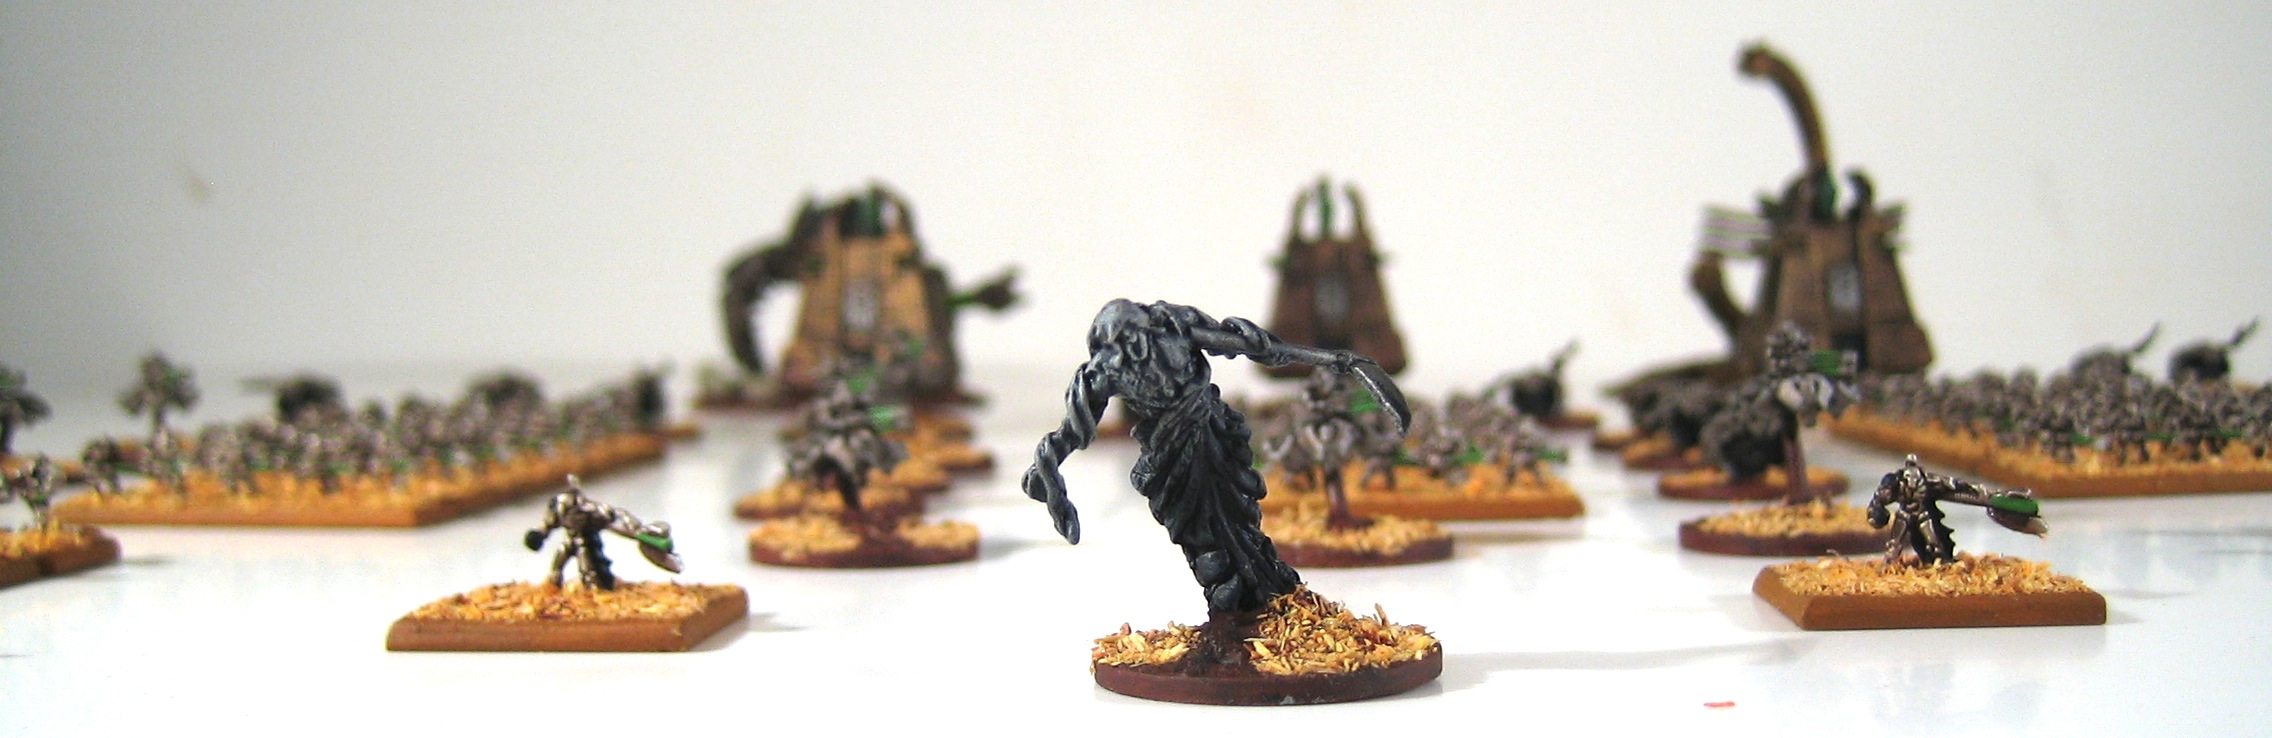
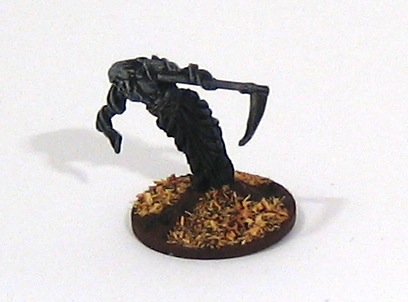
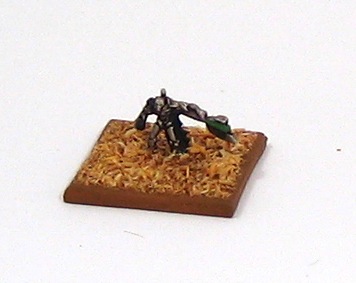
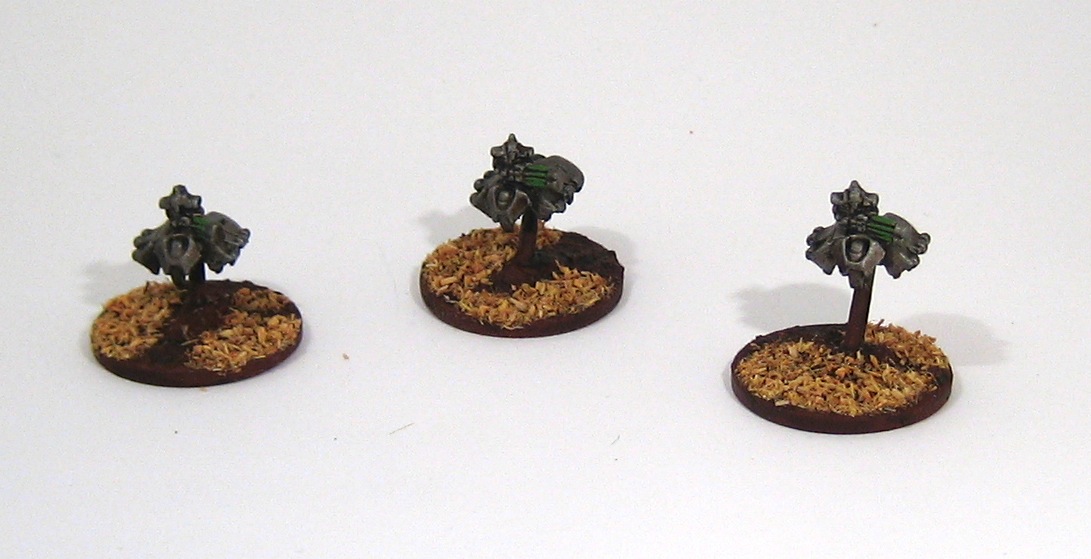
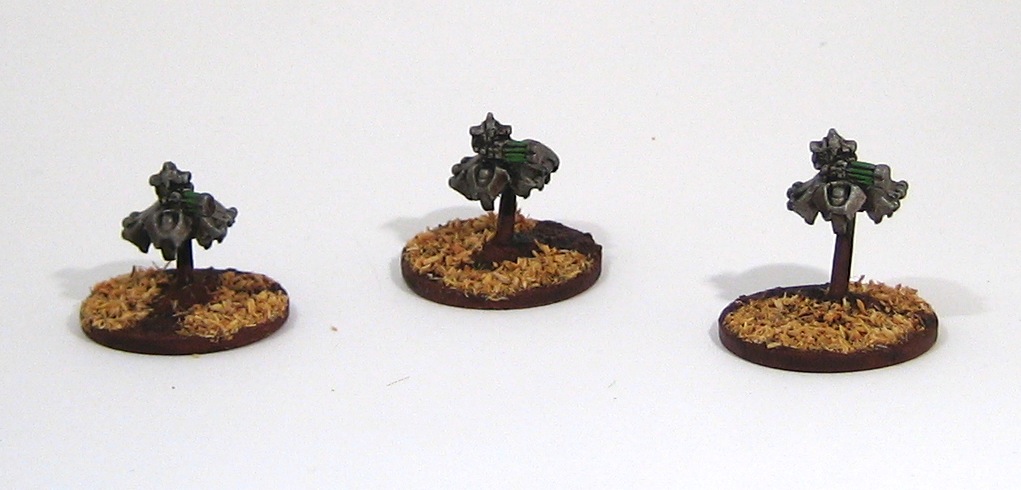
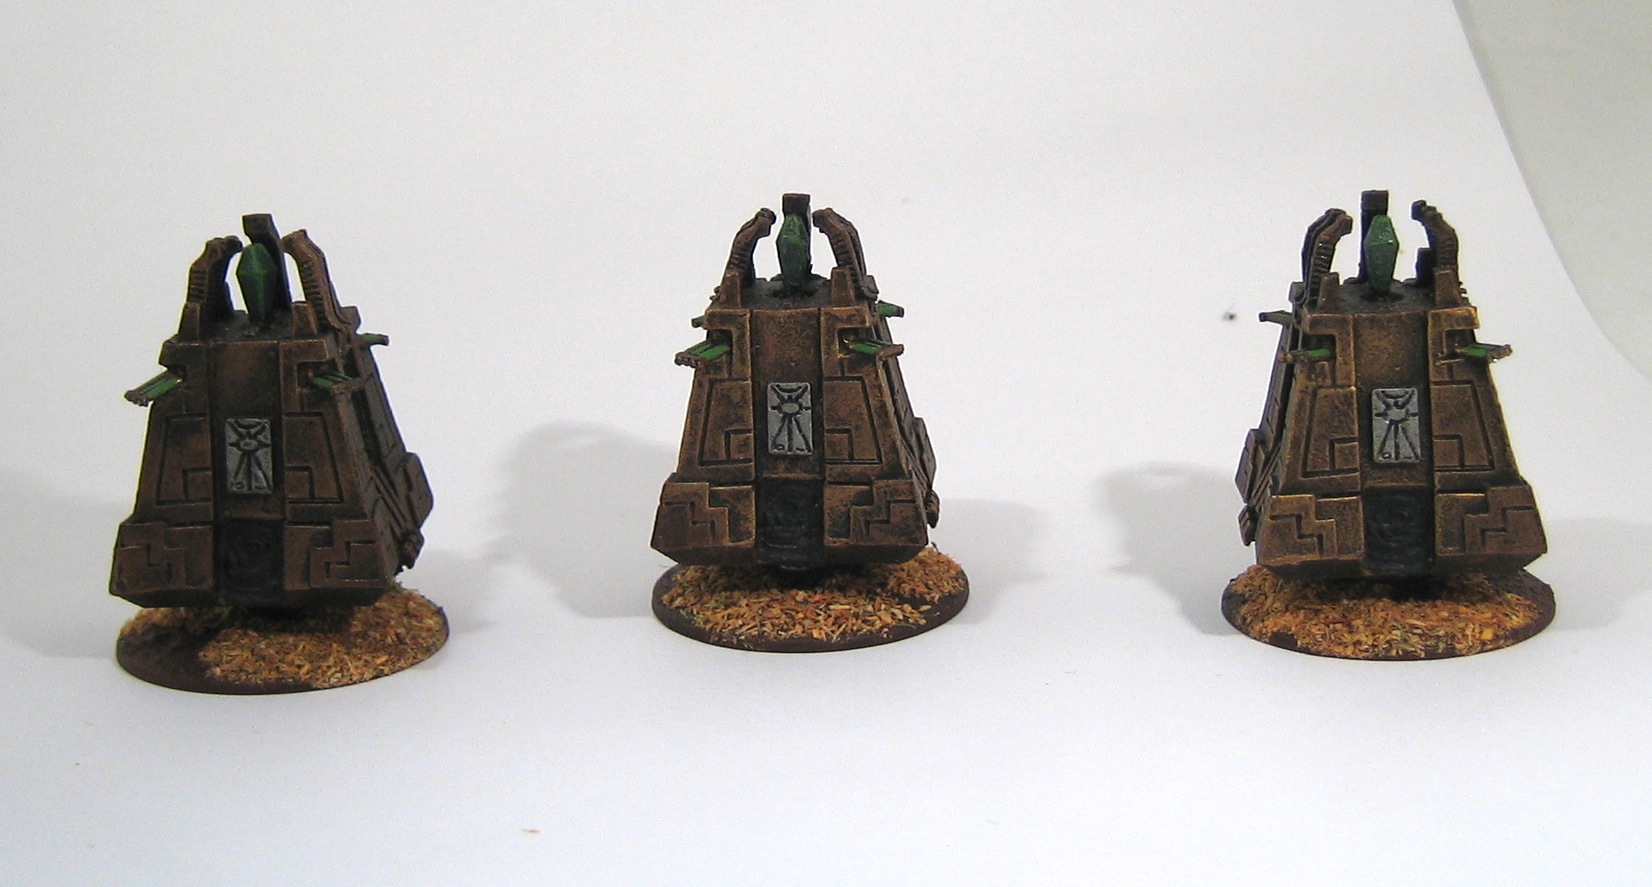
Epic-scale Necron Canoptek Wraiths
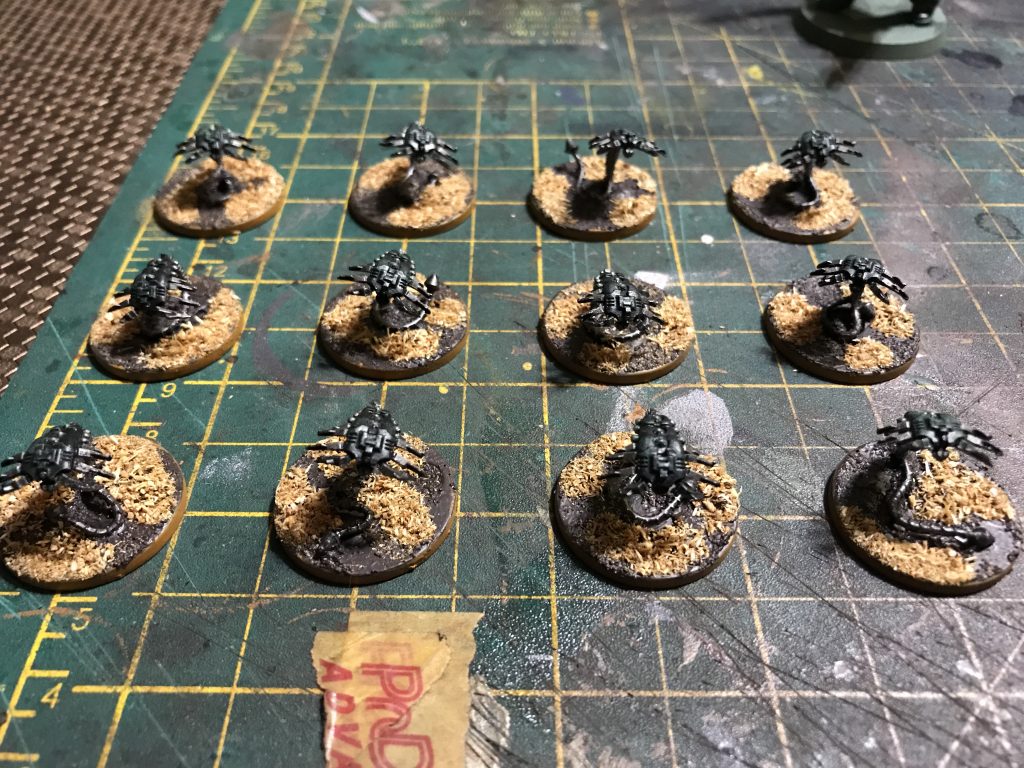
After a succession of "large" models (whether the Astraeus, the Imperial Navy fleet or the Epic-scale Necron praetorians) it was nice to get work on some small models for a change. The bases of these Canoptek Wraiths are 20mm in diameter!
My Epic Necron army, large though it is, is a bit light on close combat units (something also true of necrons in 40k) so these beasties should be a useful addition to the legions.
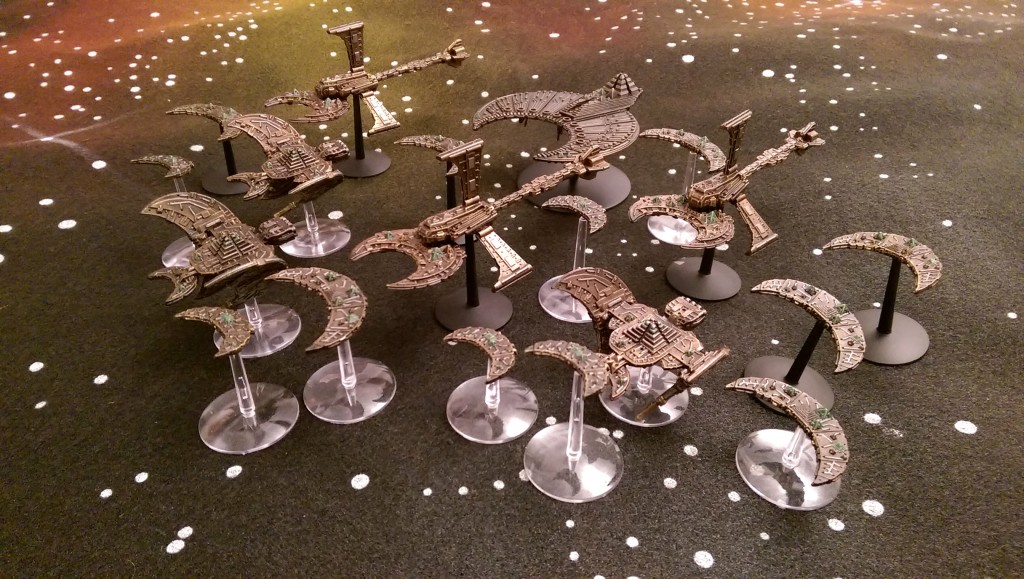
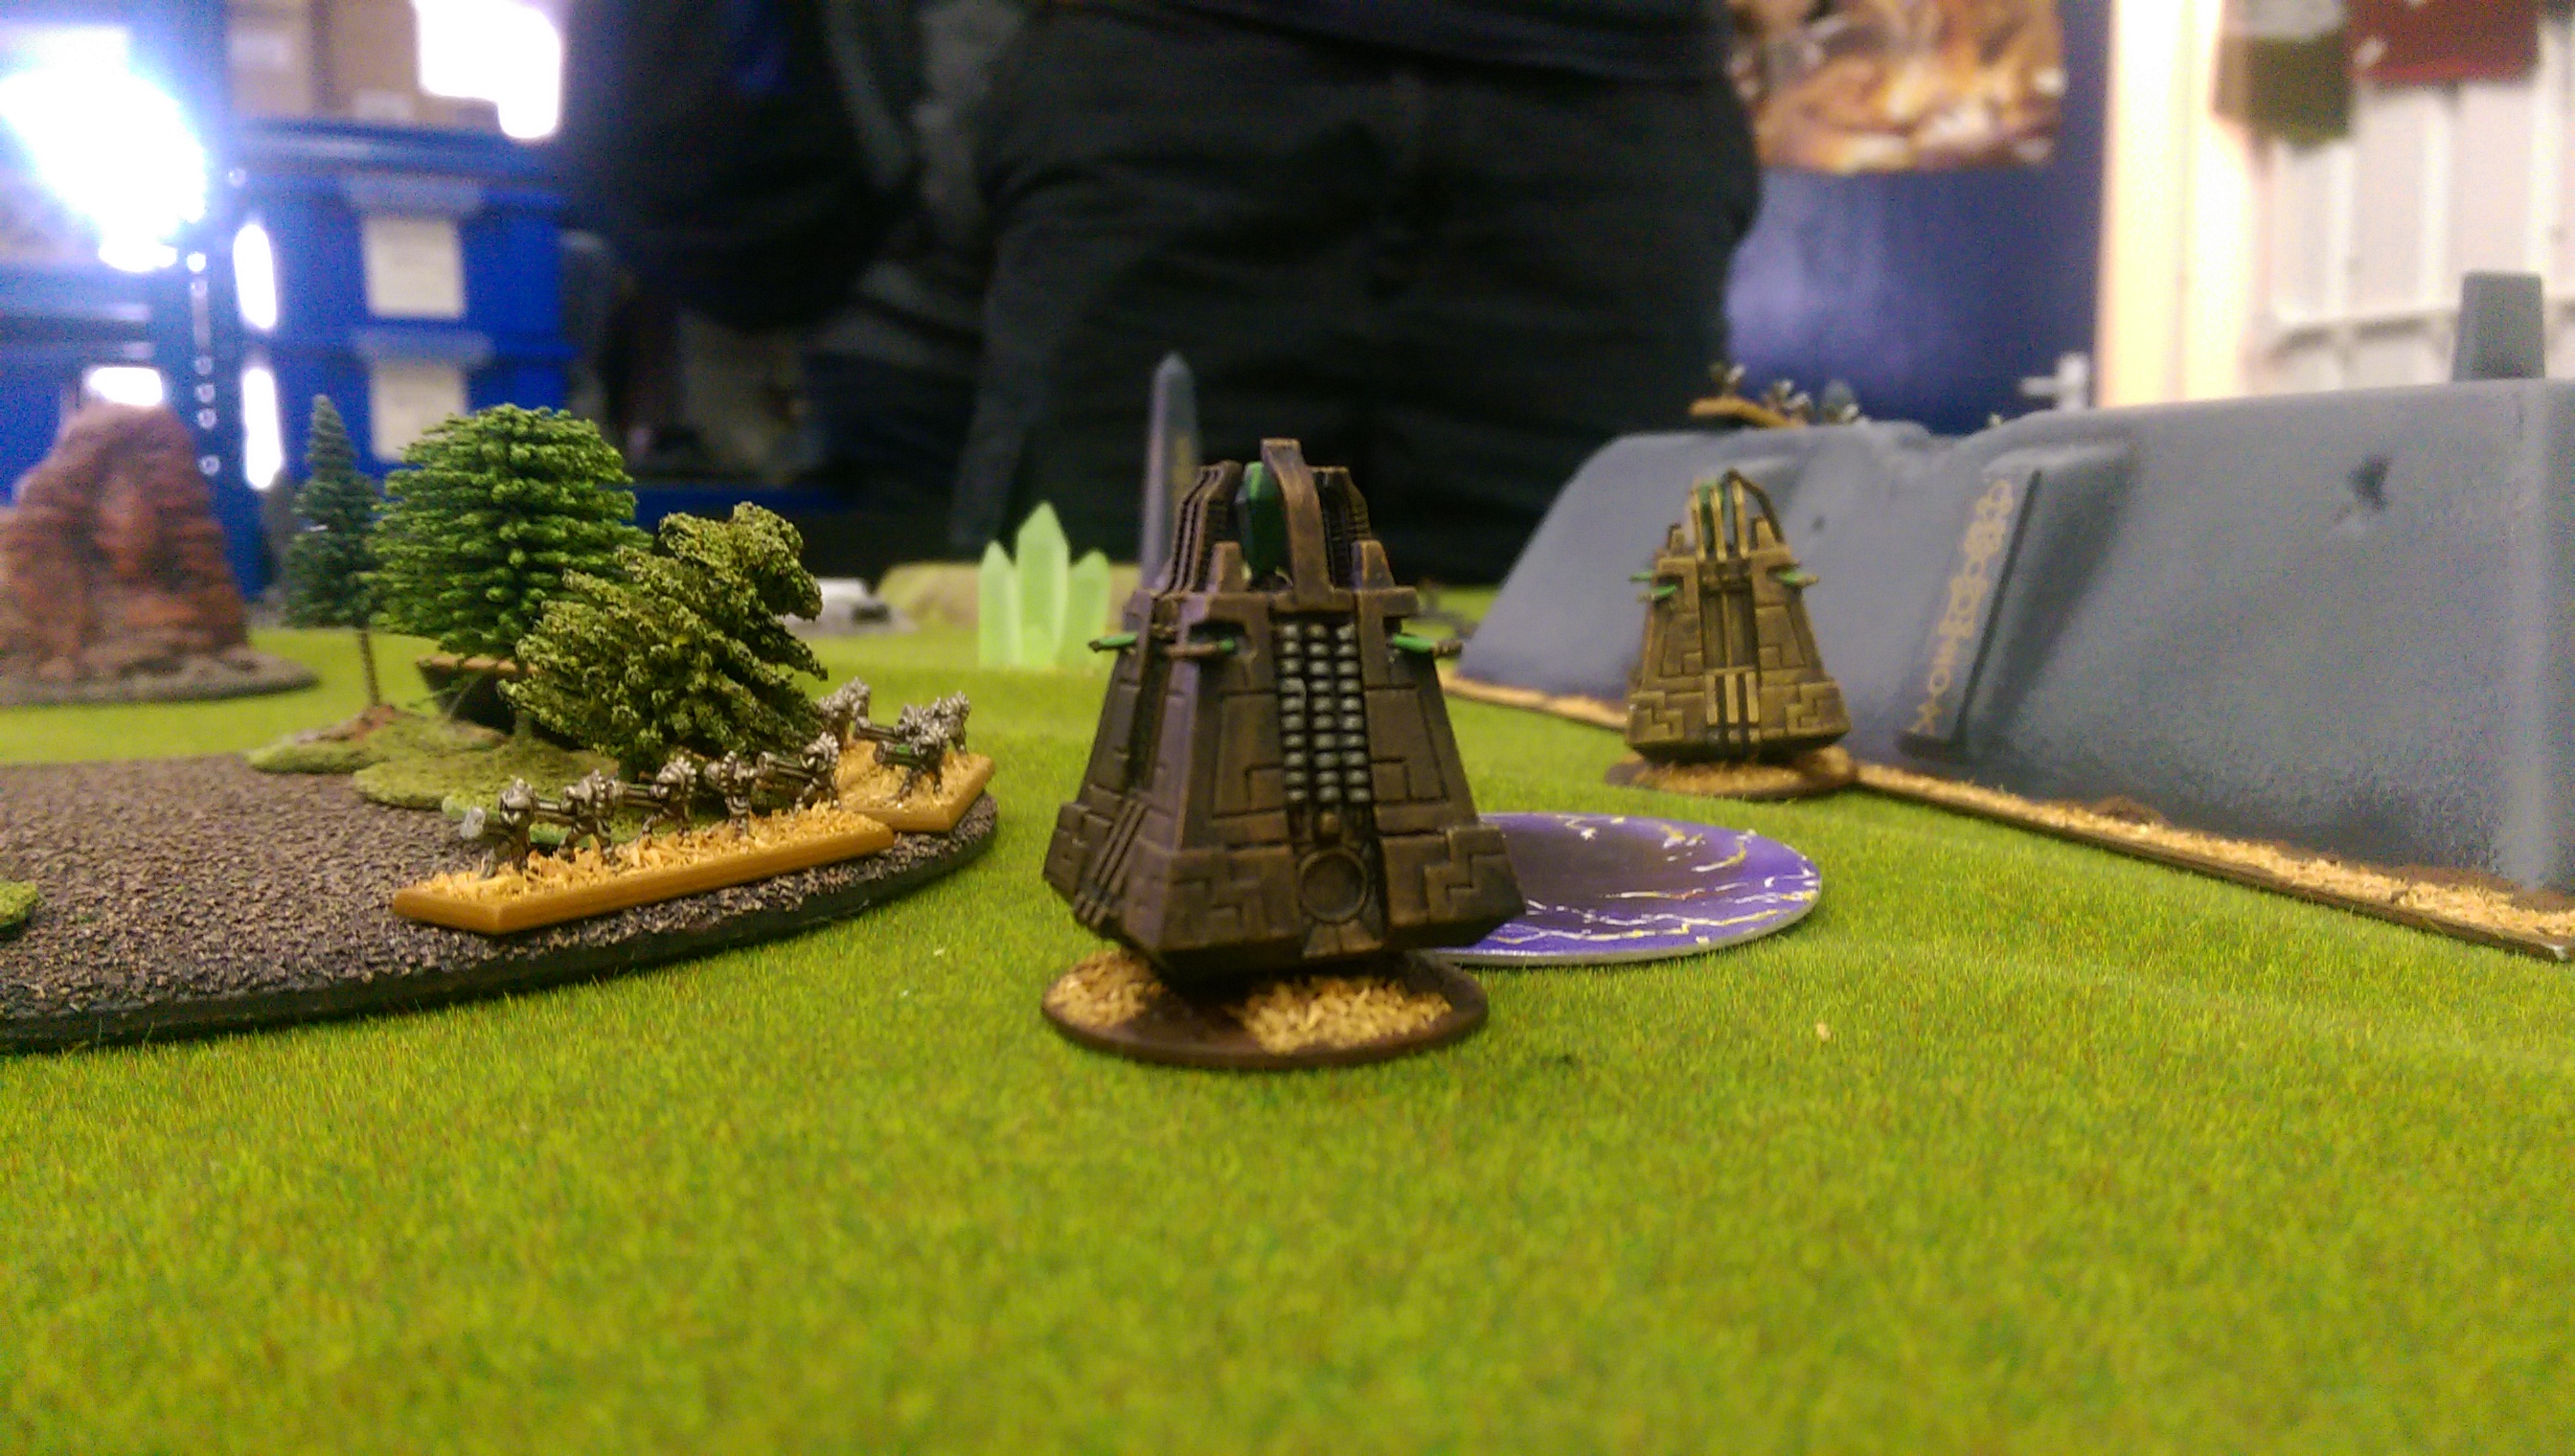
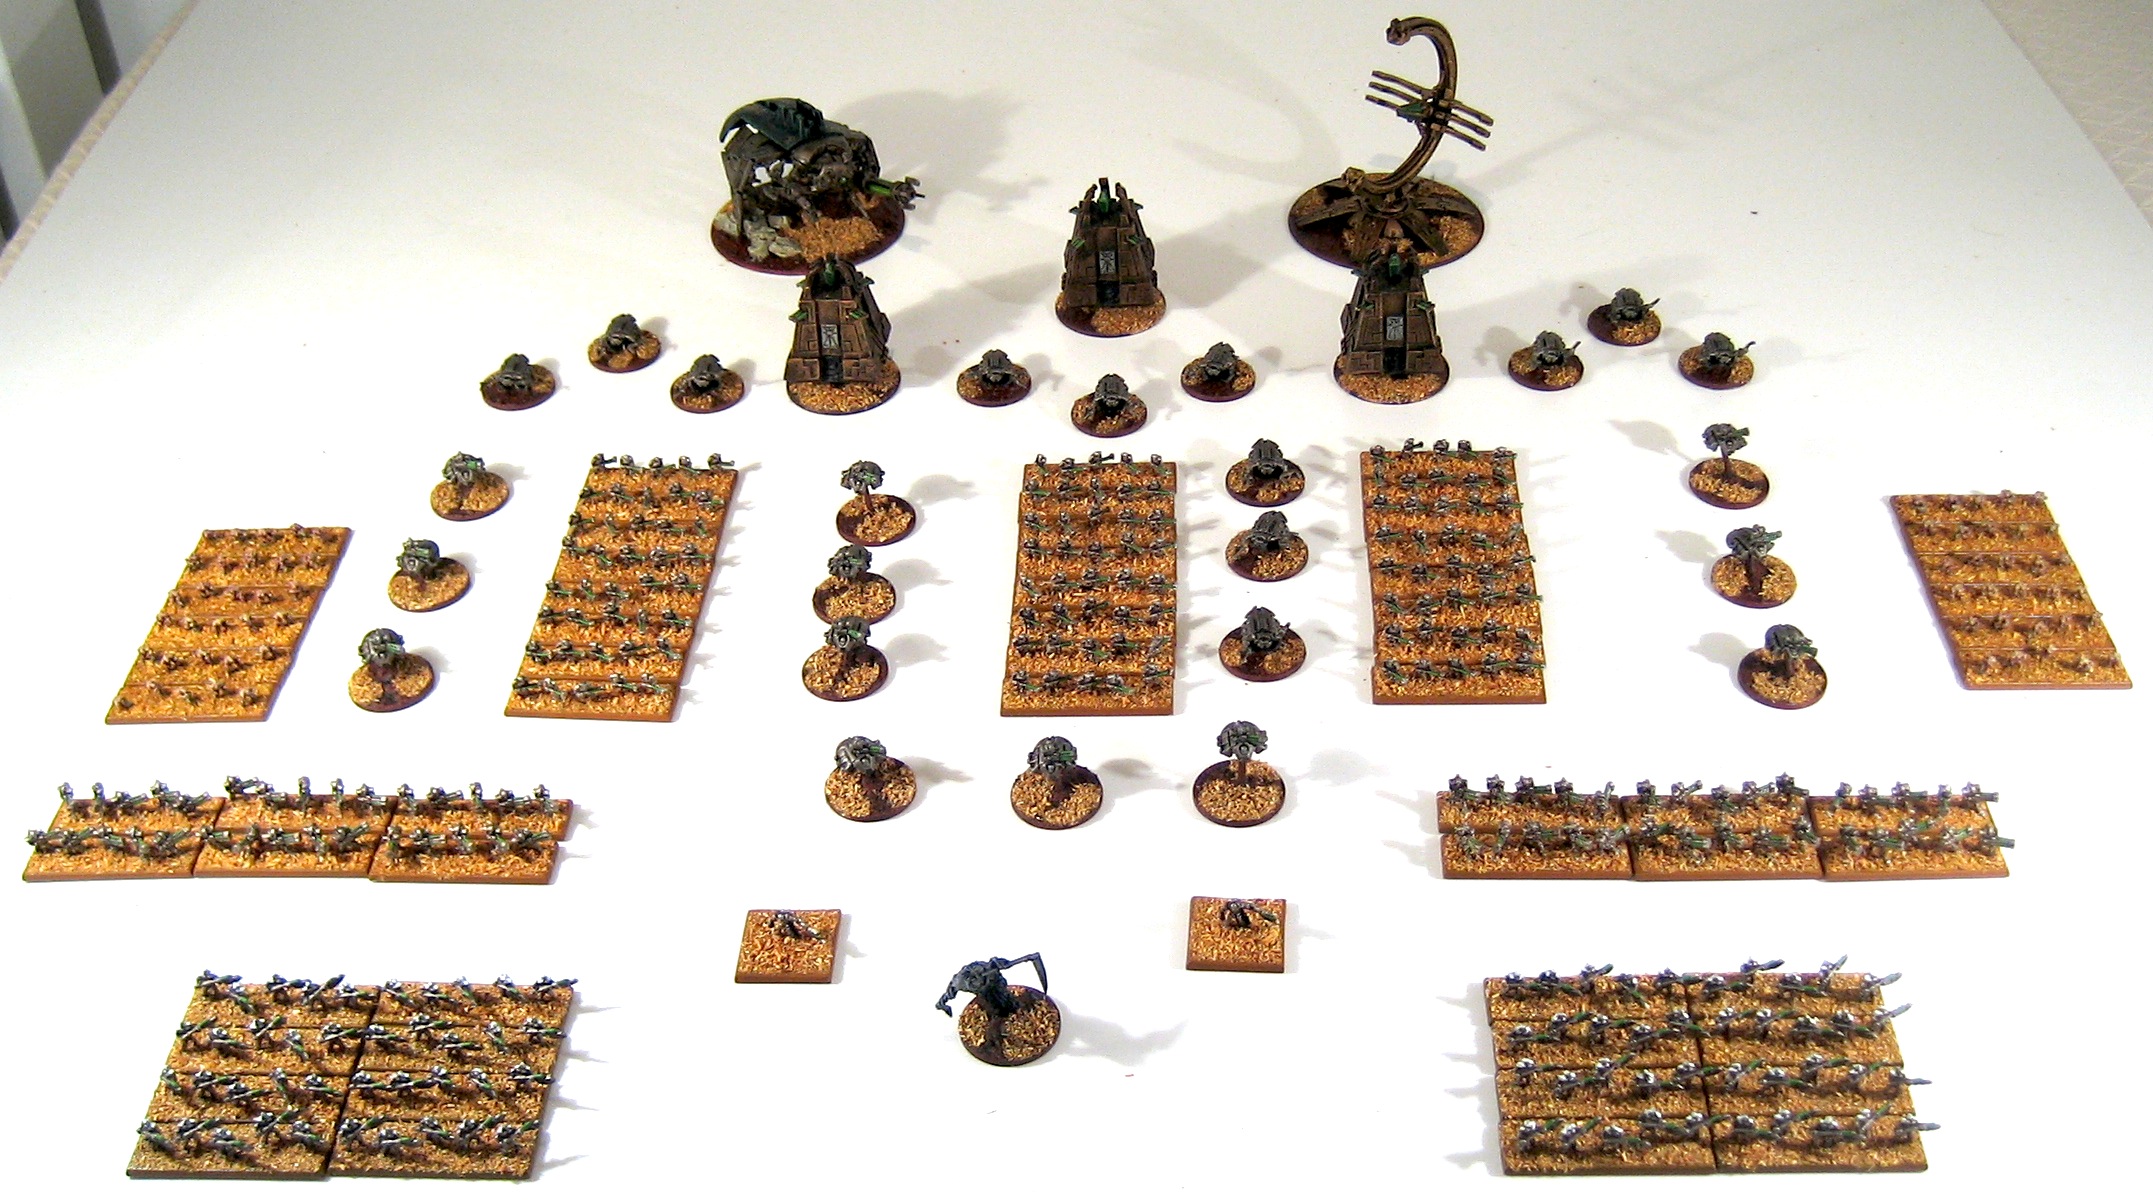
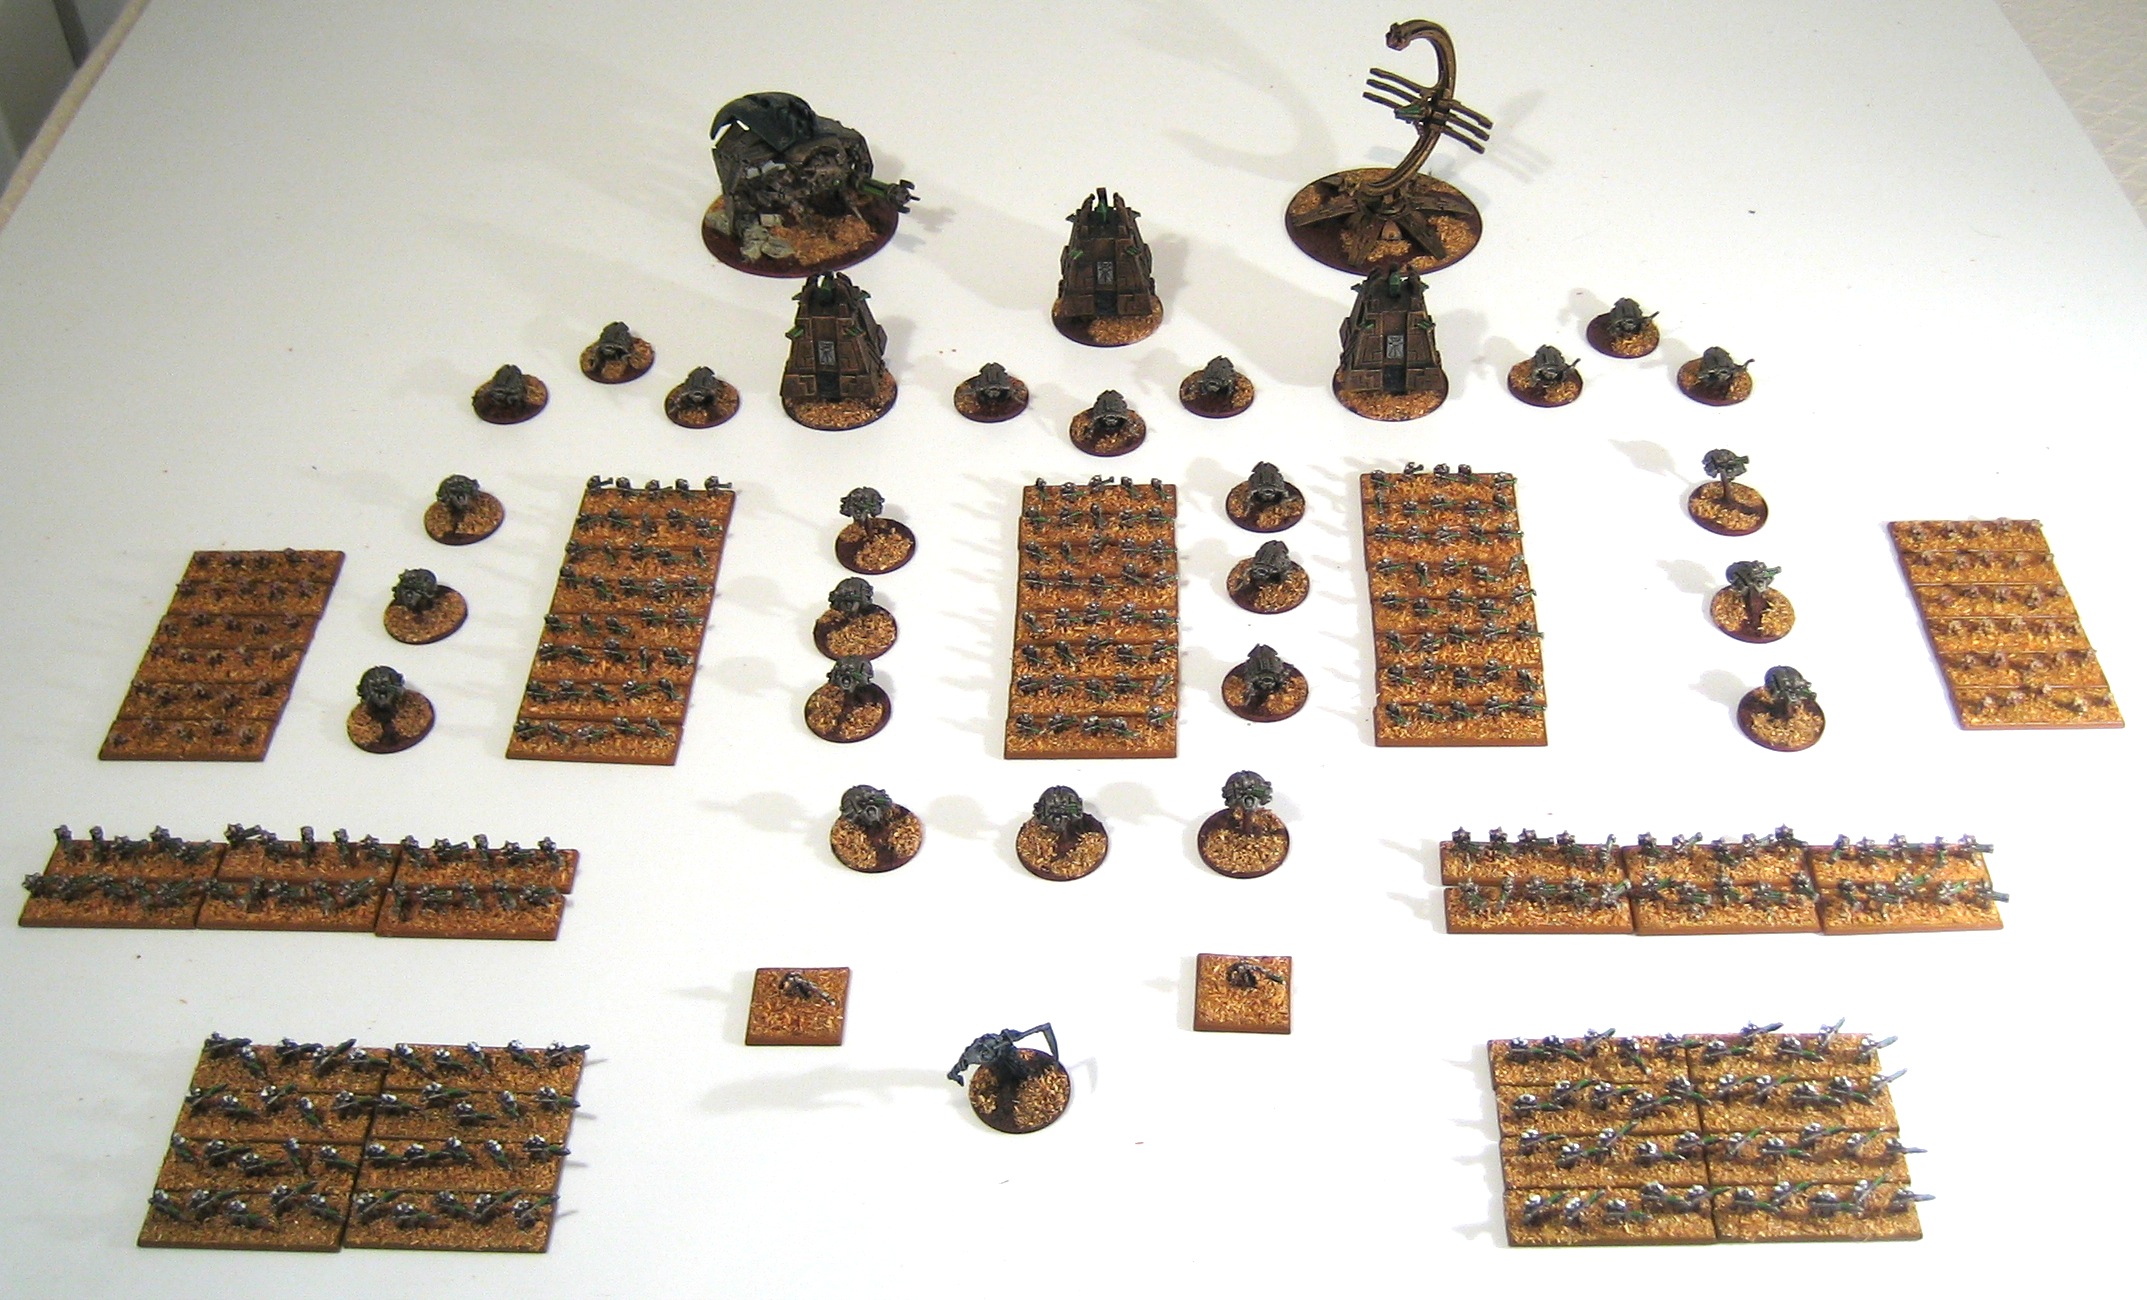
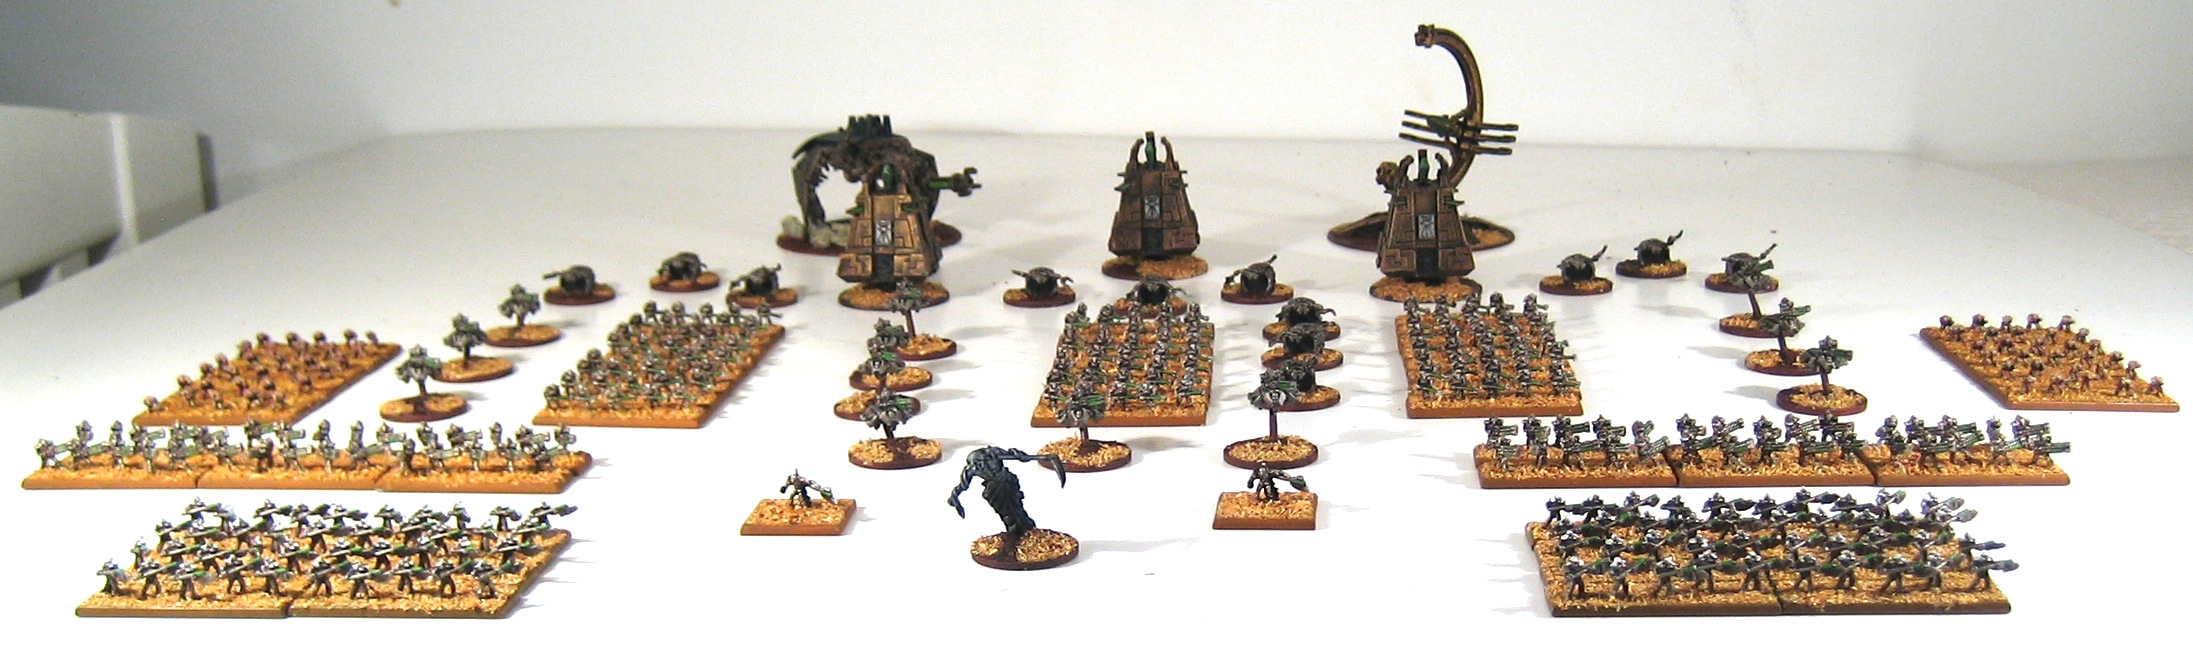
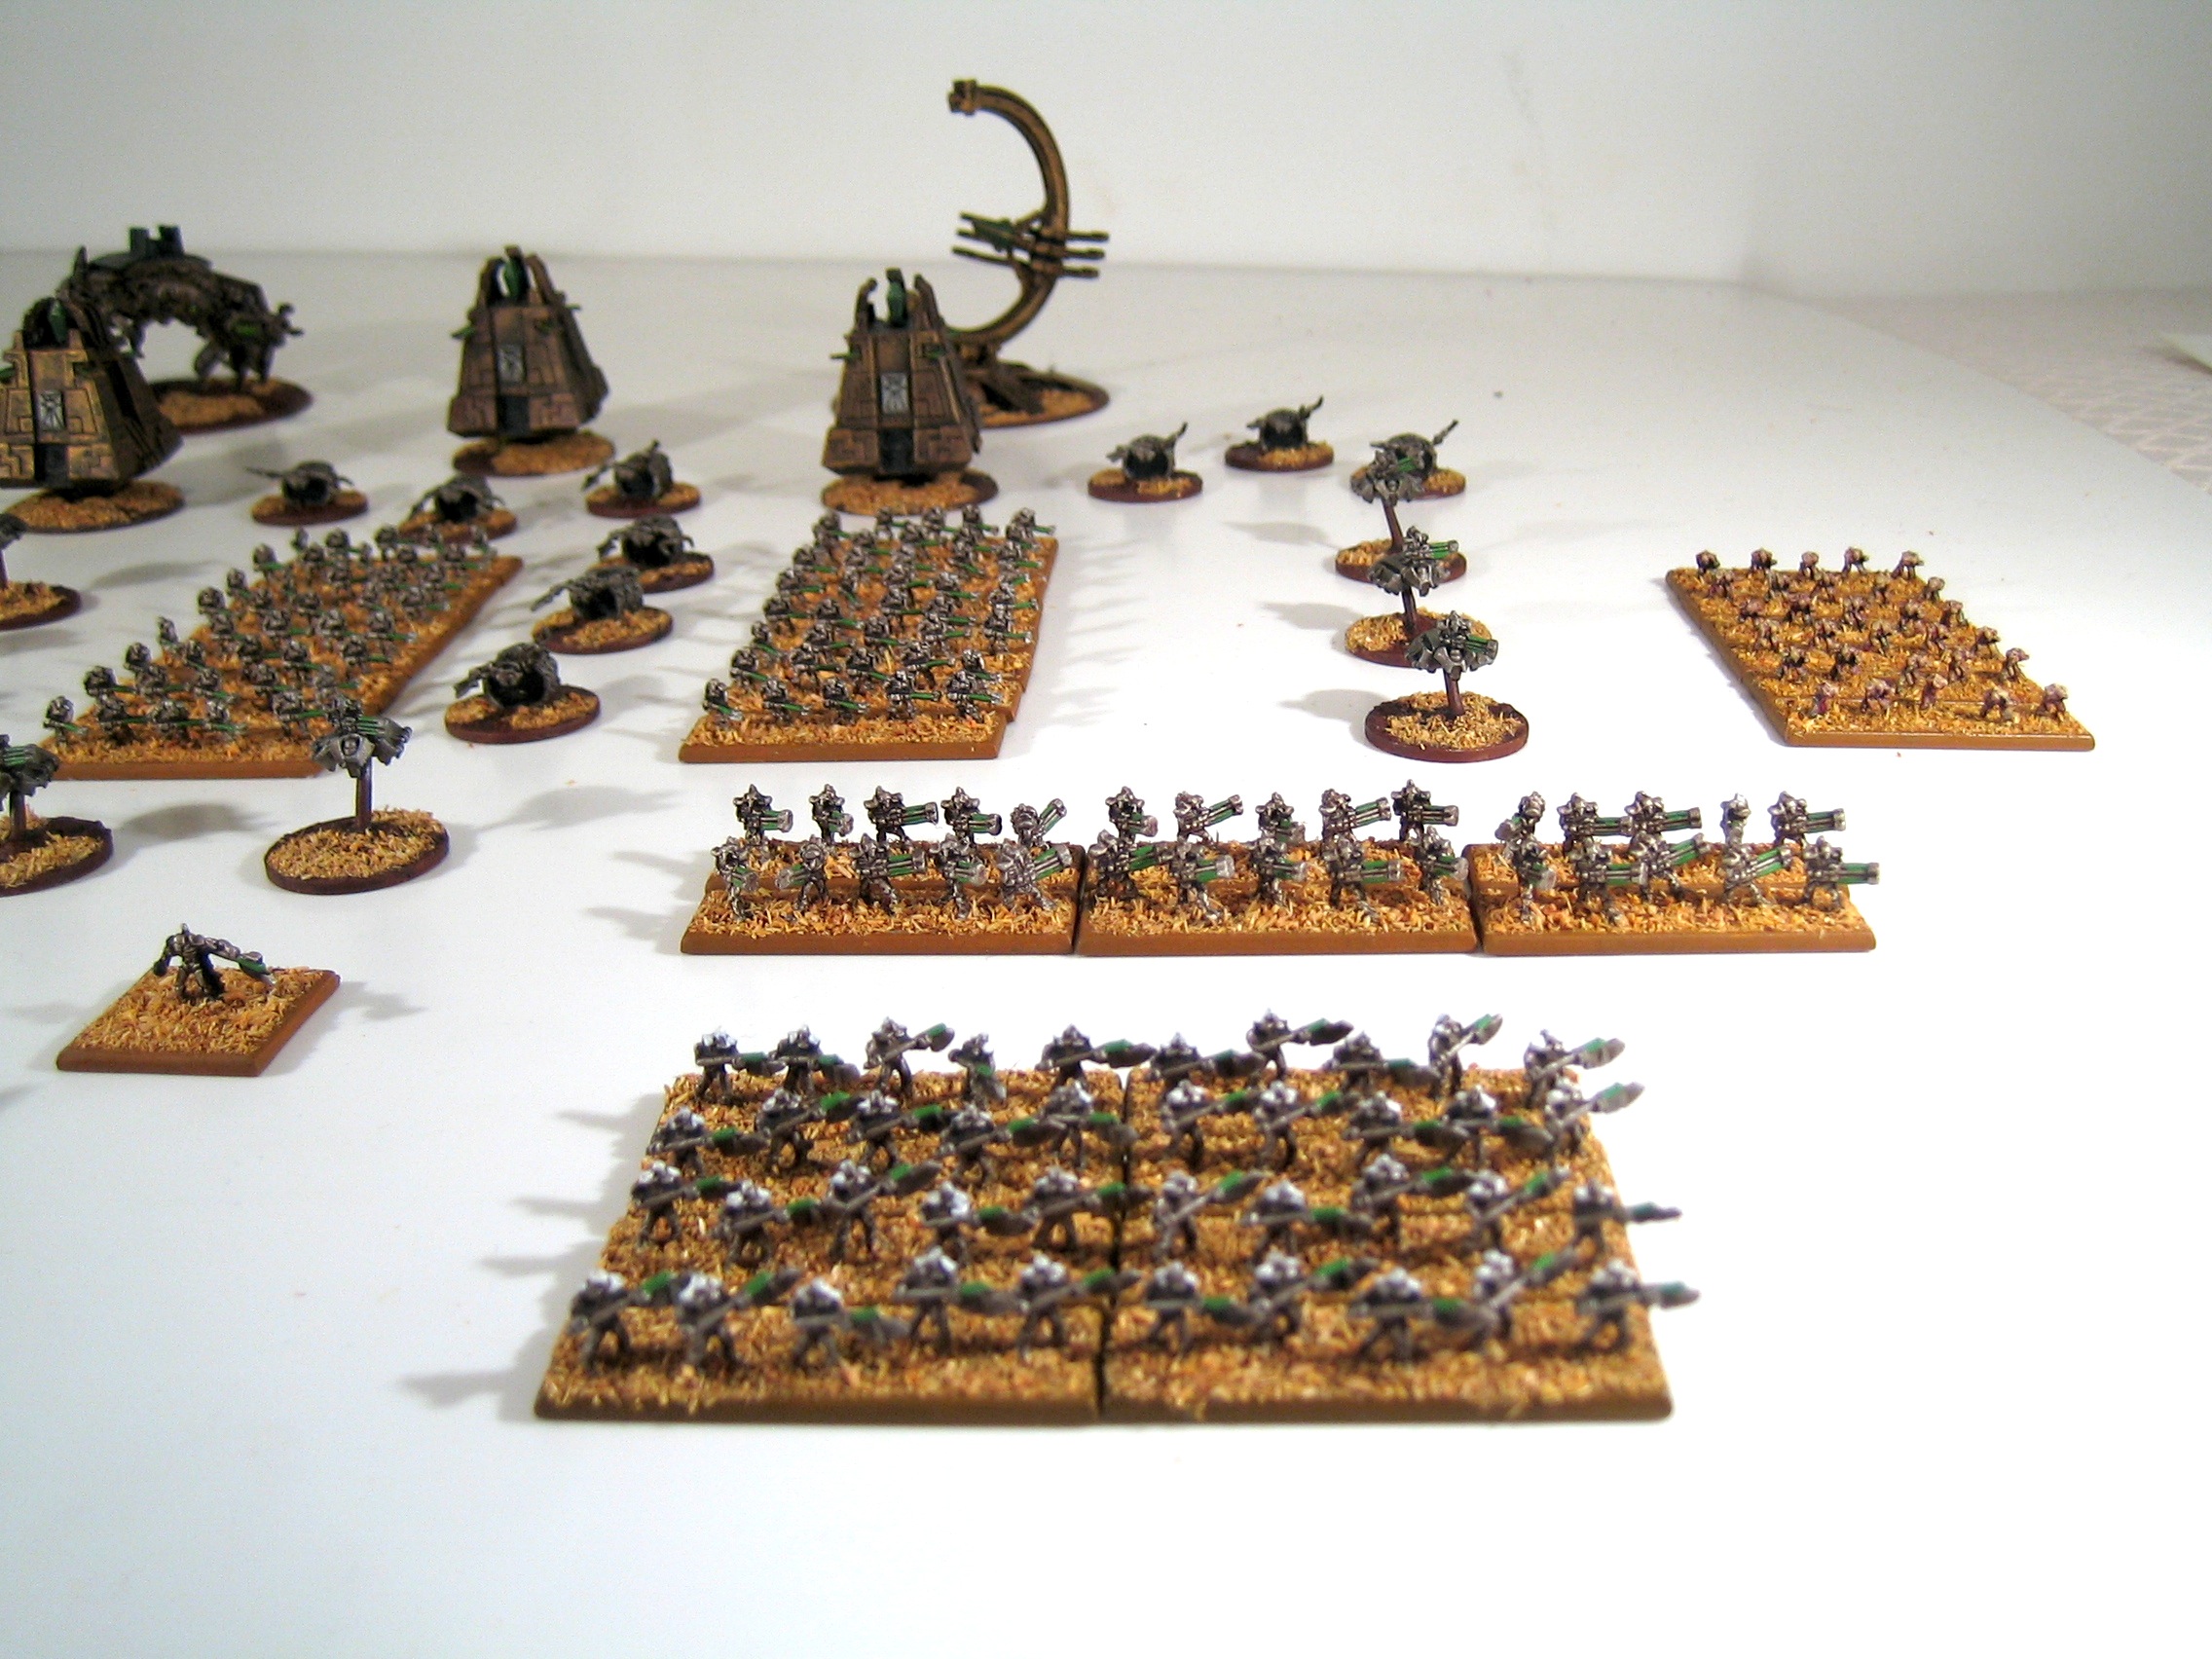
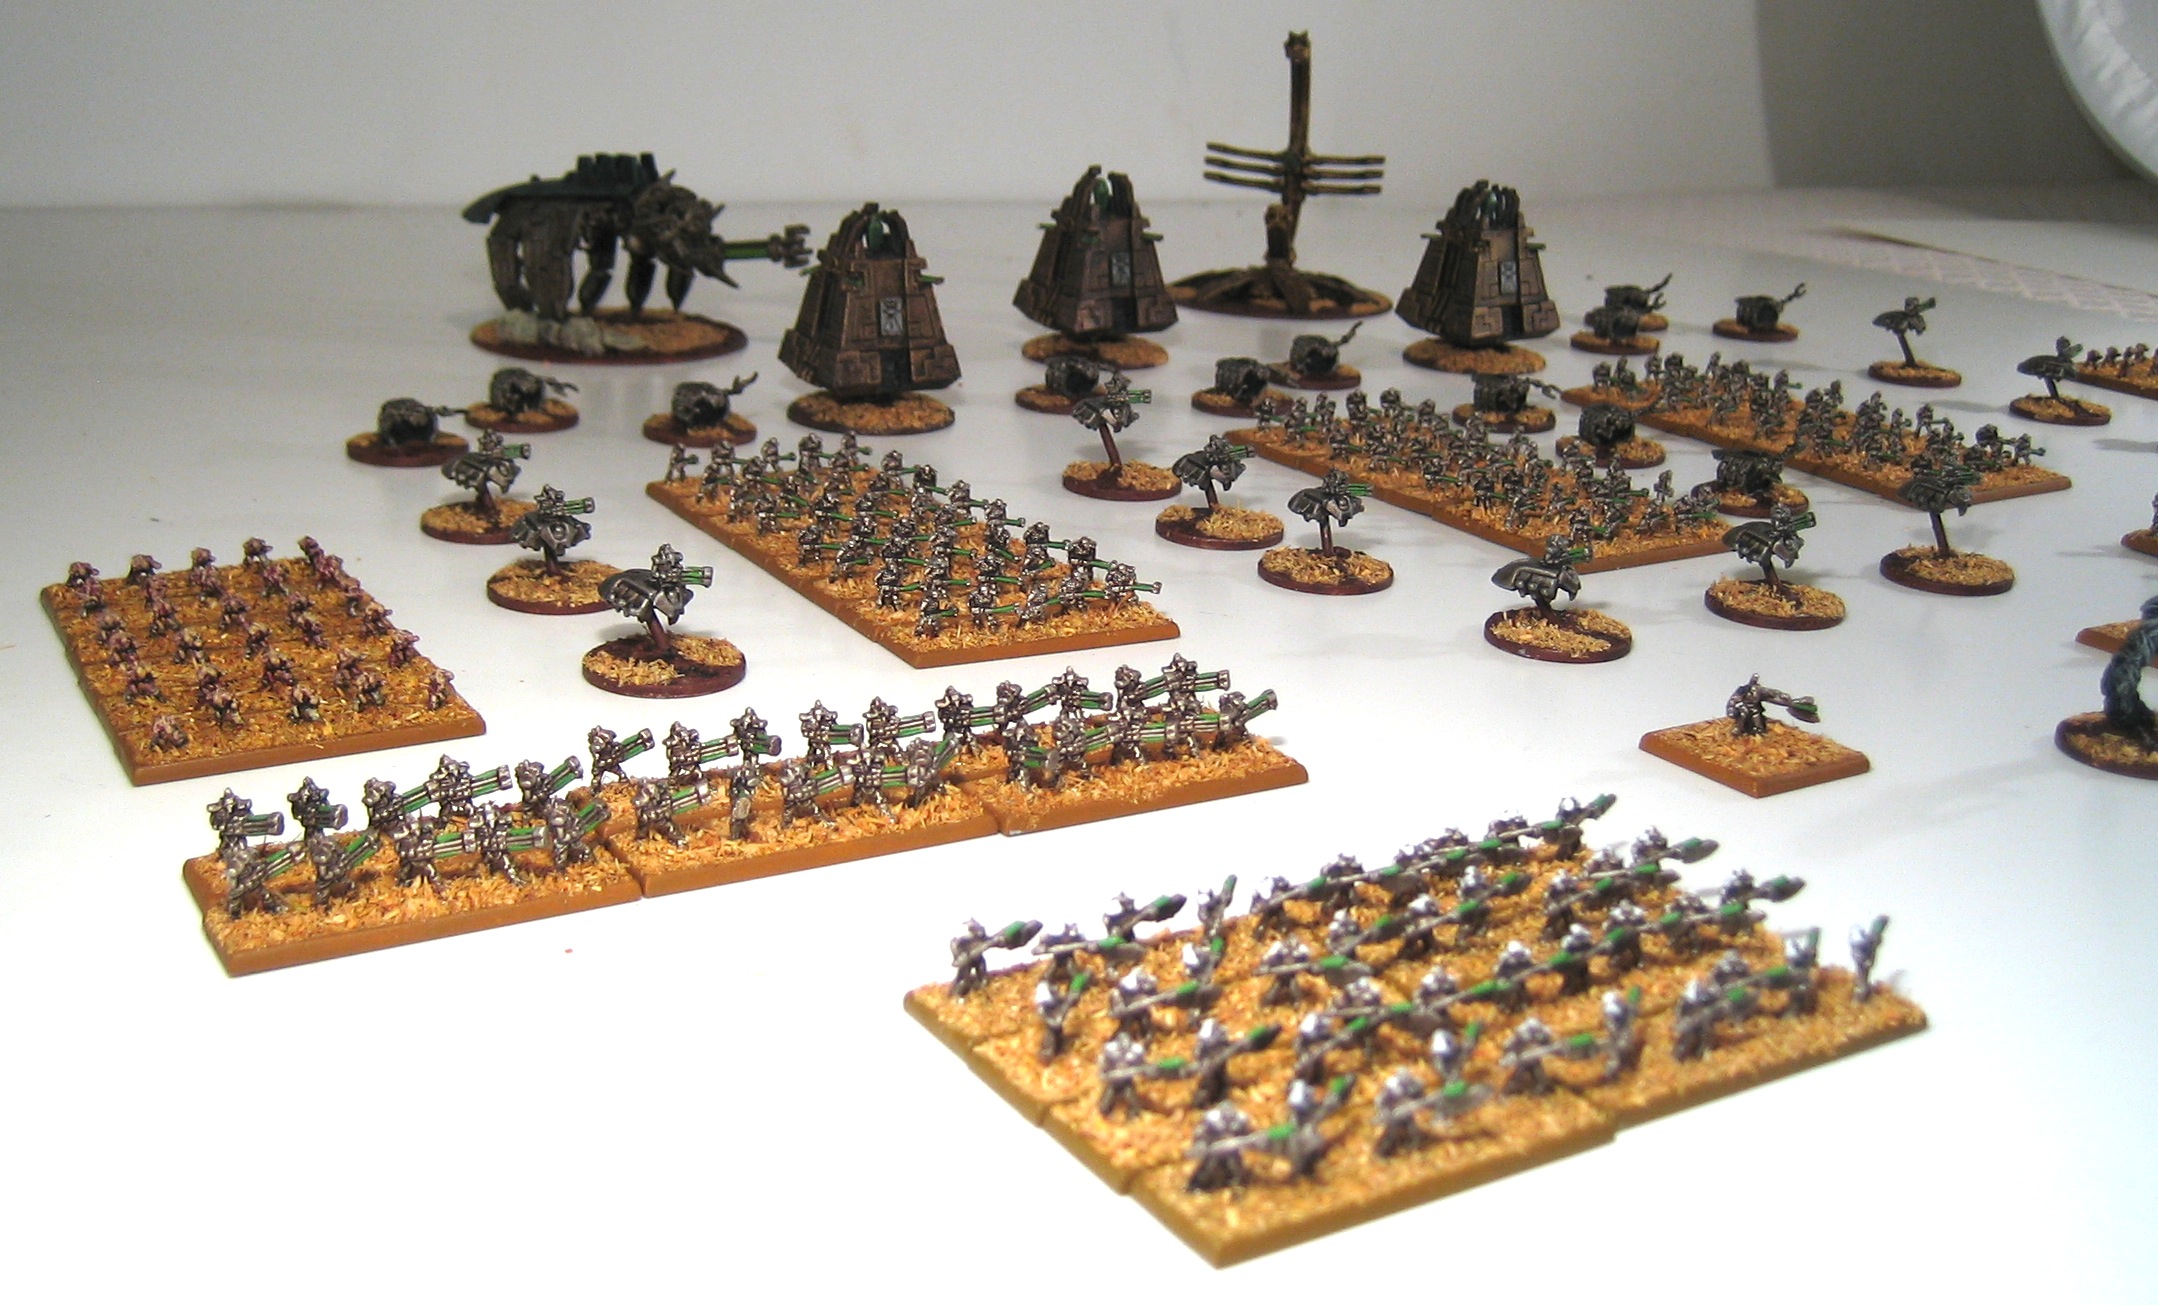
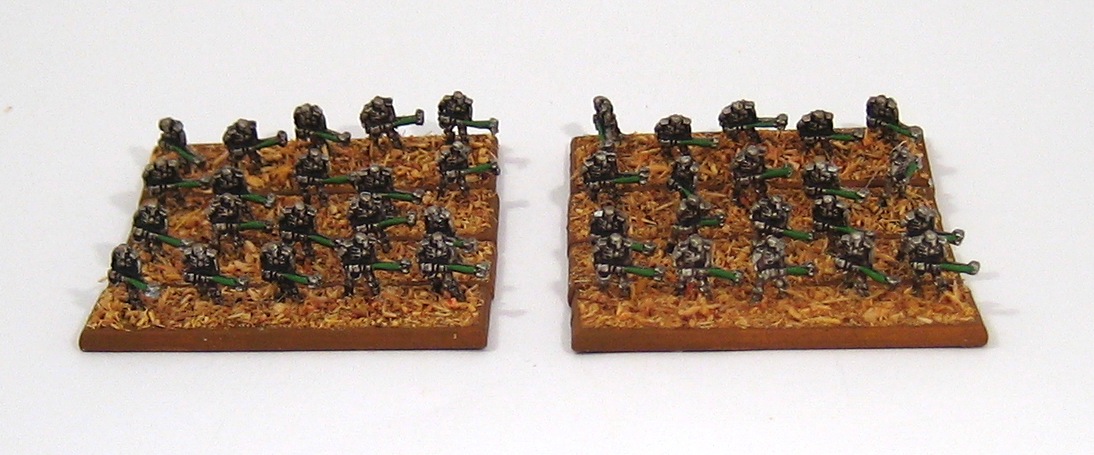
Clearing the backlog #5: Epic Necrons assembled!
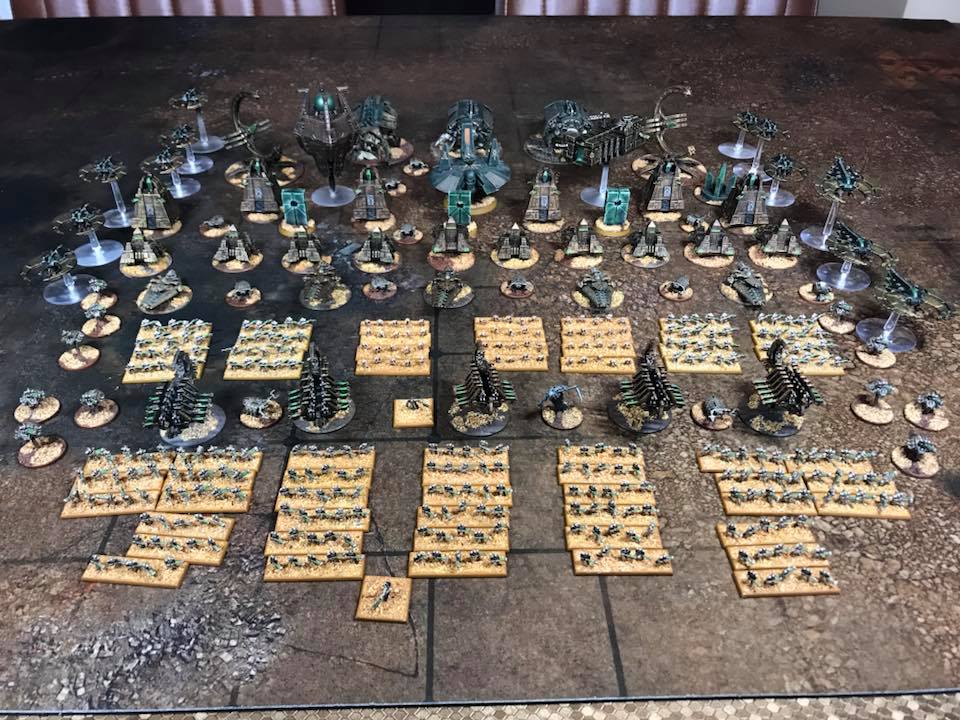
I played a game with my Epic Necrons a couple of weeks ago, and since I'd got all the models out of storage to assemble my army, I thought I'd take a moment to get everything out and take some "show us your hordes" style photos.
I still have some Canoptek Wraiths and some more Immortals to paint and add to the army. I'd also like some more Monoliths but I'm not sure I can get some that are the same design as the ones I have.
Also, check out my Necron fleet for Battlefleet Gothic and my 40K Necron army!
More pictures below.
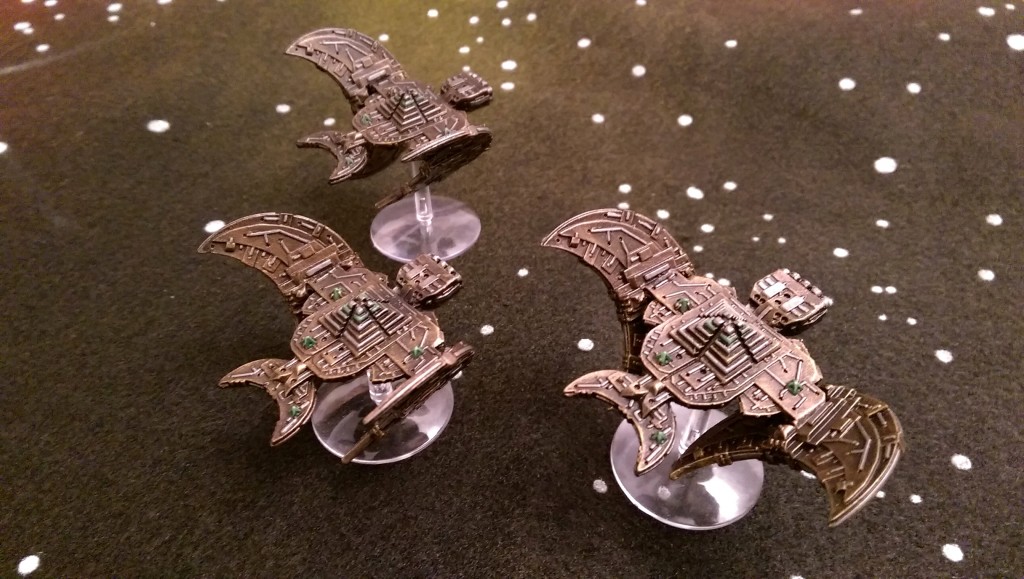
Clearing the backlog #4: Epic Necron Praetorians
The second is a Warbarque:
Clearing the backlog #3: Necron Pylon
My birthday treat to myself last year was this, a Necron Pylon from Forge World. It was a fun challenge to get the paint job to match that of my other 40K Necron models, some of which are now over 5 years old, using a different palette of paints (since GW changed their paint range and I've started using a lot more paints from other manufacturers). But I'm very happy with how it turned out!
Clearing the backlog #2: Epic Necron Aircraft
Here are some Doom Scythes and Night Shroud bombers for my Epic Necron army. I love these models - they are beautiful and very easy to paint, and they are an absolute menace on the battlefield! So much so that I added another squadrom of Doom Scythes to bring the total up to four squadrons of flyers for my Necrons, who haven't lost a battle since I started using them.
I've become a big fan of the Hawk Wargames "widgets" which are perfect for miniatures that use flight stands: simply glue the widget to the underside of the model and it will provide a high grip push-in plug for 3mm flight stand poles. The model won't wobble during games, and the flight stand can simply be pulled from the widget at the end of your games, allowing the stand to be packed separately. And only 13p each!
Epic Necron Ghost and Doomsday Arks
My friends and I are planning a big all-day Epic game next month and I decided that I needed to reinforce my Necron army. I picked up some Ghost Ark proxies from eBay - turns out I need another couple in order to field two legal units! D'oh!
I also painted up some more kitbashed Doomsday Arks, similar to ones I made a while back.
More pictures below.
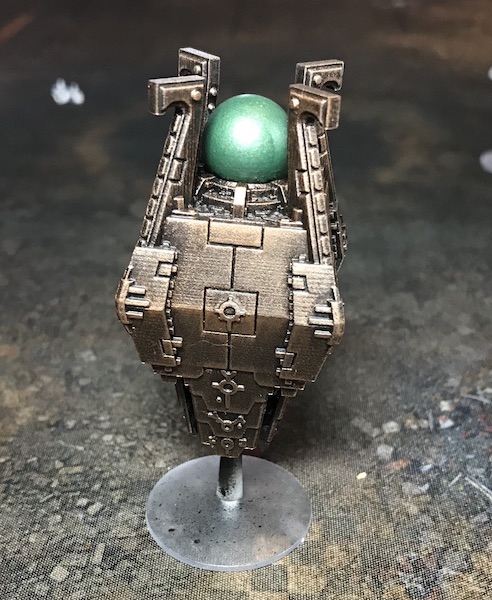
Battlefleet Gothic Necron Fleet, Resurrected
You may recall that last year I painted a Cairn-class Tomb Ship, which inspired my to repaint the other ships in my fleet. Well, there they all are!
The colour scheme is based on the same bronze and gold scheme I’ve used on my Epic- and 40K-scale Necrons, so there is consistency across all three games.
More pics below.
Classic Necron Lords

Here is a pair of classic metal Necron lords. I picked them up in a bag-o-bits that I bought from vidpui on Twitter, as a result I've customised them a little bit.
I'm rather pleased with how the cloaks turned out; although the effect doesn't really come over in the photos. I drybrushed them with a sequence of greys of various shades, then mixed a glaze using the ancient blue ink I used on the C'tan shard with some Vallejo Model Air yellow and painted it over the grey. I then highlighted the raised areas with a bright, slightly metallic green.
More pics below the fold.


Battlefleet Gothic Necron Cairn-class Tomb Ship
I picked this model up for a (relative) song on eBay. A couple of days ago I had a catch-up session with the airbush, to prime a bunch of models that had been sitting there waiting to be painted, and the Cairn was one of them.
I have been thinking about repainting my BFG Necron fleet, which currently has a rather uninspiring paint job, so I tried out a new colour scheme on this model. The scheme is based on the same bronze and gold scheme I've used on my Epic- and 40K-scale Necrons, so there is consistency across all three games.
More pics below!
My Completed Warhammer 40,000 Necron Army
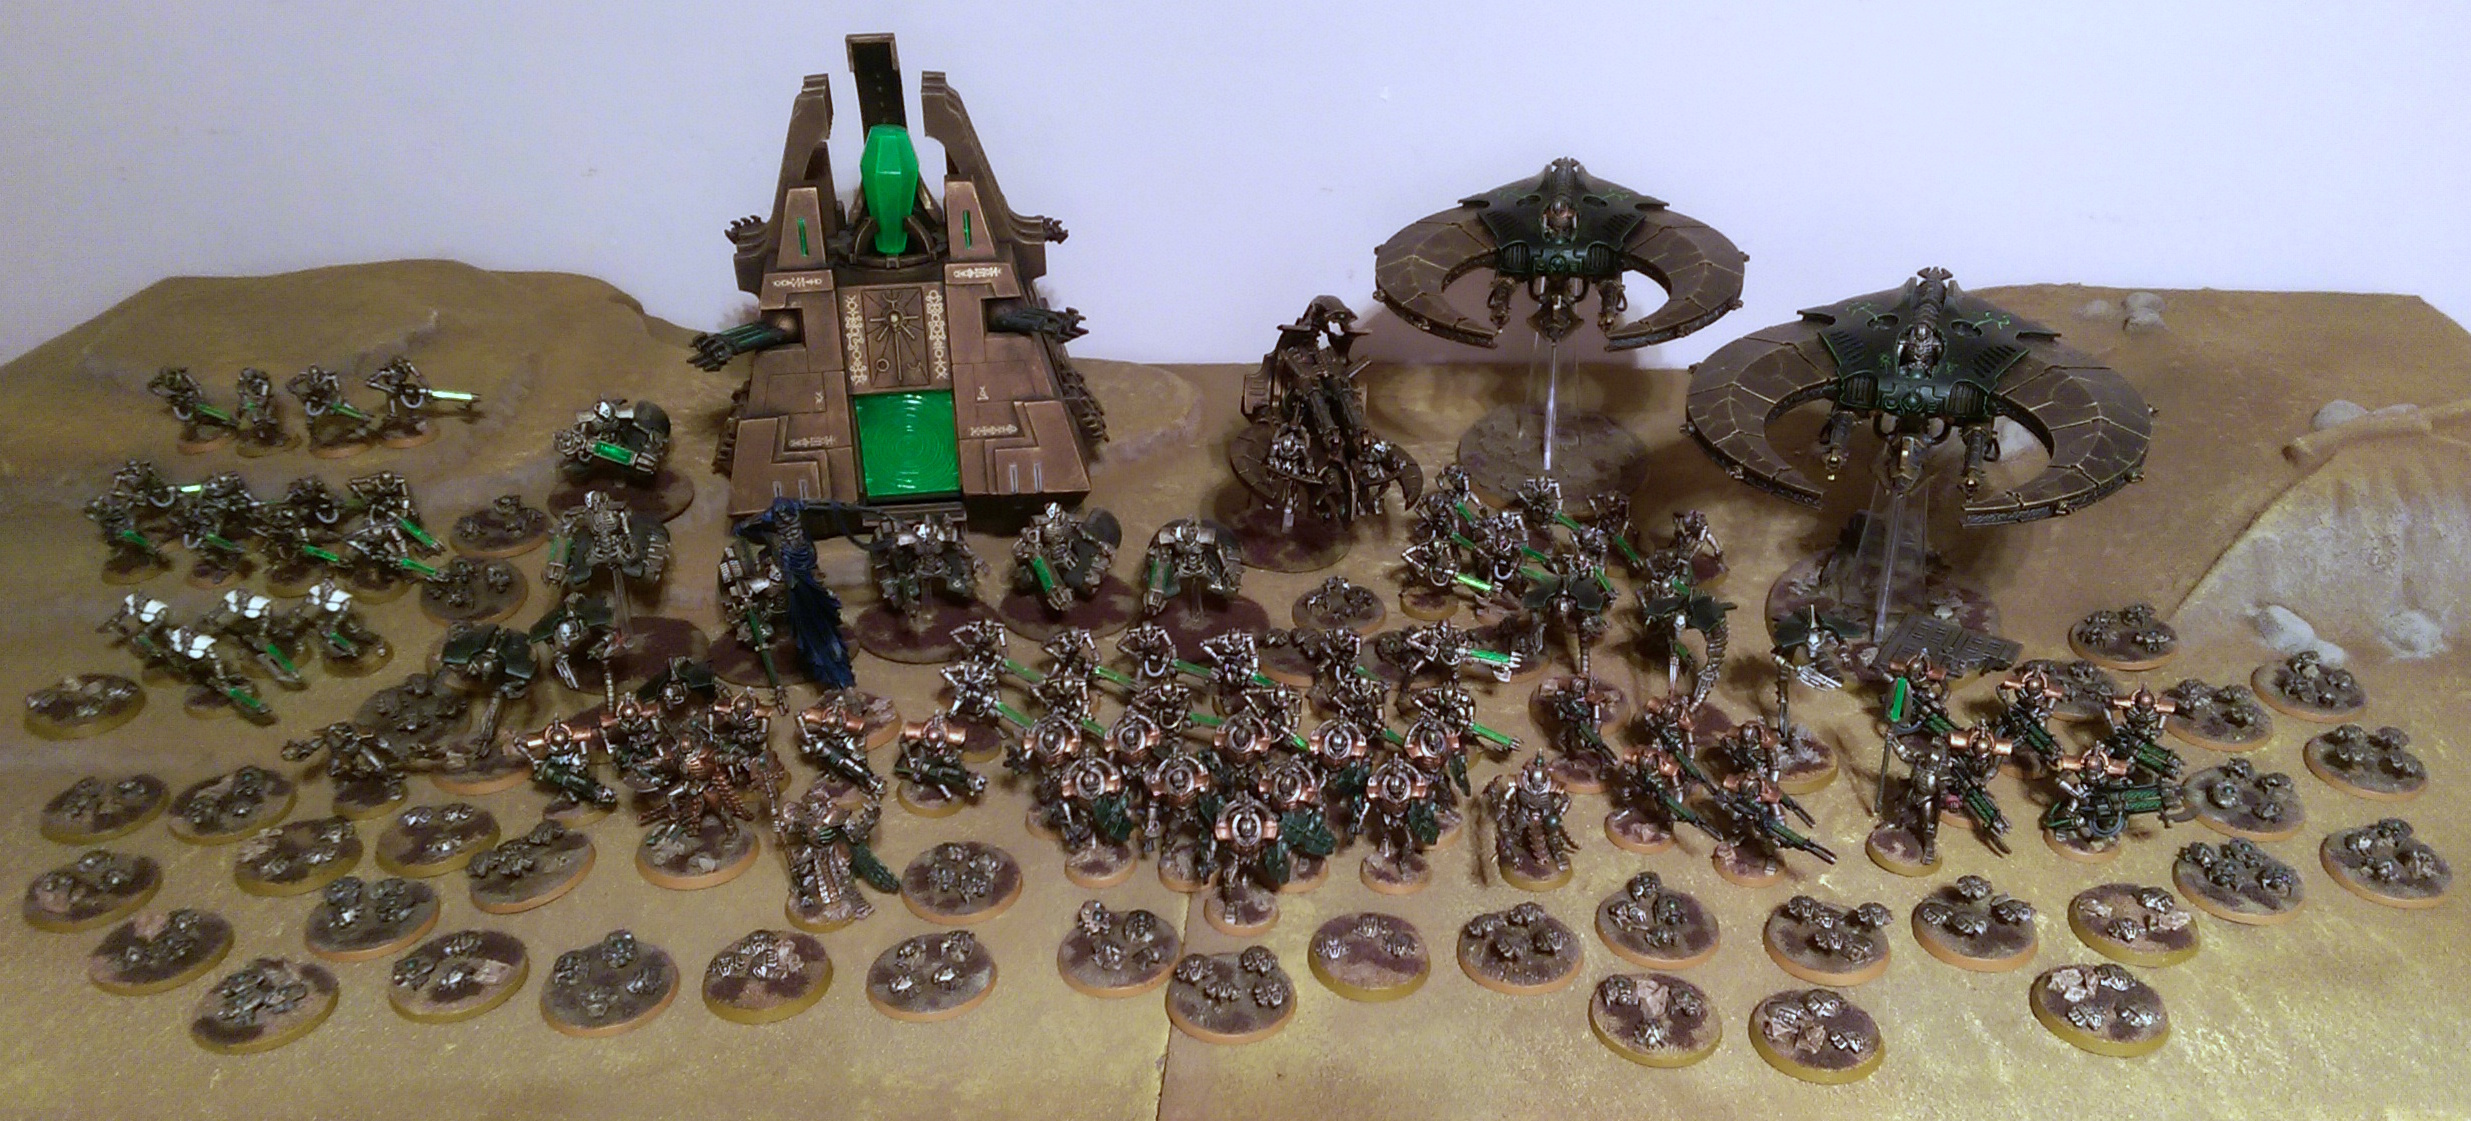
Here is my Necron army (all 4,000 points of it), completed after nearly six years (I started it in late 2009).
Obviously, no army is ever really finished. I expect that I will probably buy and paint new pieces as the whim takes me, but I now have enough stuff that I can have a few options when playing at 1,500 points and higher (rather than simply taking everything I own).
More pictures below the fold.
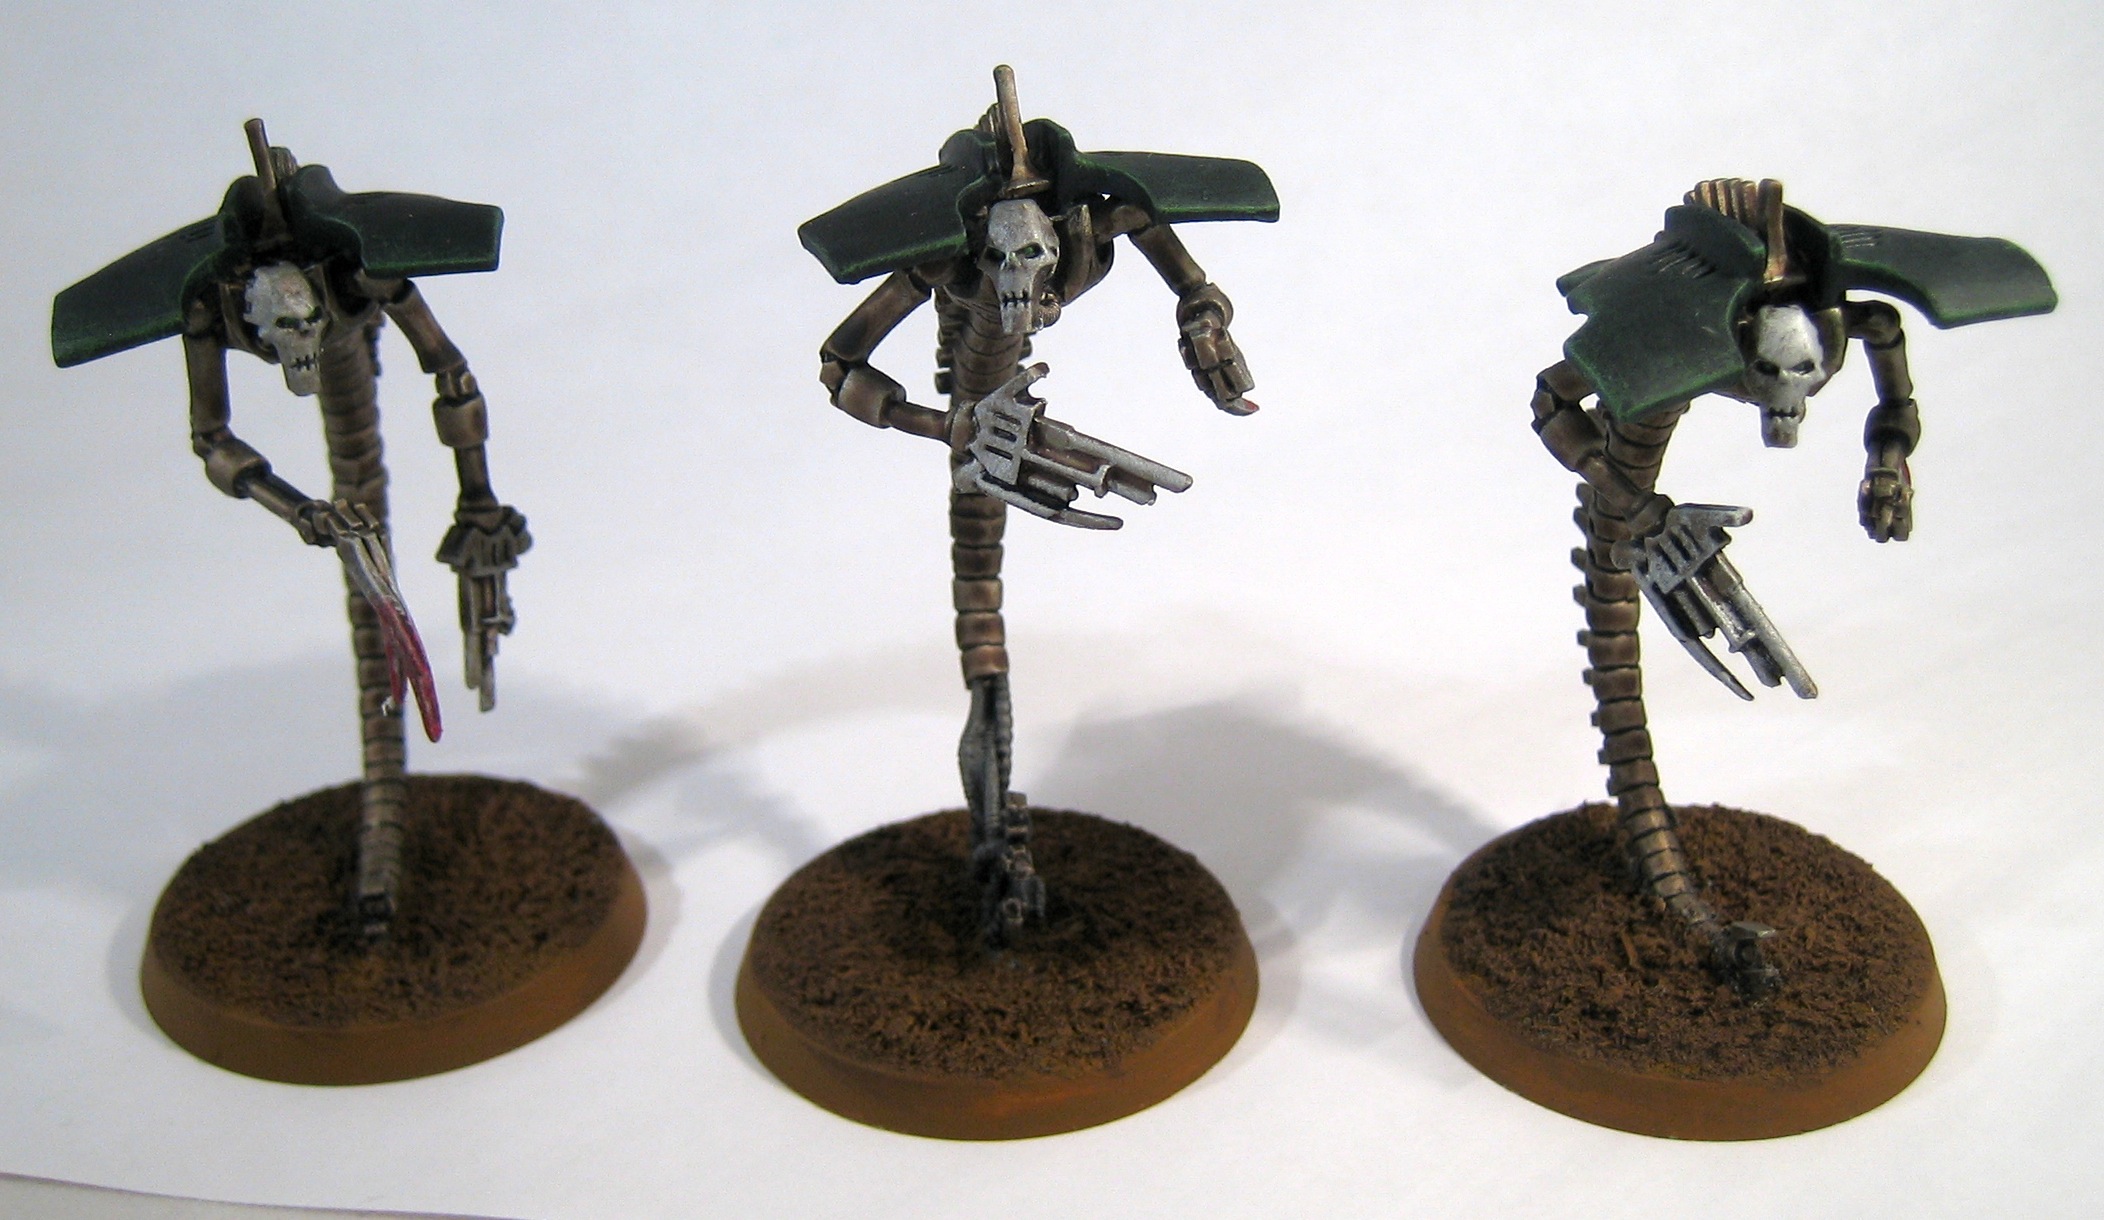
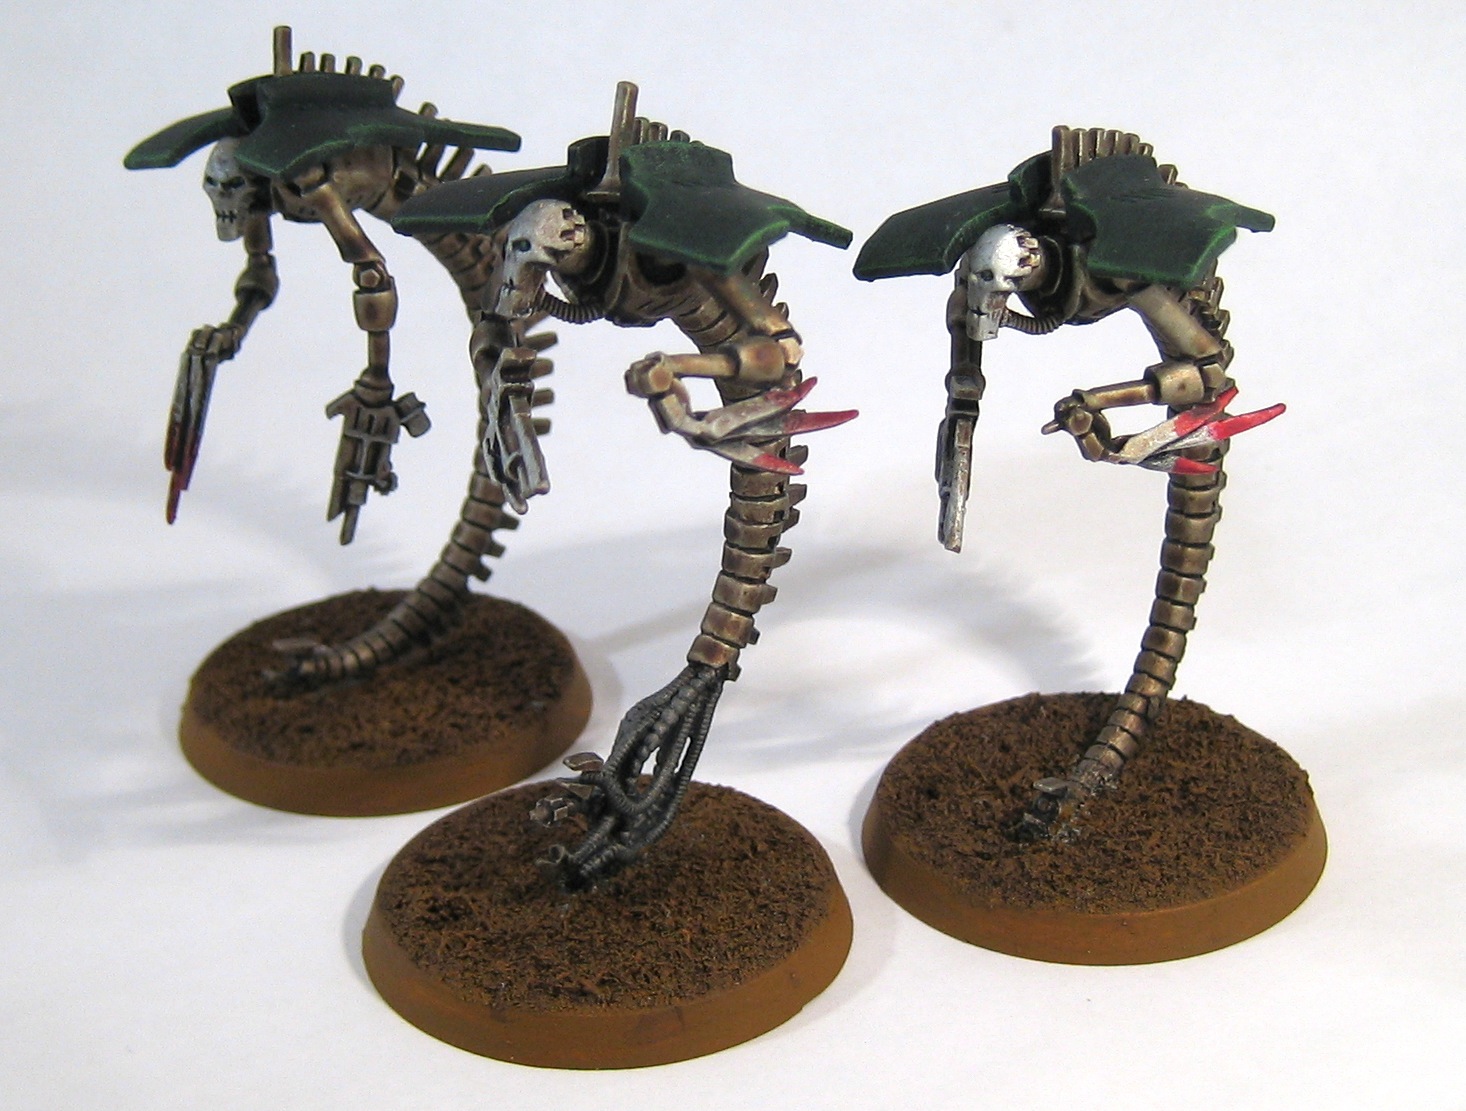
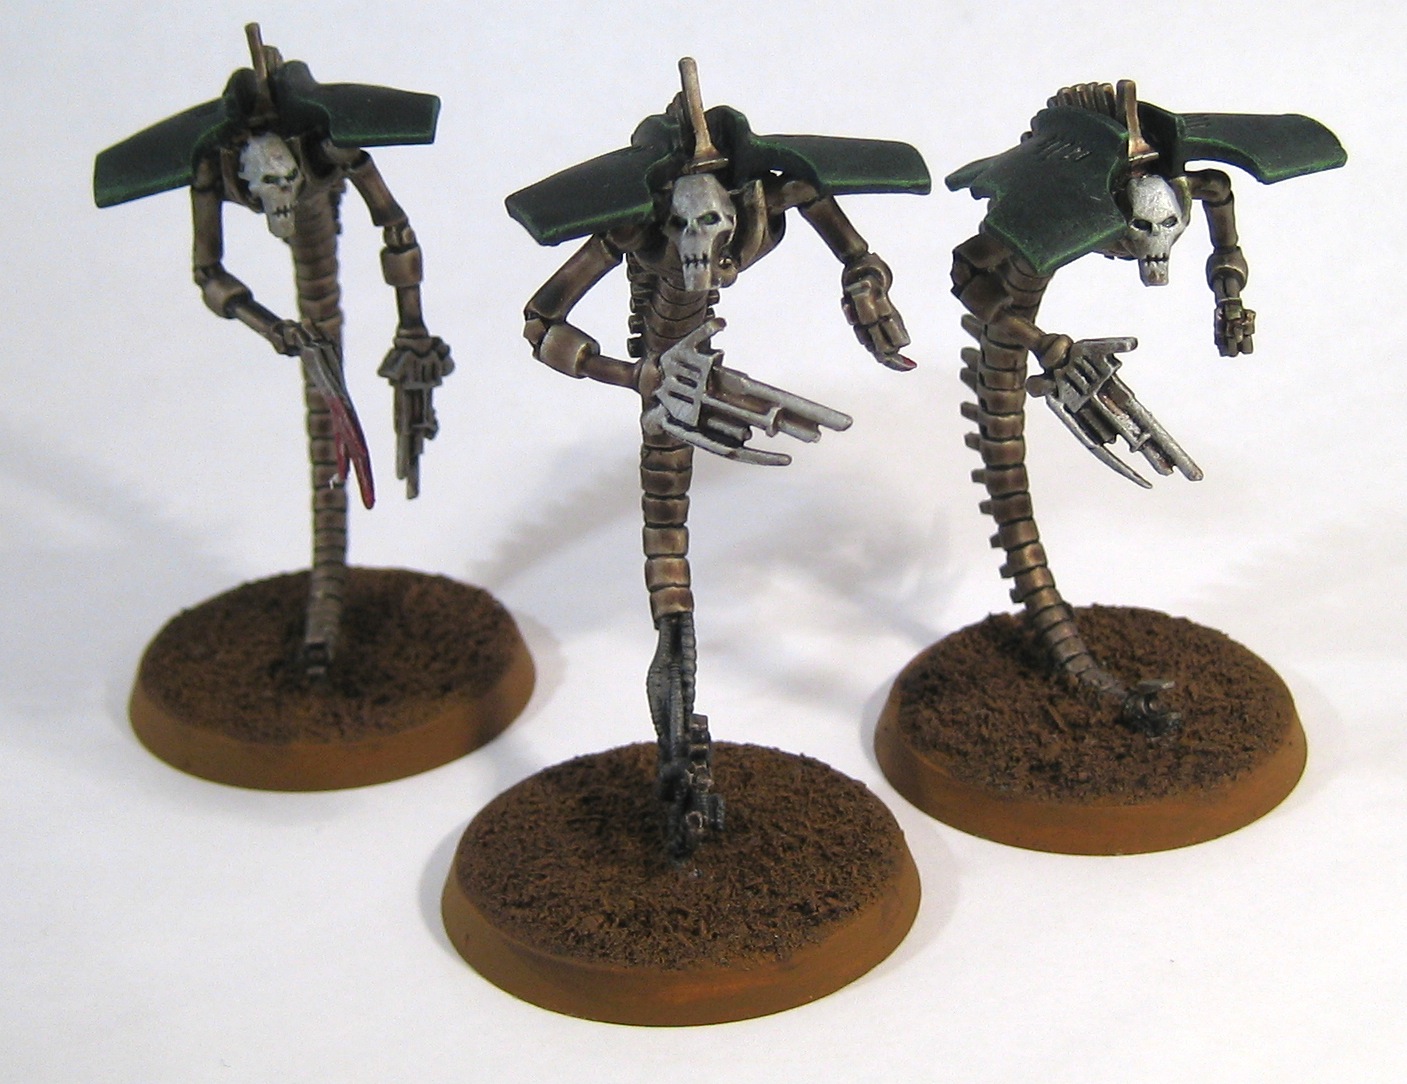
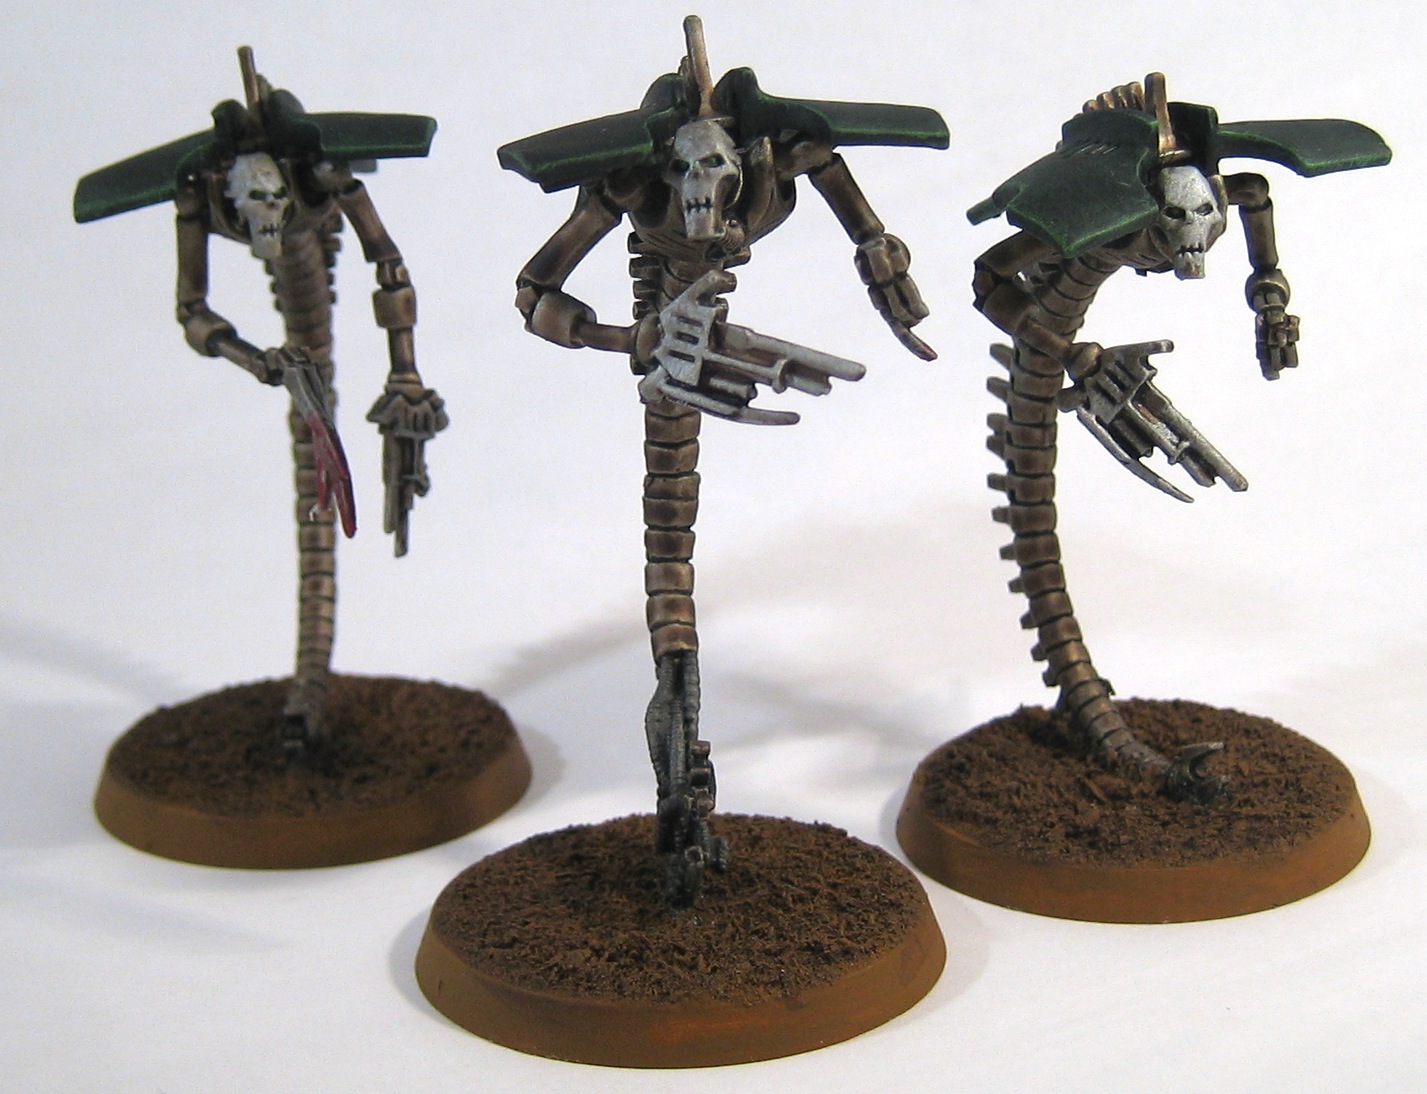
Necron Triarch Praetorians
Here's the last of the infantry reinforcements for my Necrons. The Voidblades on these Triarch Praetorians were a bugger to paint and in the end I pretty much just gave up on them. But they look OK if you don't look too closely!
Now I just need to paint the Night/Doom Scythe, and I can finish this project and get stuck into some Epic!
3,000 Point NetEpic Necrons versus Eldar
Some photos from the game are below. My army was:
- Venator Legion:
- 1x Necron Lord
- 1x Warrior Phalanx (8 stands)
- 1x Immortal Phalanx (6 stands)
- 1x Monolith Triceps (3 Monoliths)
- Immortal Phalanx (6 stands)
- Monolith Triceps (3 Monoliths)
- Doomsday Ark Triceps (3 Doomsday Arks)
- Praetorian Phalanx (4 stands)
- Praetorian Phalanx (4 stands)
- C'tan Shard
Preparing for tomorrow's game. The harvester legion awakens... pic.twitter.com/K6ju4YOLDv
— Jodrell (@J_Plays_Games) February 14, 2015
And this is what it looks like. Just need to get those tanks painted tonight! pic.twitter.com/PuwobAMlKx
— Jodrell (@J_Plays_Games) February 14, 2015


Necron Overlord

Here is my version of the new Necron Overlord released with the new codex. The new rules allow you to equip your Overlord with any wargear you like so I took a couple of bits from my bits box to make him unique.
He's on a 40mm base which I think works quite well for characters. I'm tempted to rebase some of my other characters on the same size base so that he doesn't stick out. He got the same basic paint job as all the other models in the army.
It occurred to me that his pose is somewhat reminiscent of Usain Bolt's signature pose, what do you think?

More pictures below.


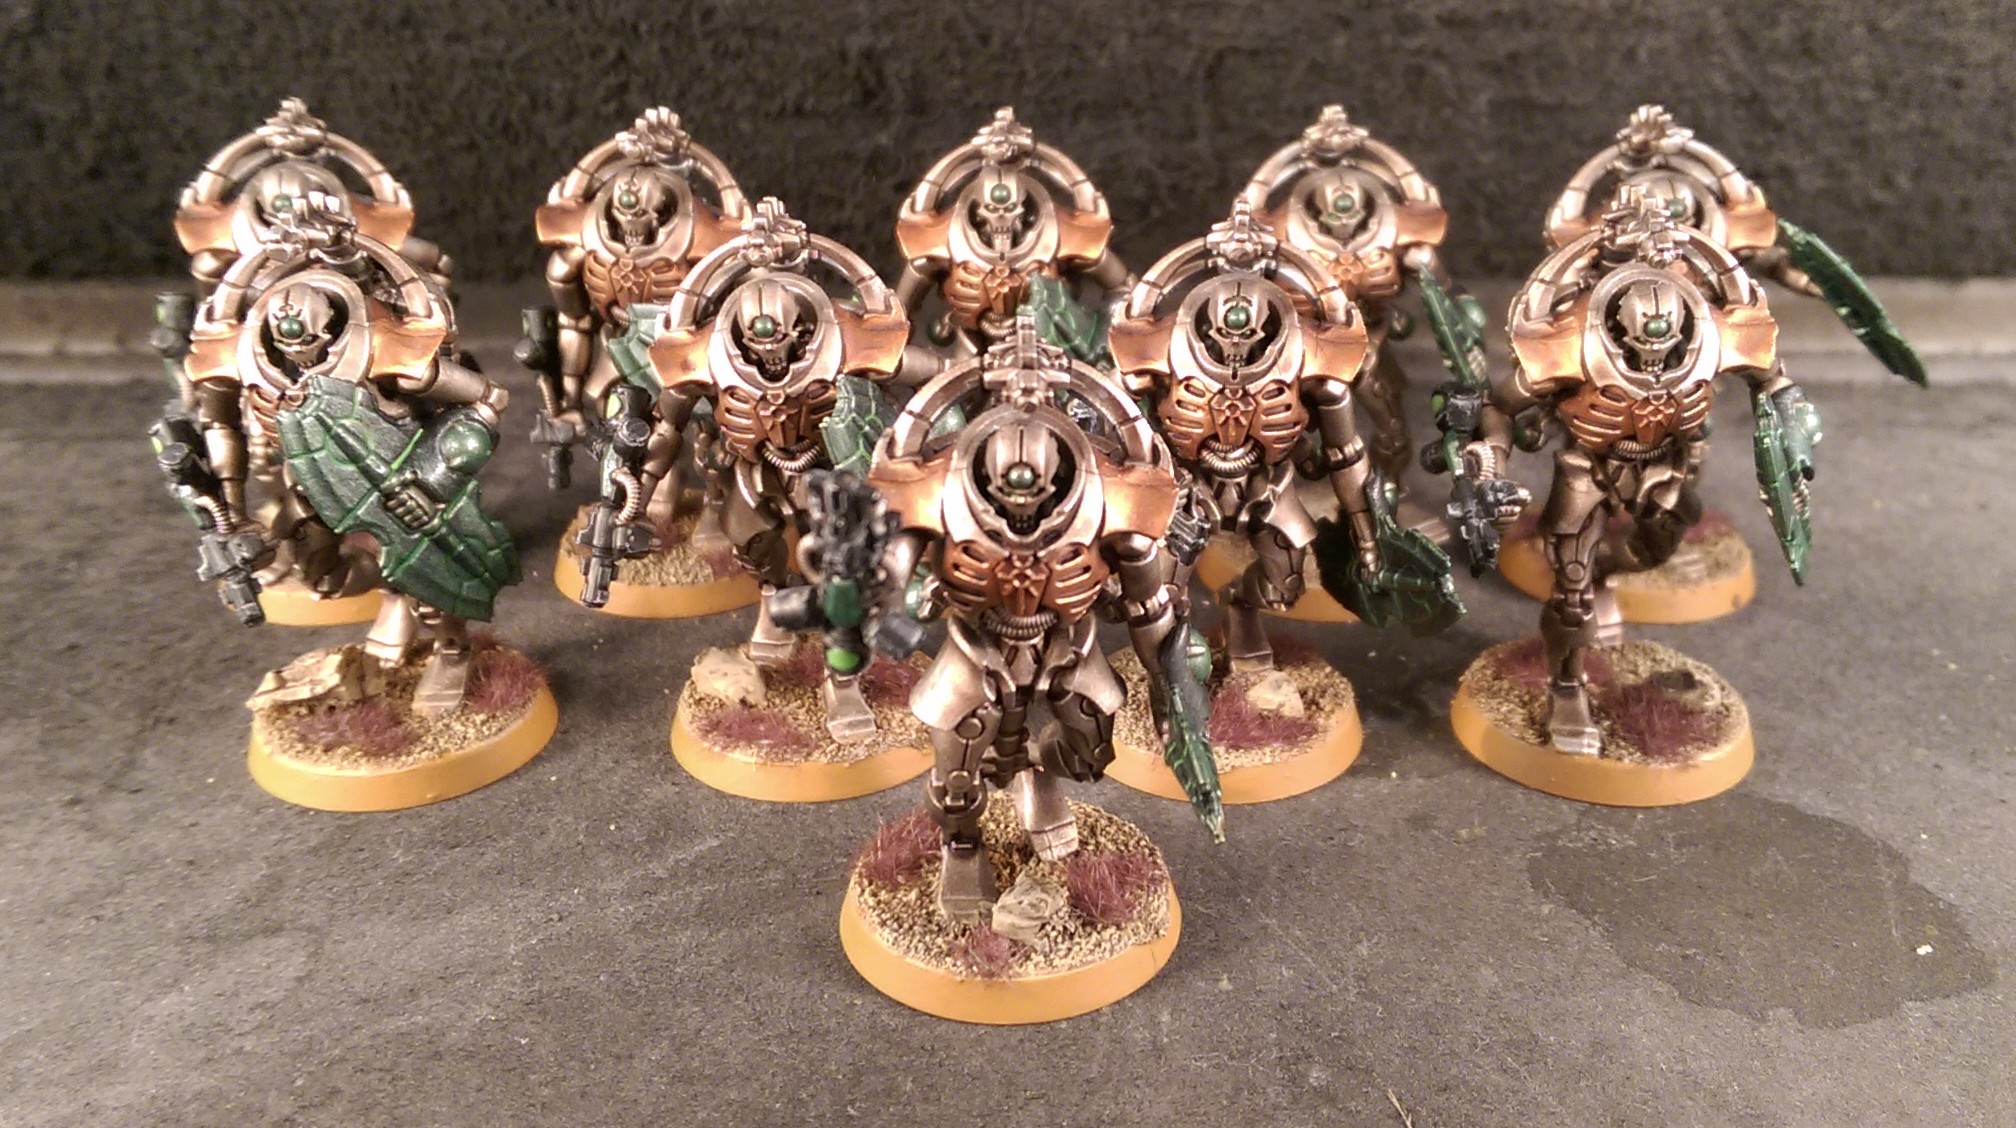
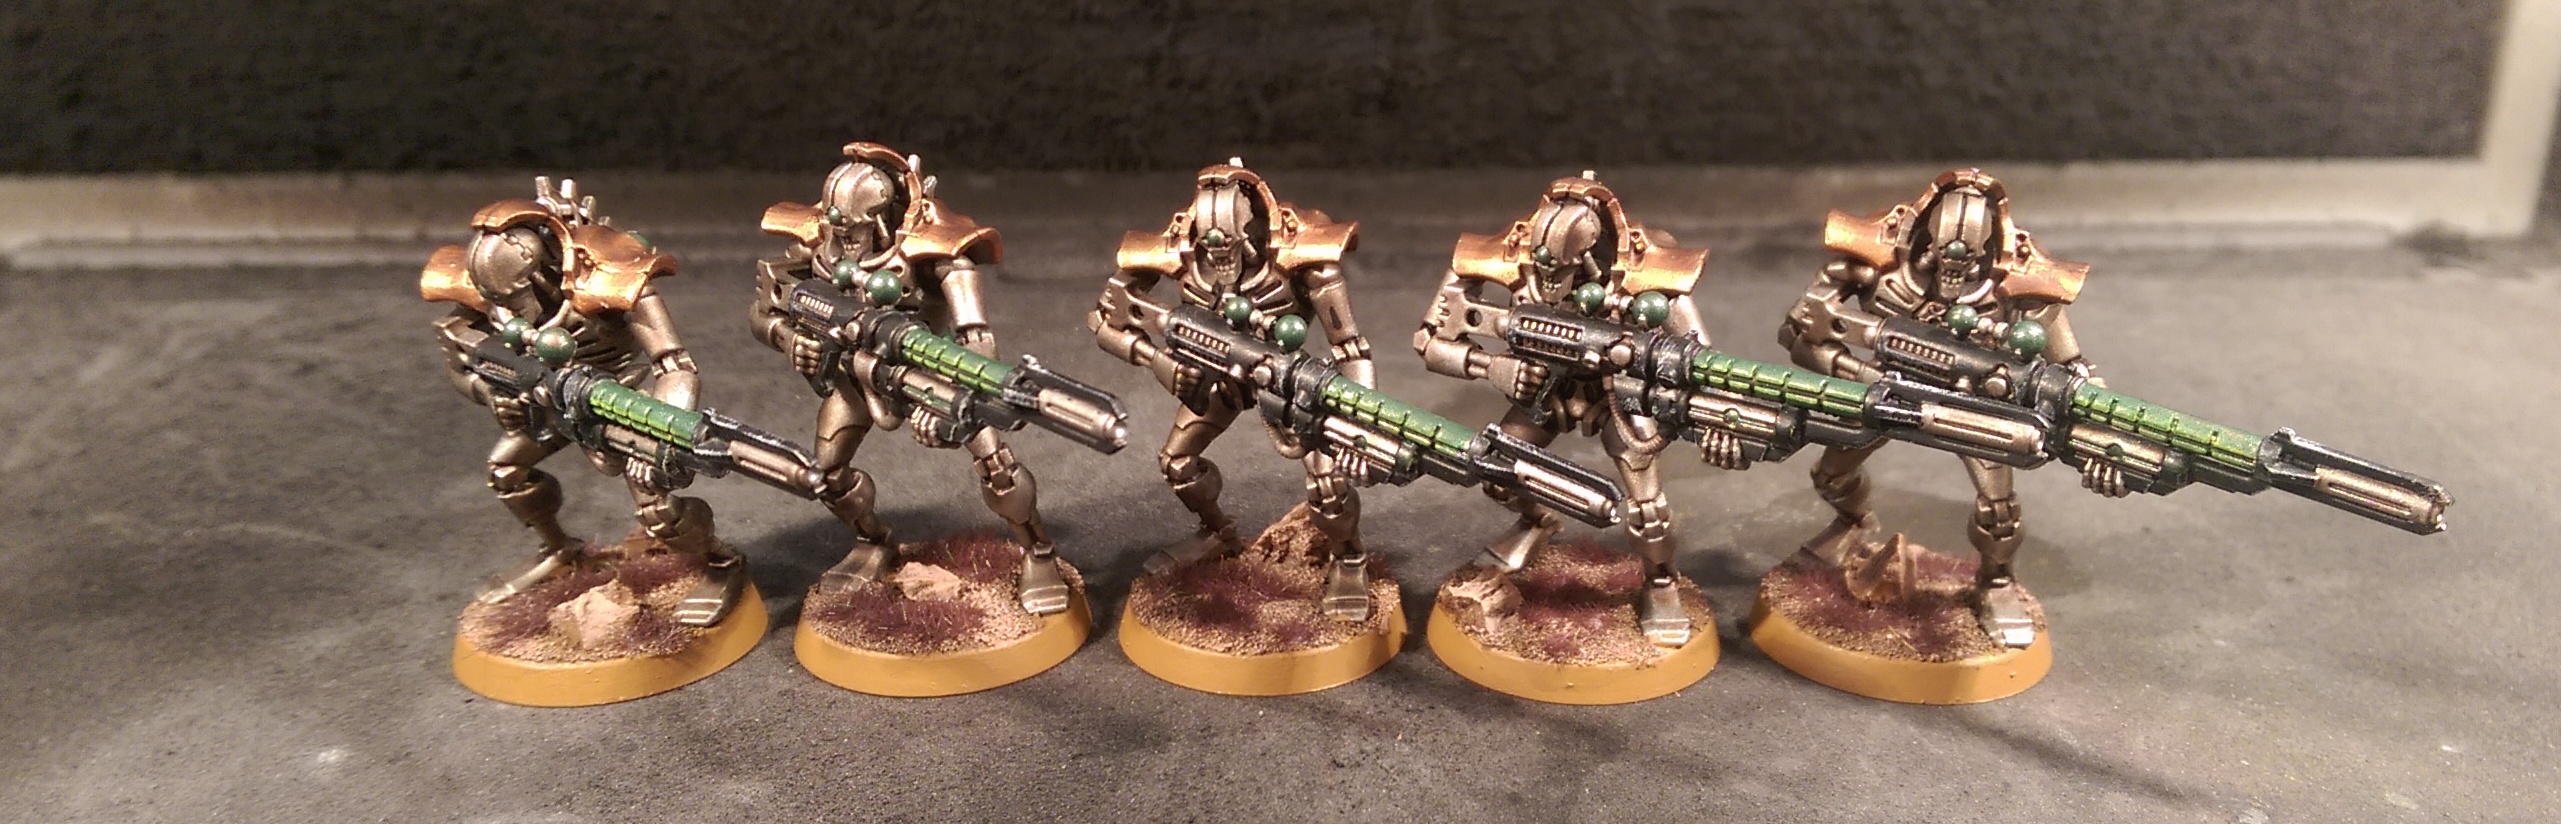
Necron Immortals

Nothing especially unusual about these guys. I already have a unit of Immortals with Tesla Carbines so I chose to give these guys Gauss Blasters for diversity purposes.
The Army Painter Chainmail spray went on a bit too thick in places — I've been spoiled by my airbrush — and a couple of the models have distinctly featureless faces. I decided against repainting for the simple reason that although I'm a big fan of Necrons, my aim with this wave of reinforcements is to get the army into a usable state, rather than produce a work of art.
More to follow...
Necron Deathmarks and Old-School Wraiths

I've just finished these models, the next wave of reinforcements for my 40K Necron army.
It's been an interesting experience to paint models to match the colour scheme I developed more than five years ago; getting the green hue on the shoulder blades of the wraiths to match the original models was quite challenging. My ability as a miniature painter has improved a bit in the years since I started my Necron army, and it's interesting to compare "before" and "after", and realise what I would do differently if I were to start again now.
Anyway, these are done now, but I still have a few more models to go: some Immortals (with Gauss Blasters), Triarch Praetorians (with Particle Casters and Voidblades), a Doom/Night Scythe, and a dozen bases of scarabs. Stay tuned!
Kitbashed Epic-scale Necron Skimmer Tank

Years and years ago, someone on the Tactical Command forum posted a photo of a prototype Necron tank, kitbashed from leftover parts from the Lychguard/Triarch Praetorian box. When I saw it, I immediately wanted to build some of my own, but never had access to the parts. But when I bought two boxes of Praetorians for my 40K army, I knew that I'd finally get a chance.
More photos after the jump!
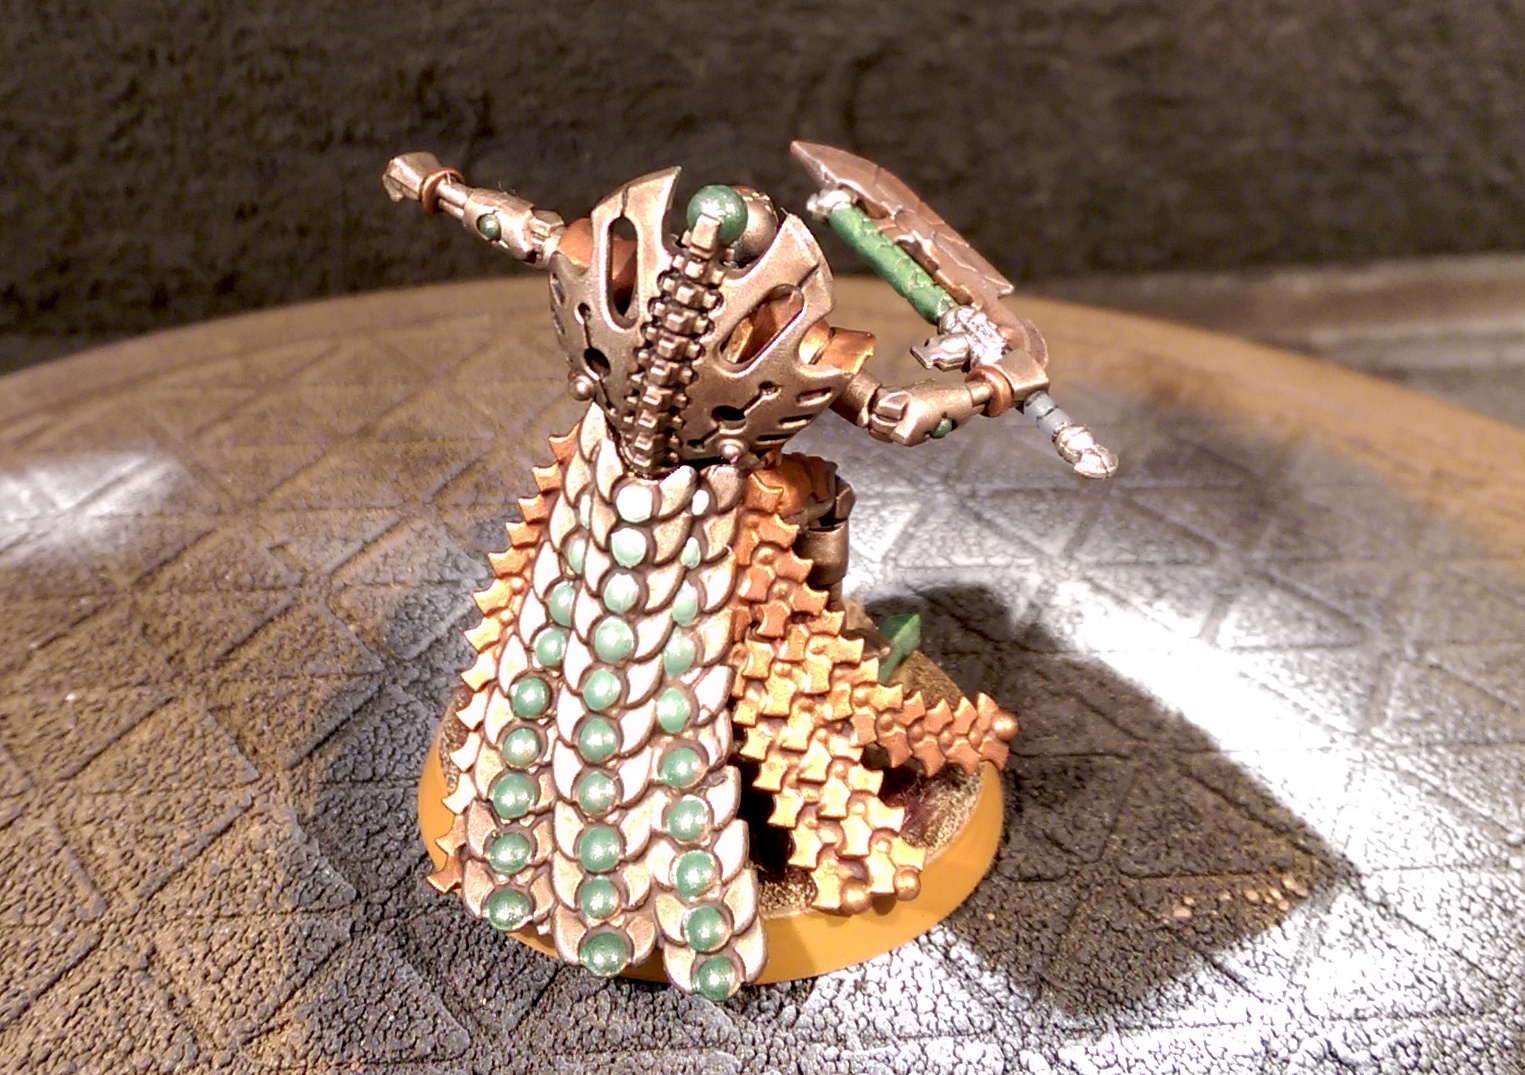
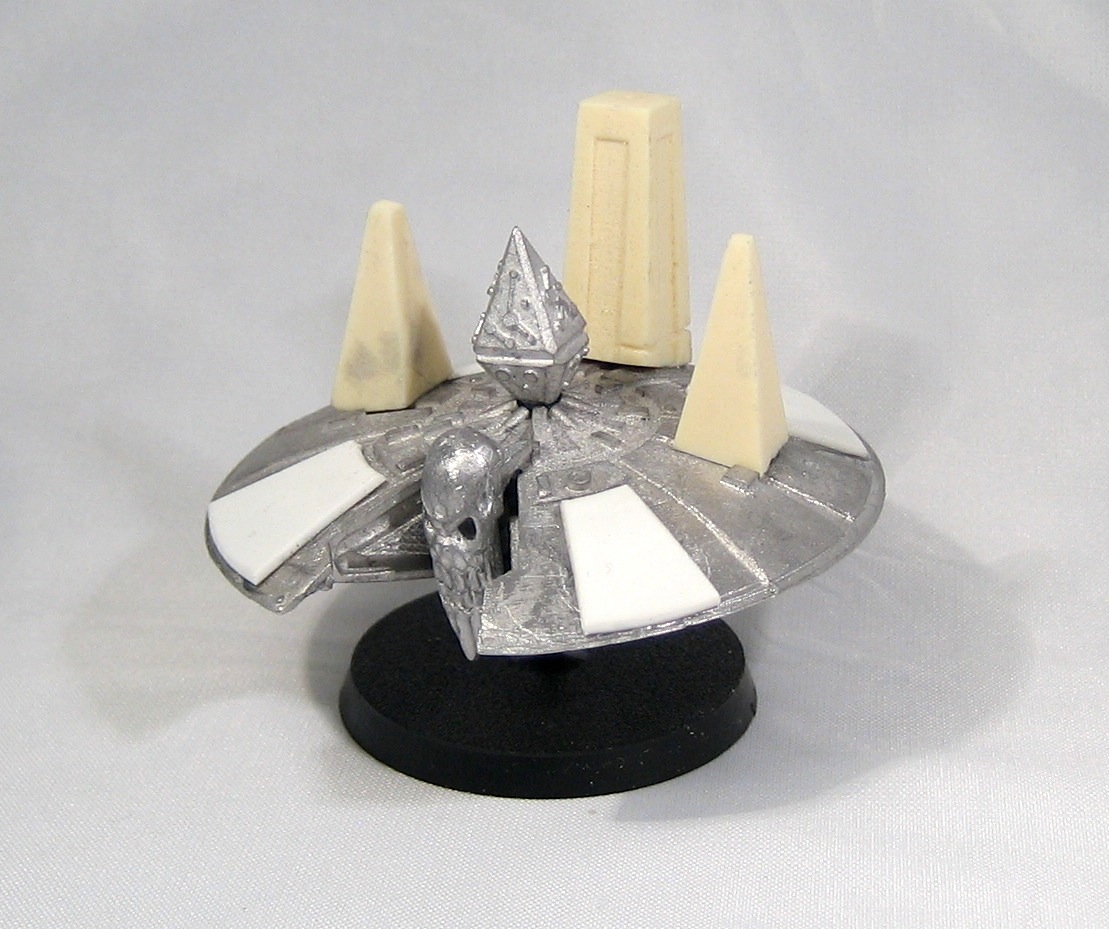
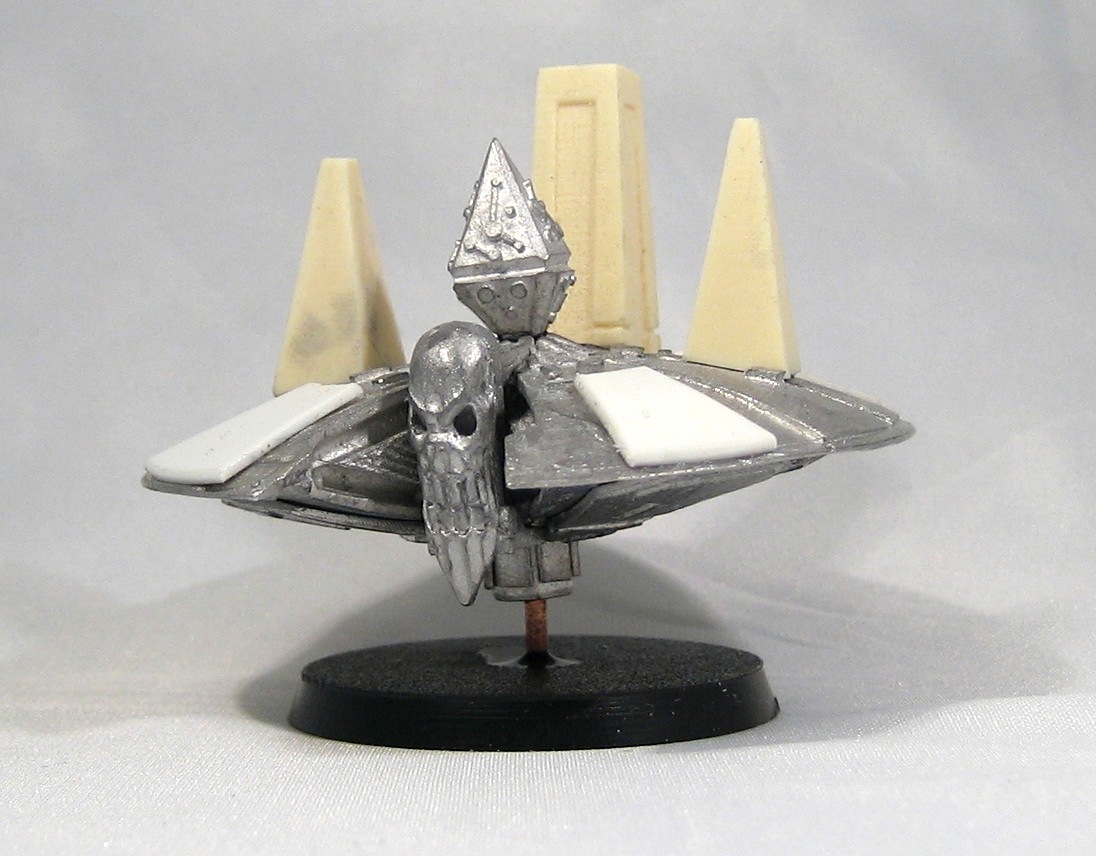
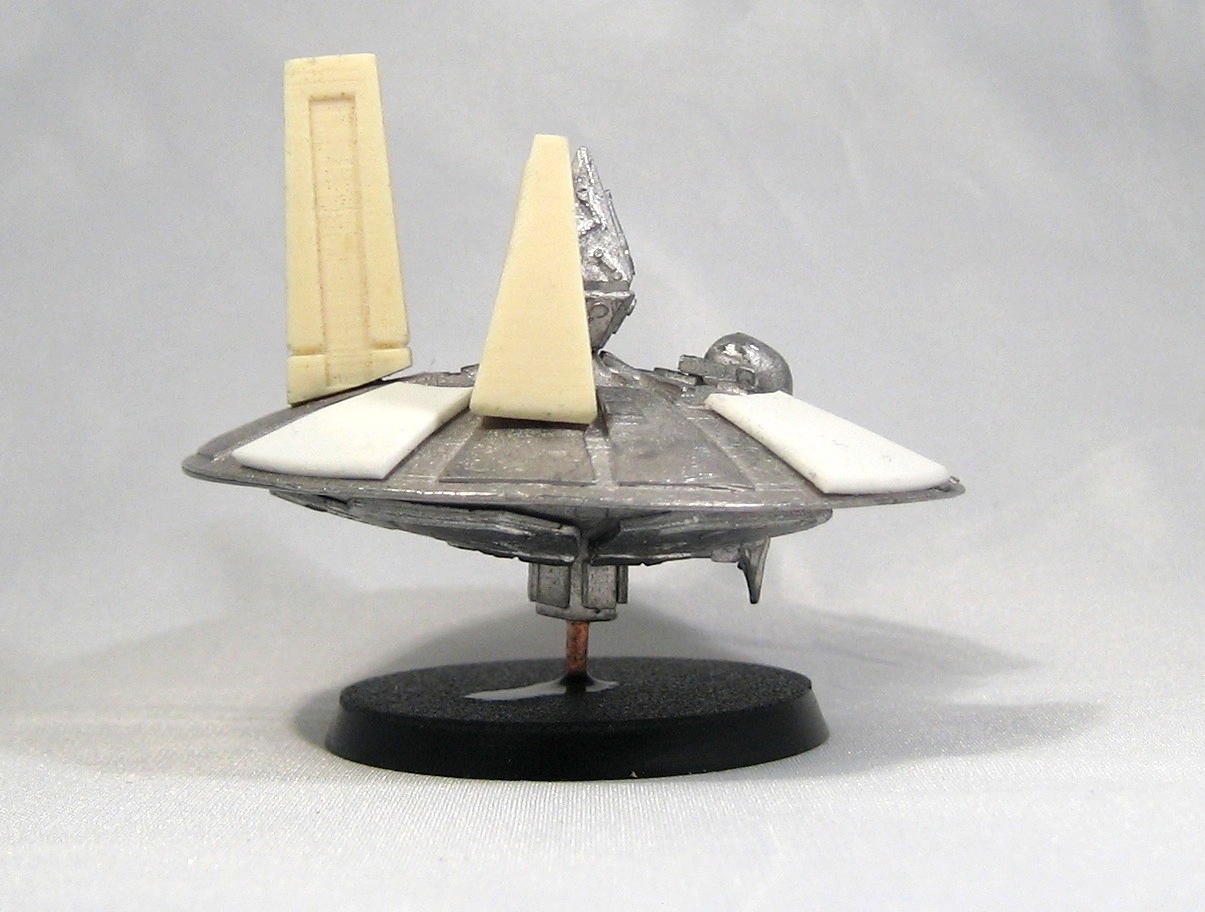
C'tan Shard of the Nightbringer
Here is the first finished model from the wave of reinforcements to my Necron army. I'm fairly pleased with the opalescent effect I accidentally achieved on the robes (which is the result of using an ancient Citadel ink over black drybrushed with grey), but the drybrushing on the torso could be better.
More photos after the jump...
Necron Cryptek
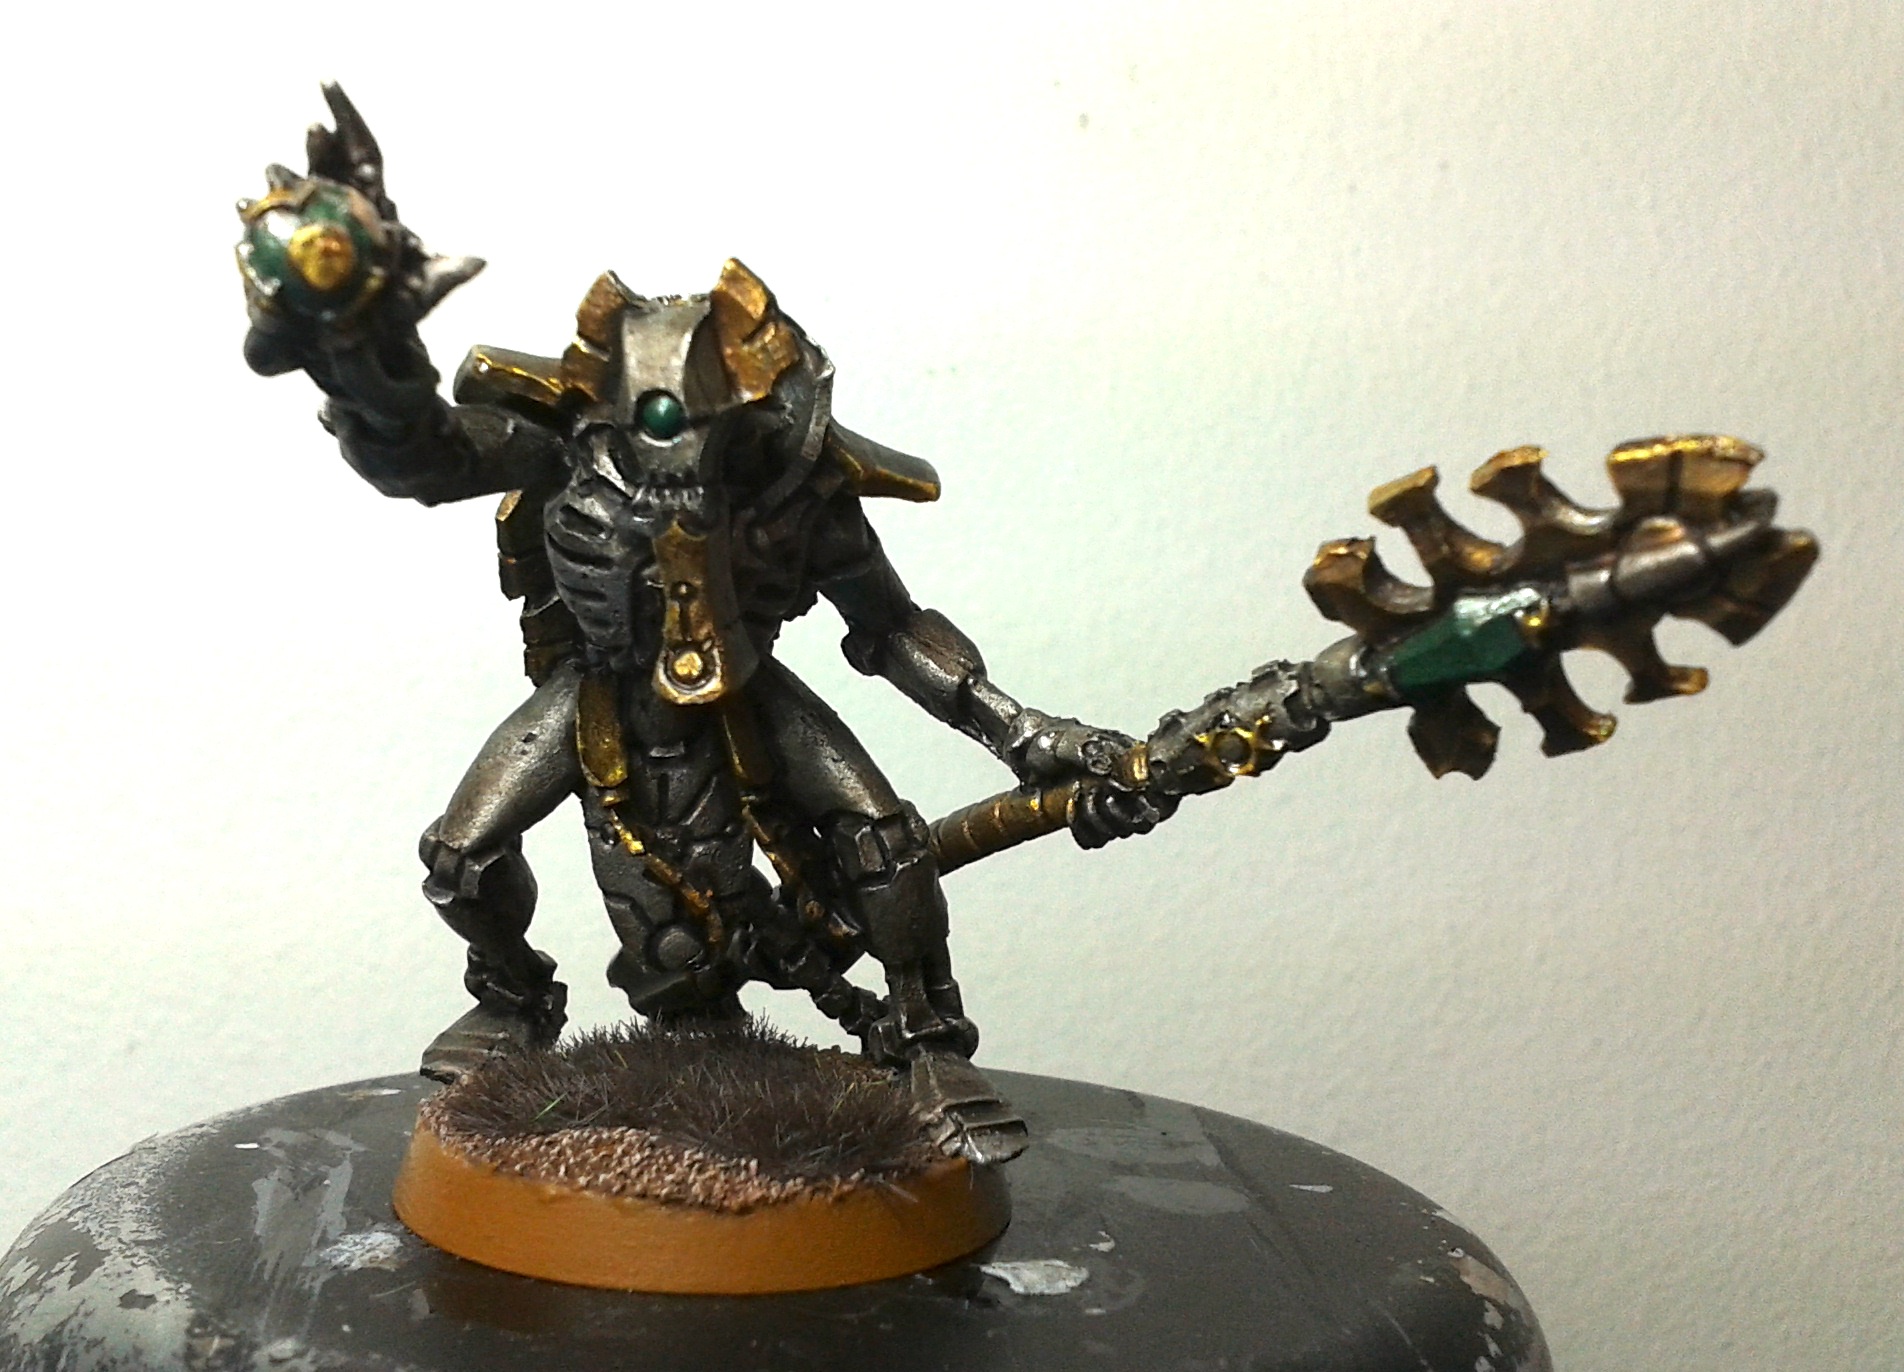
I just finished this Necron Cryptek. Because, y'know, Veil of Darkness is just too much fun not to use in my Necron army.
Paint scheme as per all my other necrons.
New ITEN Necron Retinue List
You can download the list here - if you have any comments, please post them on the Forge Of War forum.
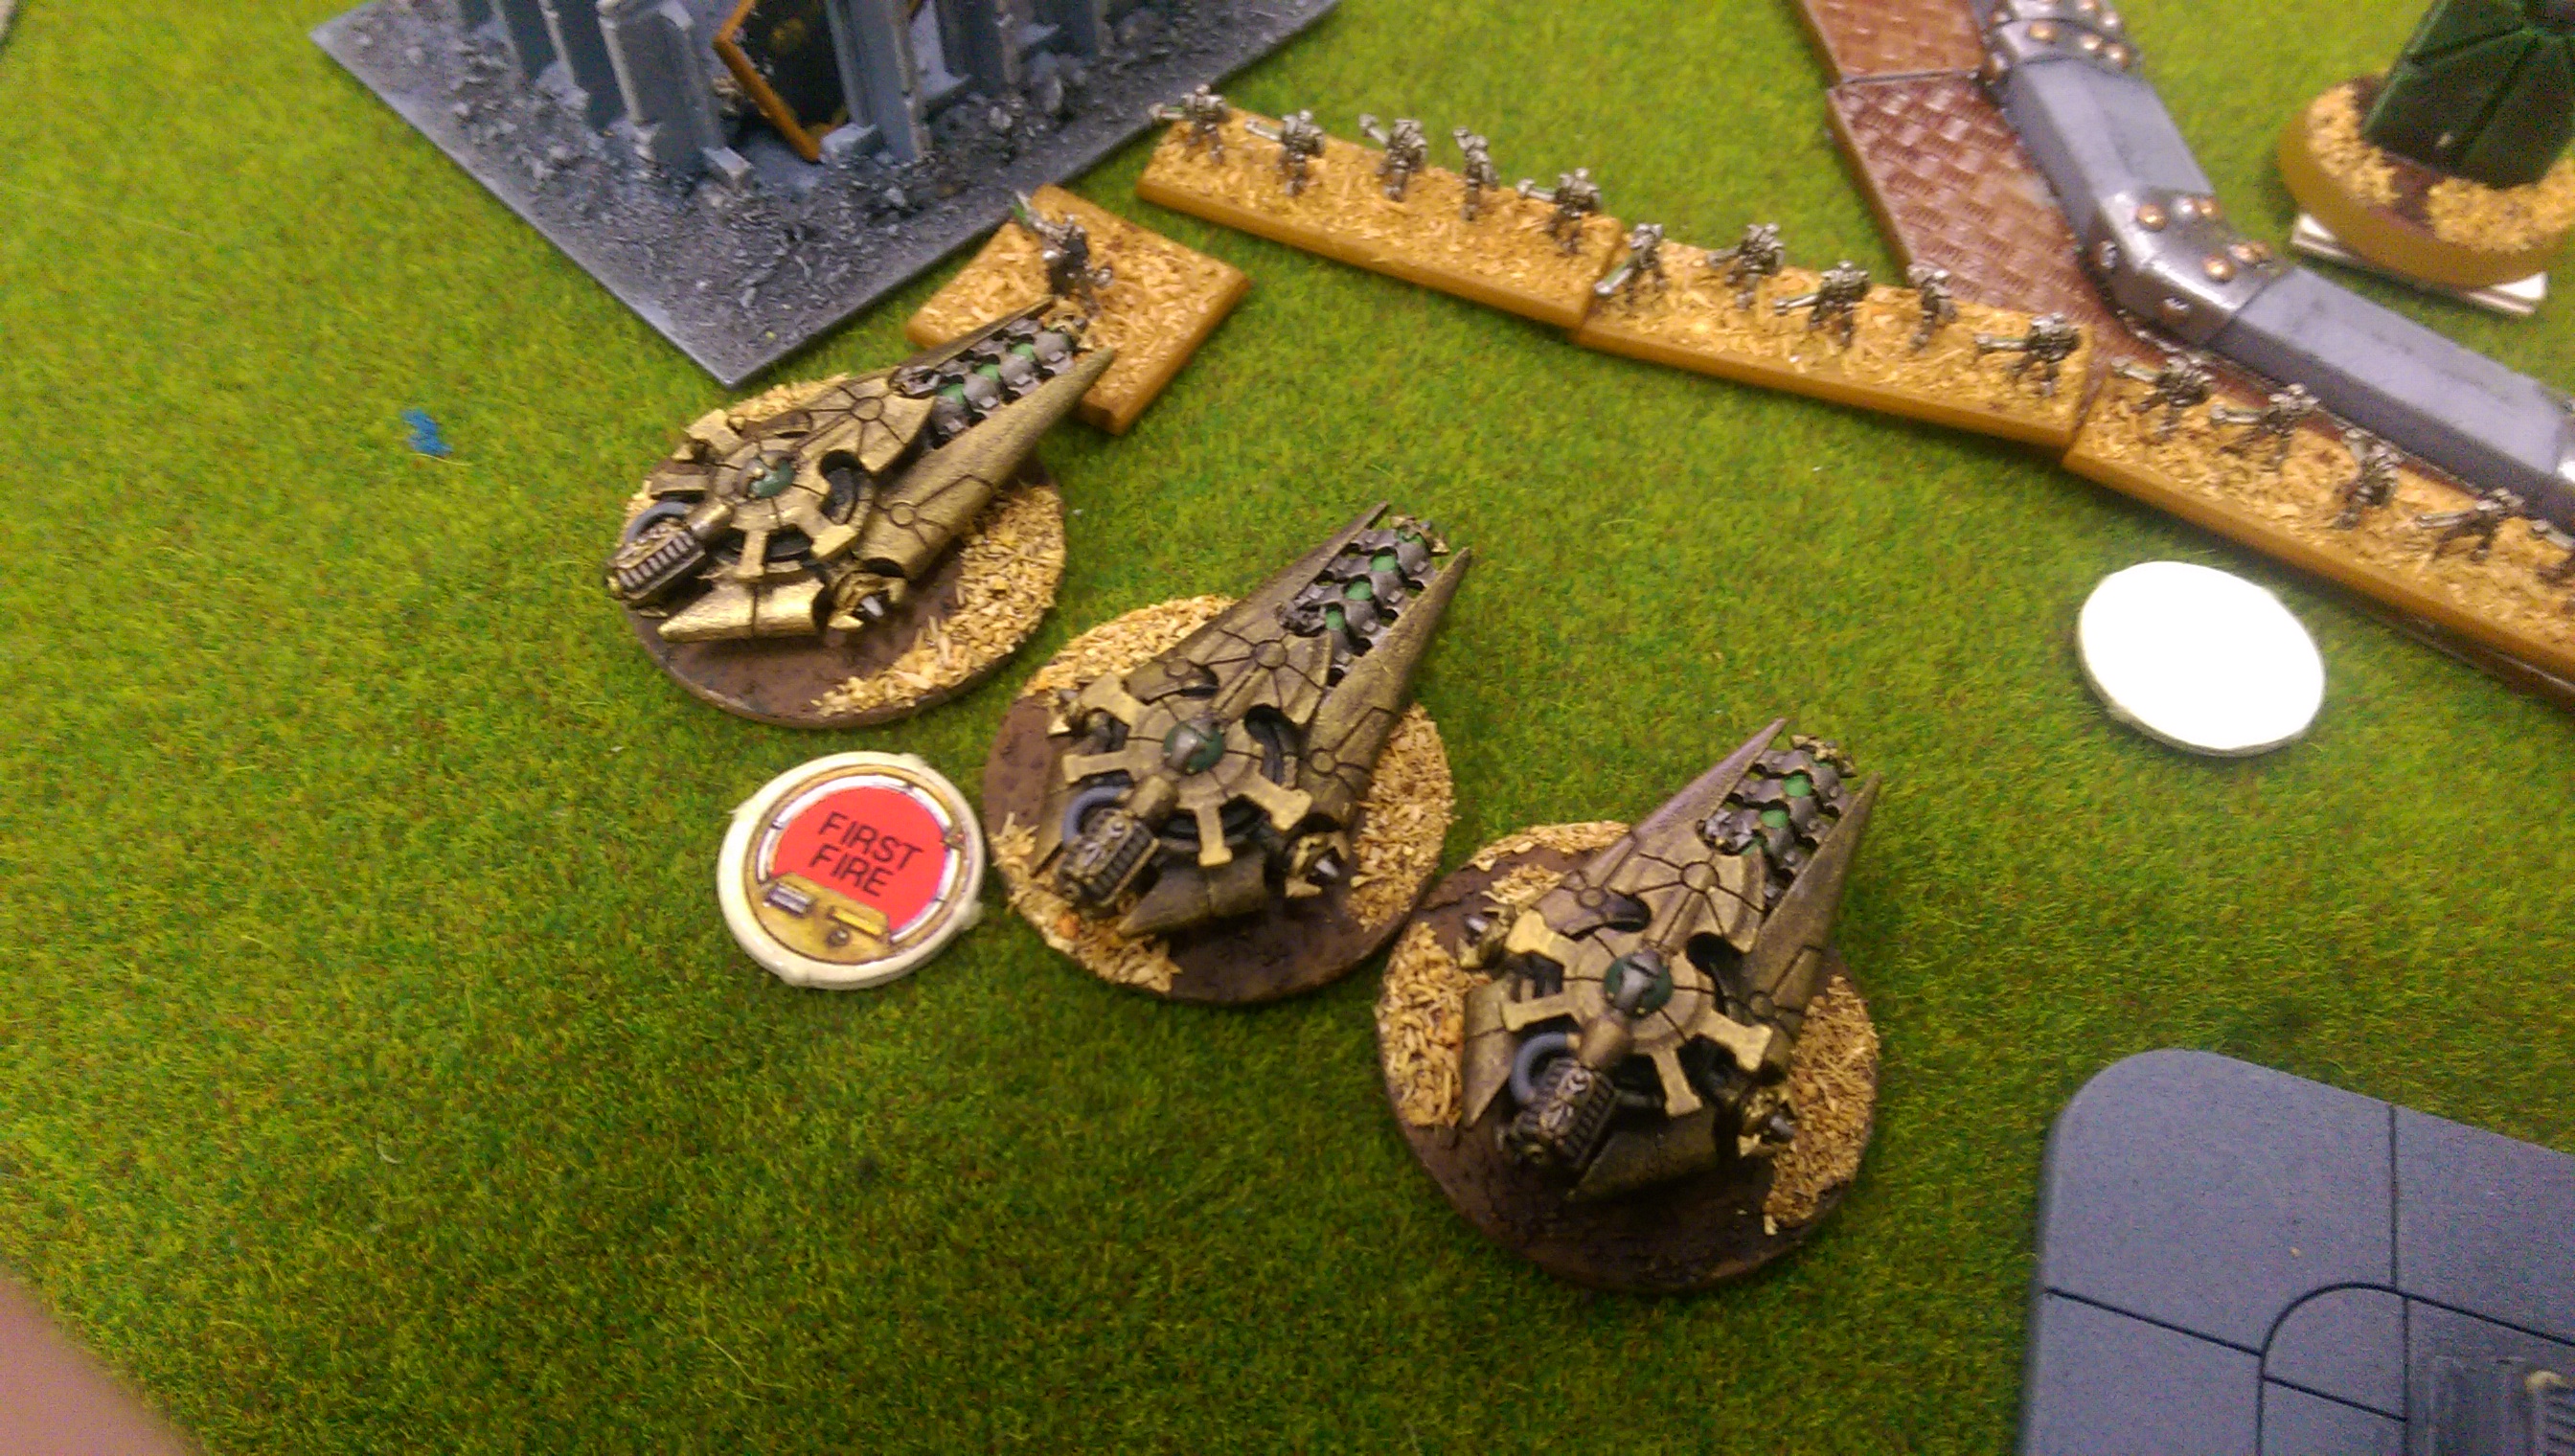
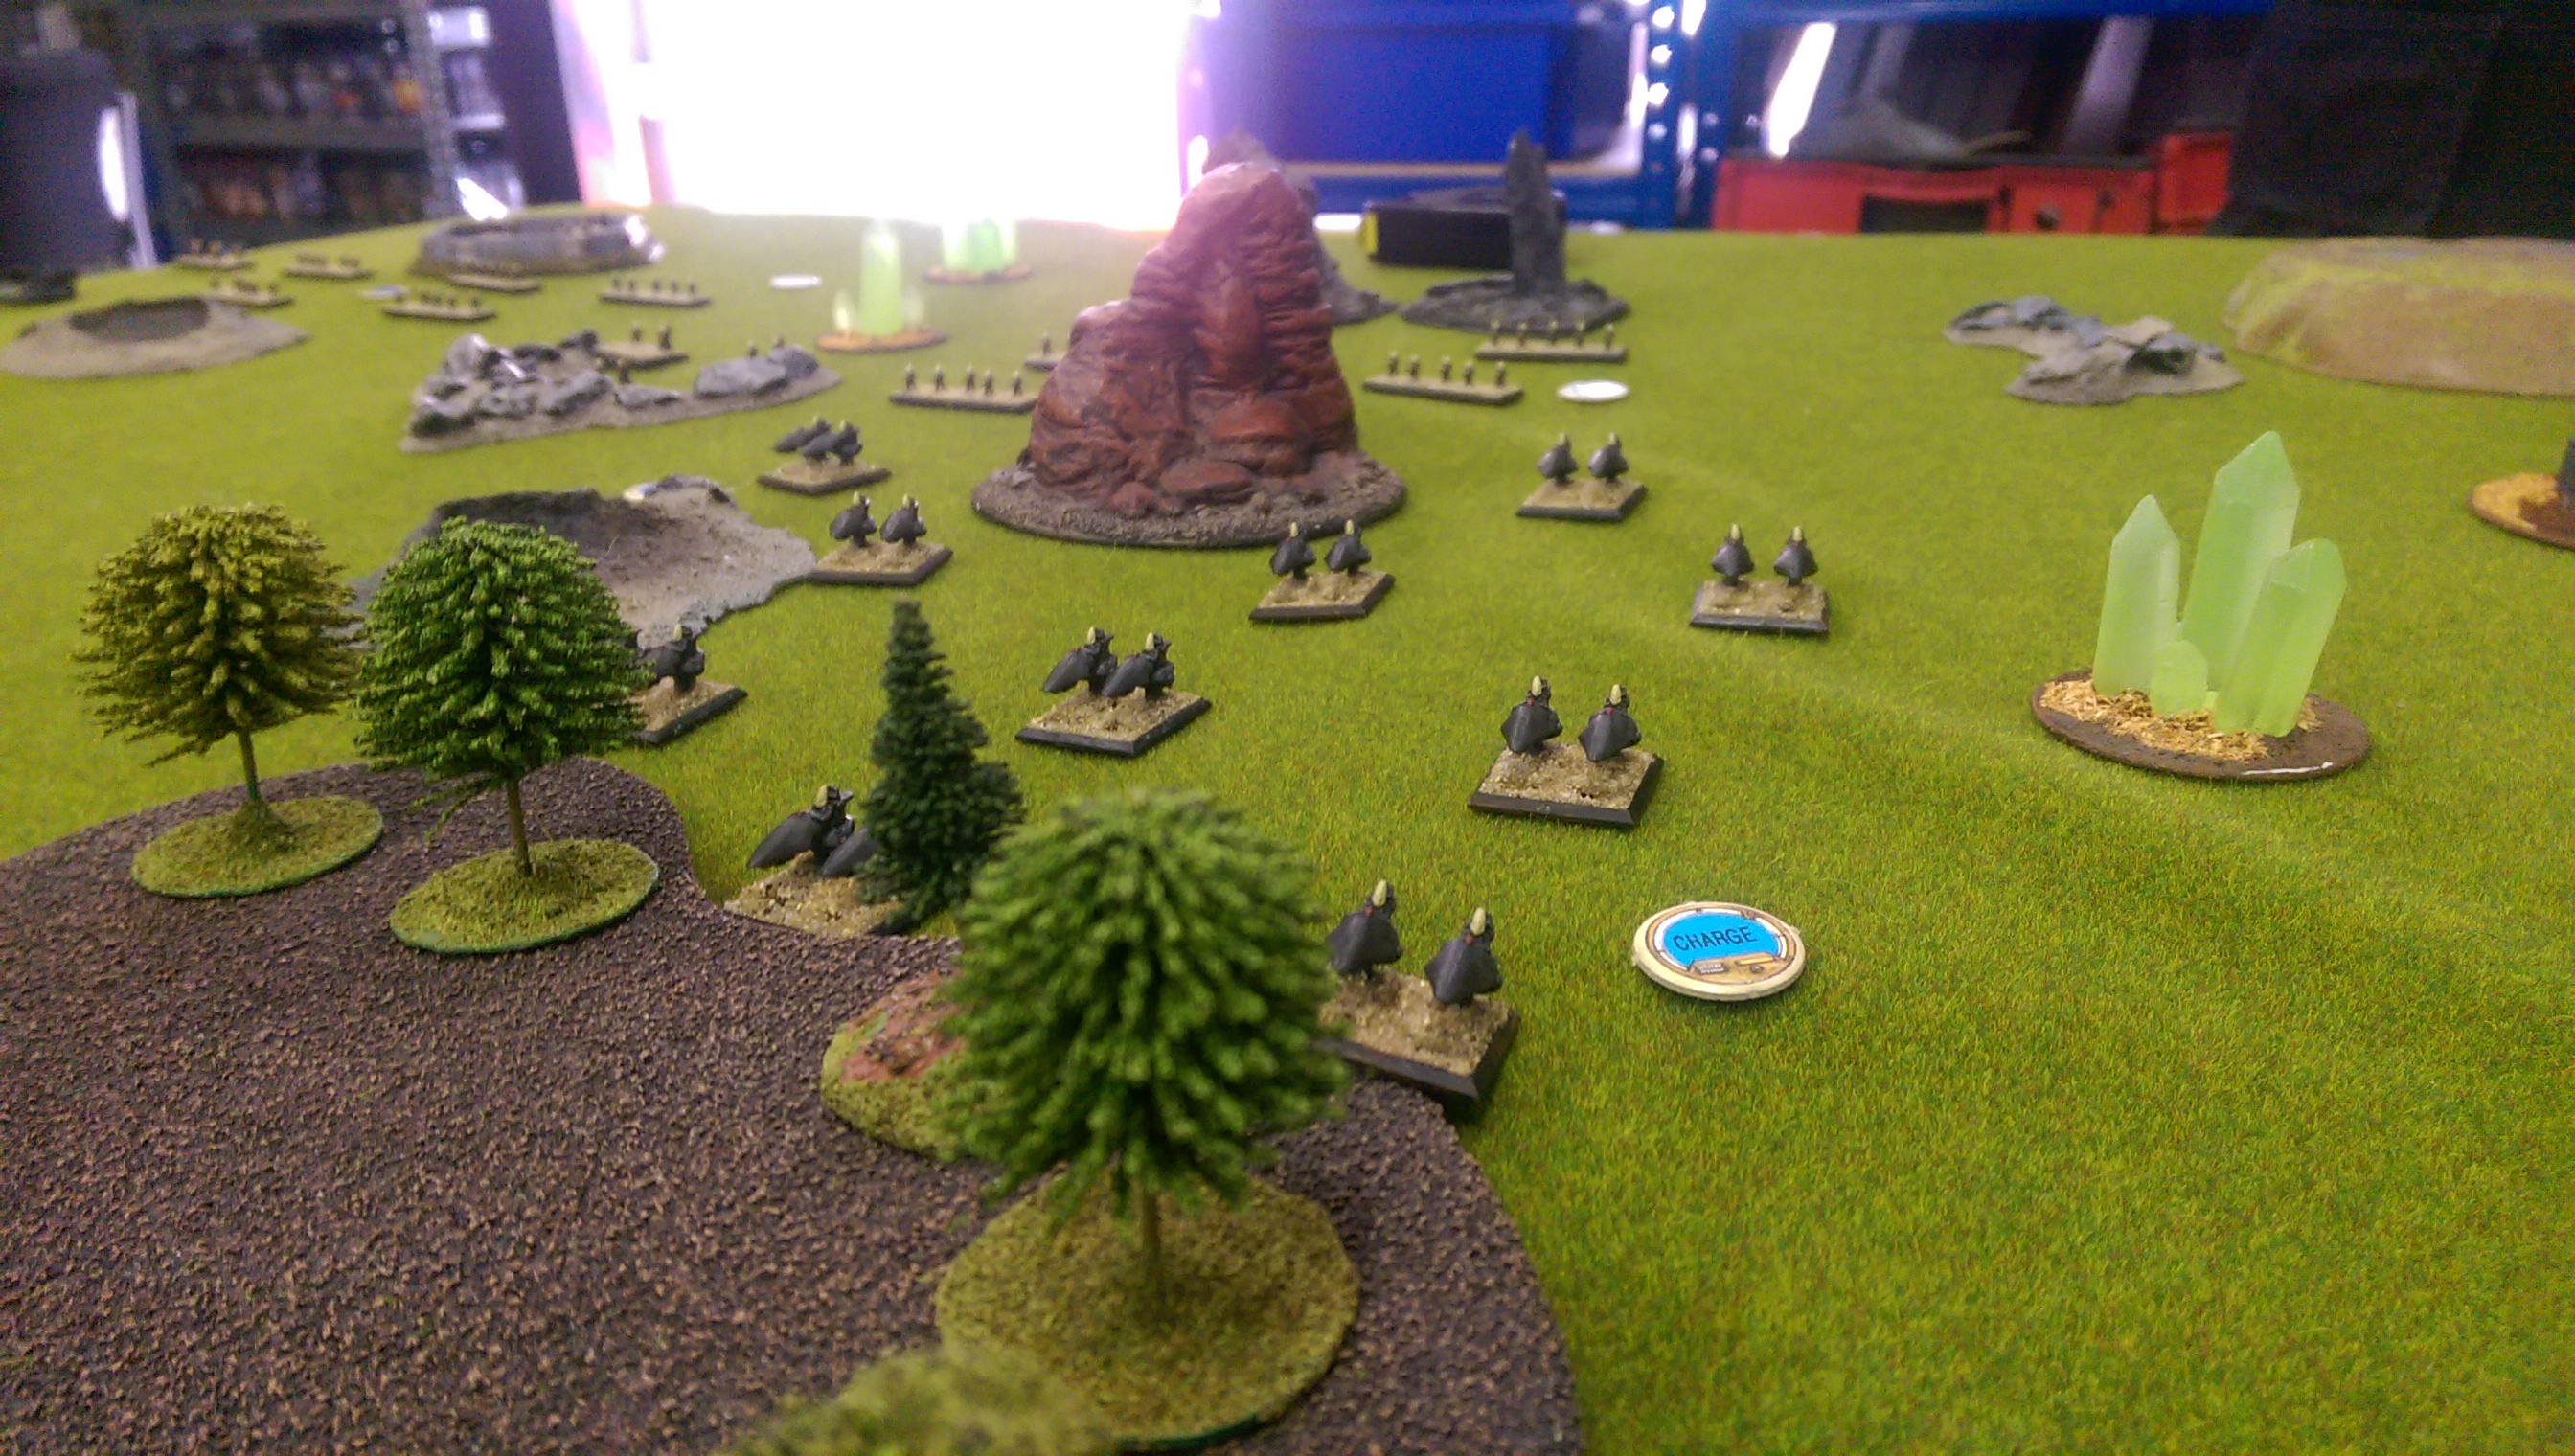
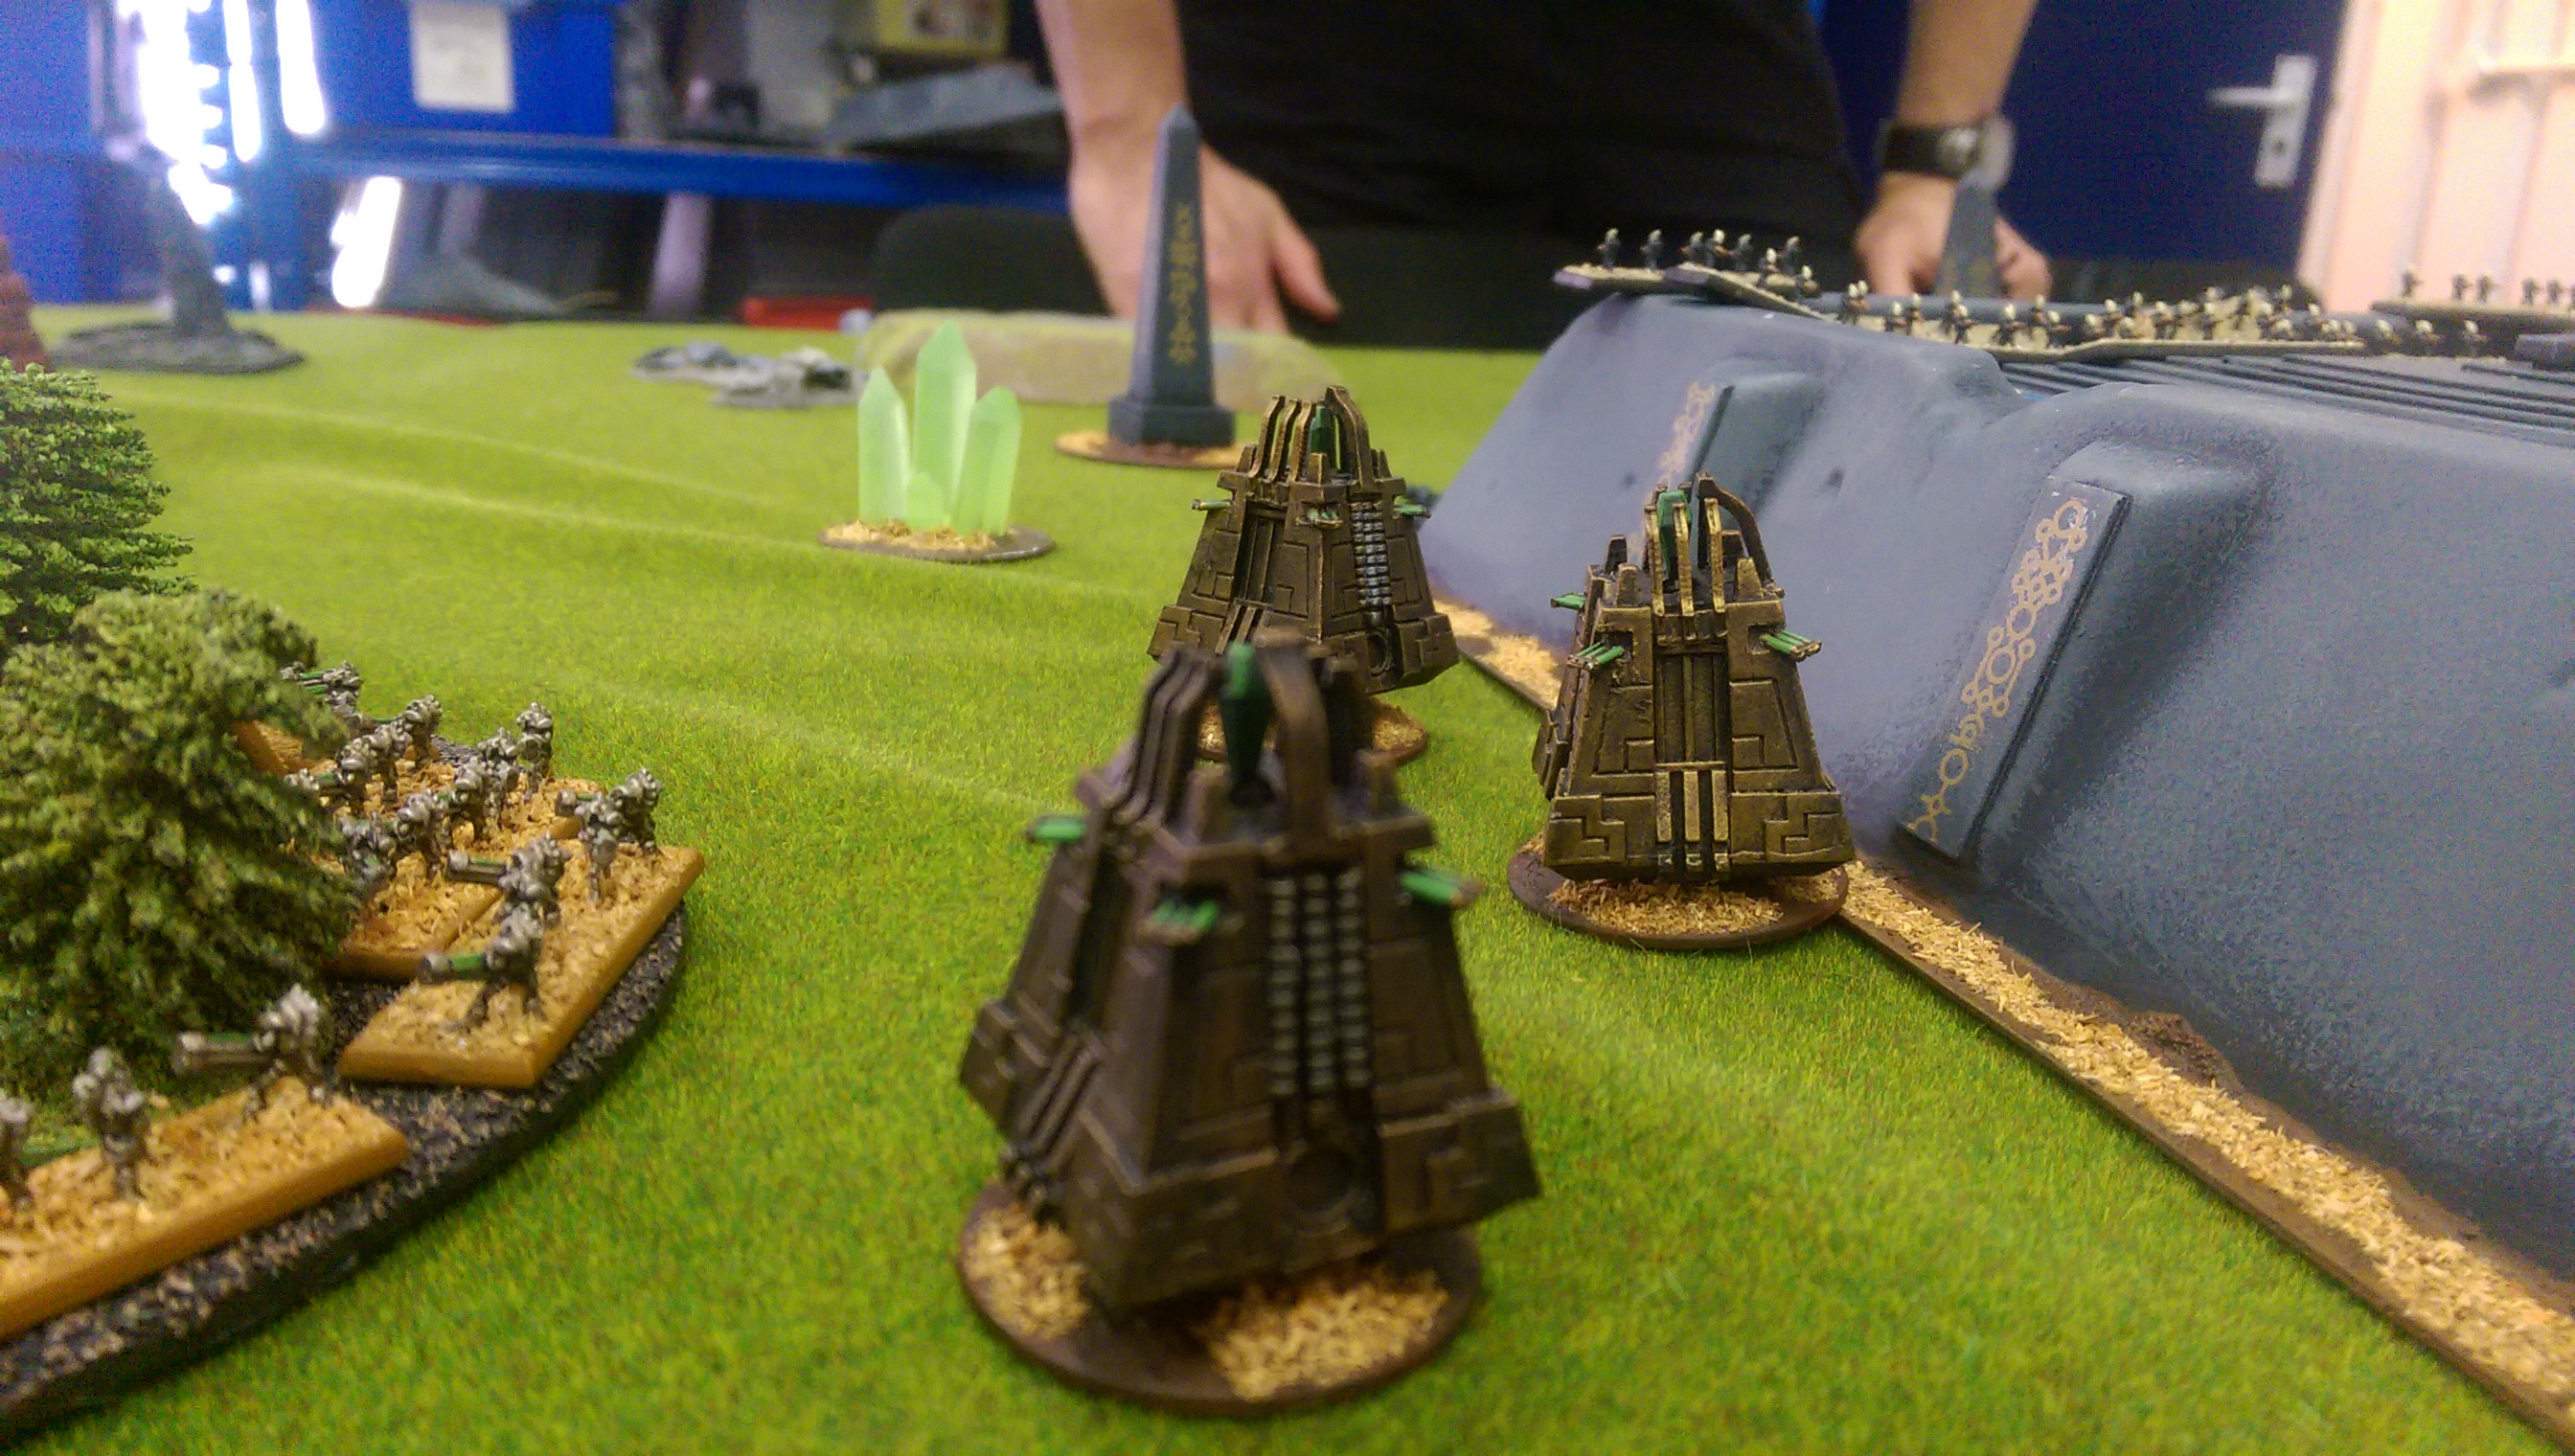
6,000 NetEpic Game: Necrons vs Squats at No Man's Land
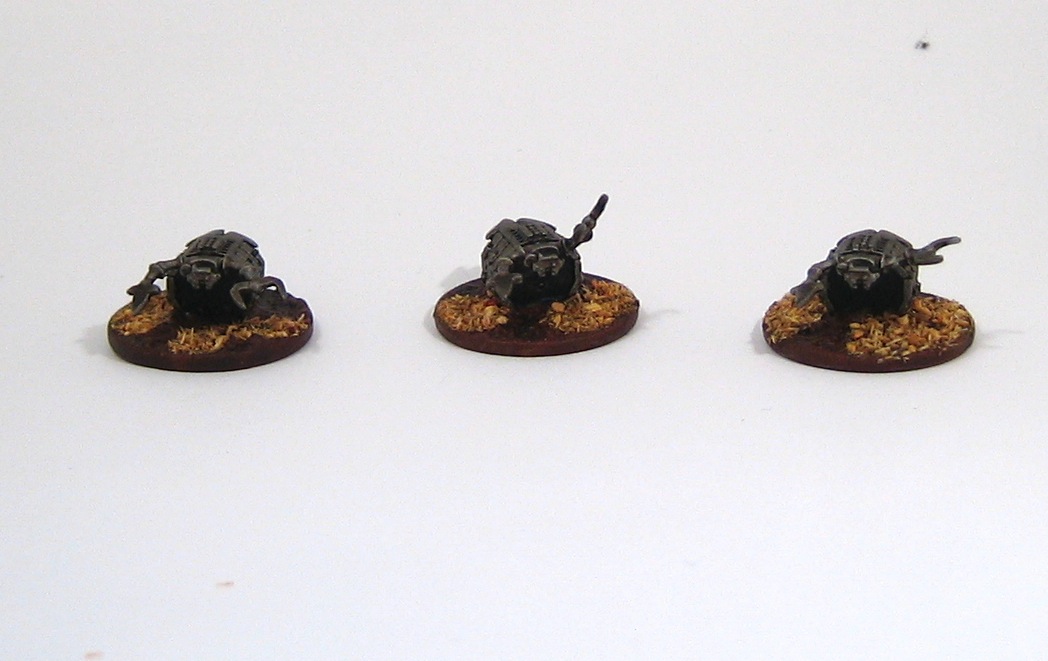
Review: Puppets War Cyber Beetles (Canoptek Scarab proxies)
Seeing how I sacrificed most of my cache of scarabs to make Epic scale destroyers, I am pretty short of the beasties, so I decided to buy some. They just arrived today, so here's a picture of how they turned out:

The casting quality is pretty good, with only a small amount of flash or warpage (and where there is any, it's to the underside where it's not likely to be noticed). The detail is pretty good and the size in comparison to Games Workshop's scarabs is pretty good. So they're not a bad alternative to the official models.
Citadel Finecast, First Impressions

Here's the first FineCast miniature that I've assembled and painted. I recently took my step-daughter and her friend to one of my local GW stores for one of their "hobby tutorial" sessions (which was actually great fun) and we each bought a miniature to paint after. The kids both got Huron Blackheart and I got this, Imhotek the Stormlord.
Overall, I'm not especially impressed with Finecast: of the three miniatures, mine was the only one that didn't have major gaps left by bubbles in the mould. Imhotek's staff was quite badly warped (although that's easy enough to fix), but the absurd number of injection sprues meant that getting the model off the frame was pretty risky, and I ended up breaking off his thumb, which I promptly lost, and had to replace with a piece of sprue. His foot also broke off and I had to reinforce it by adding some cork pieces to the base (which actually turned out quite well).
I was probably foolish in believing what I'd been told about being able to paint directly onto the resin: when the kids tried this with their miniatures, the paint refused to adhere and I had to give them a quick blast from a spray can to prime them.
Here's a few more pictures of the finished Overlord. I think I am going to avoid Finecast miniatures whenever possible, and stick to metal miniatures if I can: thankfully a lot of the stuff that's now Finecast only is still available on eBay.
I'm still pretty impressed by the new Necron stuff. I bought a box of Immortals/Deathmarks and these plastic minis are pretty fantastic.
Illuminated Necron Monolith

This is what it looks like when you turn the lights down:

To build it, I pretty much followed the instructions in this article on Librarium Online. The only difference was my use of small pieces of paper, which I glued behind the green plastic rods to make the light more diffuse. Here's what they look like from the inside:

You can also see the big wads of Green Stuff I used to plug the holes around the Gauss turrets in each corner. Here's a couple of pictures of the lighting rig:


I bought the CCFL system from Scan.co.uk: the components cost me less than a tenner, which is pretty amazing. I am thinking about buying some more to use in some future terrain pieces.
After being sprayed black, I painted the outside of the Monolith in Tin Bitz using some home-made foam brushes of various shapes and sizes:

I then drybrushed Brazen Brass over the Tin Bitz using a large drybrush, and then picked out the edges in Shining Gold. I used Devlan Mud to add some weathering and dirt, especially to the parts that I'd given a coat of Boltgun Metal to add some contrast.
Side and rear shots:


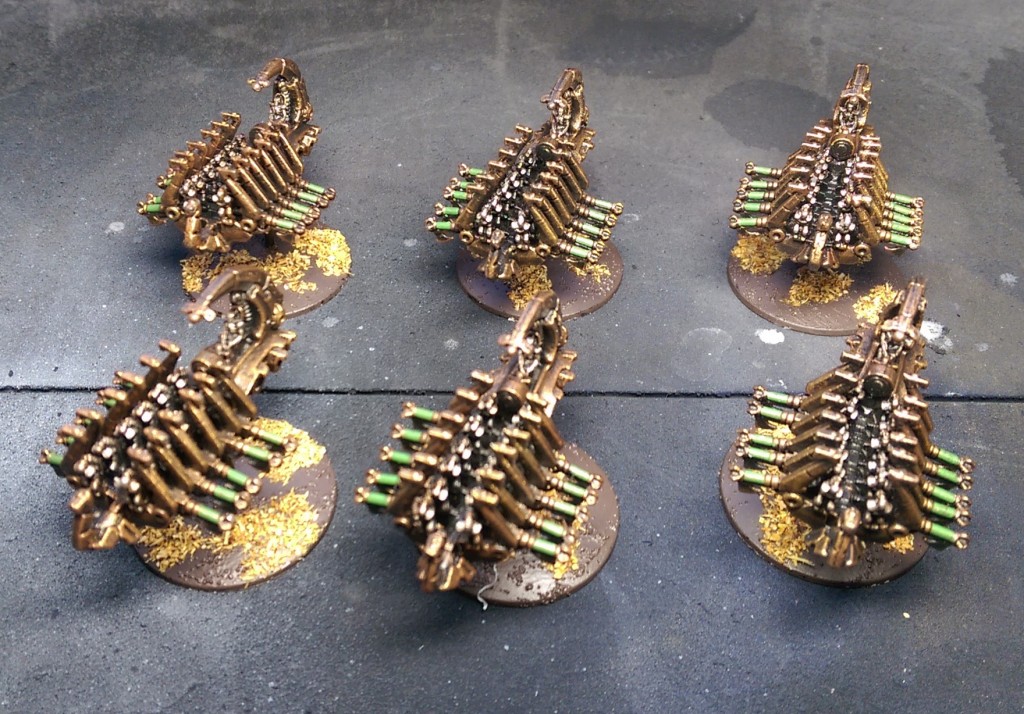
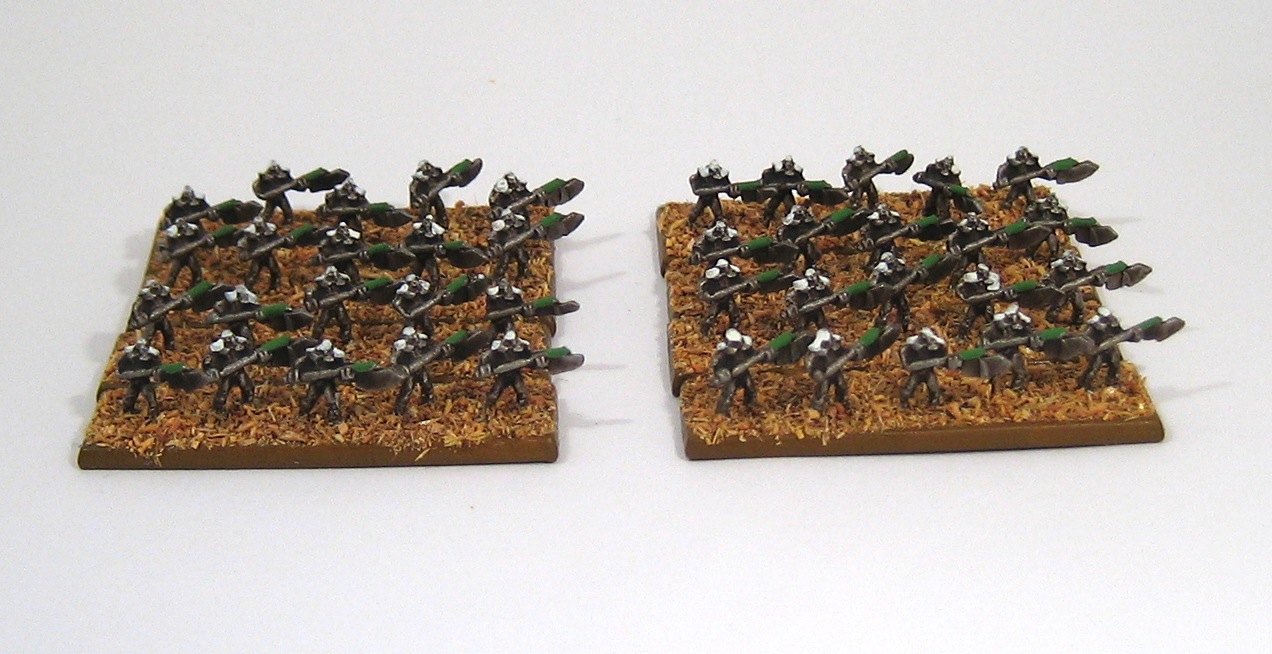
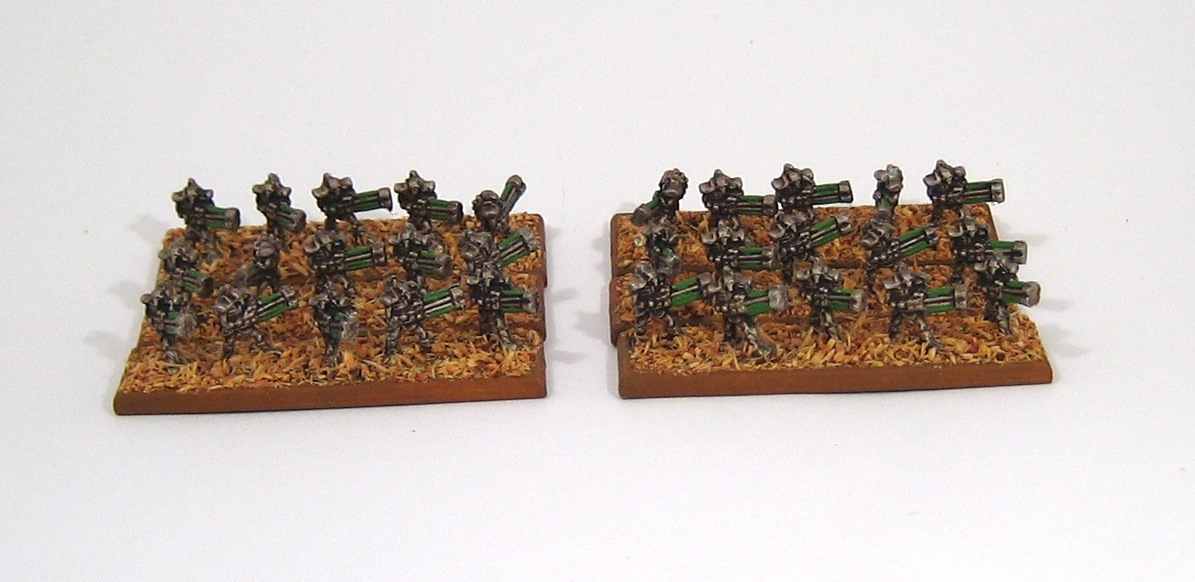
Necron Destroyers and Heavy Destroyers


Necron Warriors Finished

I've just finished the second phalanx of Necron Warriors for my 40K Army. This is the first set of models I've done with the new basing style, which you can see here:

The base texture is fine sand glued to the base with PVA. This is then painted with Snakebite Leather (as is the side of the base), and then washed with Devlan Mud. This is then drybrushed with Bronzed Flesh and Tallarn Flesh. Finally, I applied some of GW's Burnt Grass using a Noch applicator.
The first picture shows both phalanxes together, the first one is on the left. Here's a close-up:

I had to re-base these miniatures, using a razor saw to remove them from their old base. Here's the new phalanx:

These two phalanxes form the core of my Necron army, which is just about finished: all that's left is a couple of Heavy Destroyers that are nearly done, and then the centrepiece: my internally illuminated Monolith. More to follow!
Quick tip: future-proof your bases
I wanted to share a quick tip which might make your life easier in the future: I have decided to rebase all my 40K scale Necrons, as I wasn't happy with the appearance of the basing material I was using (a very coarse saw dust). I quickly realised that this would be a particularly tough challenge for my plastic Necron warriors.
I was a scale model maker before I was a war gamer, so for as long as I can remember, I've always used polystyrene cement (specifically Revell's professional liquid poly) for assembling plastic miniatures. As I understand it, a lot of miniature hobbyists use superglue instead, but using polystyrene cement welds the plastic parts together, meaning that you can shave and file the join down until it's invisible.
So naturally, when assembling my Necron warriors, I used liquid poly to glue them to their base. I've now realised that if I'd used superglue instead, it would have made the job of rebasing much easier.
So: always superglue plastic miniatures to their bases, even if their bases are also plastic! Here endeth the lesson.
Necron Wraiths
I finished a squad of Necron Warriors and a Lord last year, but progress stalled due to problems with some Destroyers that were damaged by the Plasti-kote spray I was using. While painting my Epic army, I found that Army Painter chainmail spray gives a better finish, so now that the Epic army is pretty much finished, I'm ready to have another go at the 40K army. Here are some Wraiths I just finished:
Gale Force 9 "Battlefield In A Box" Green Crystals
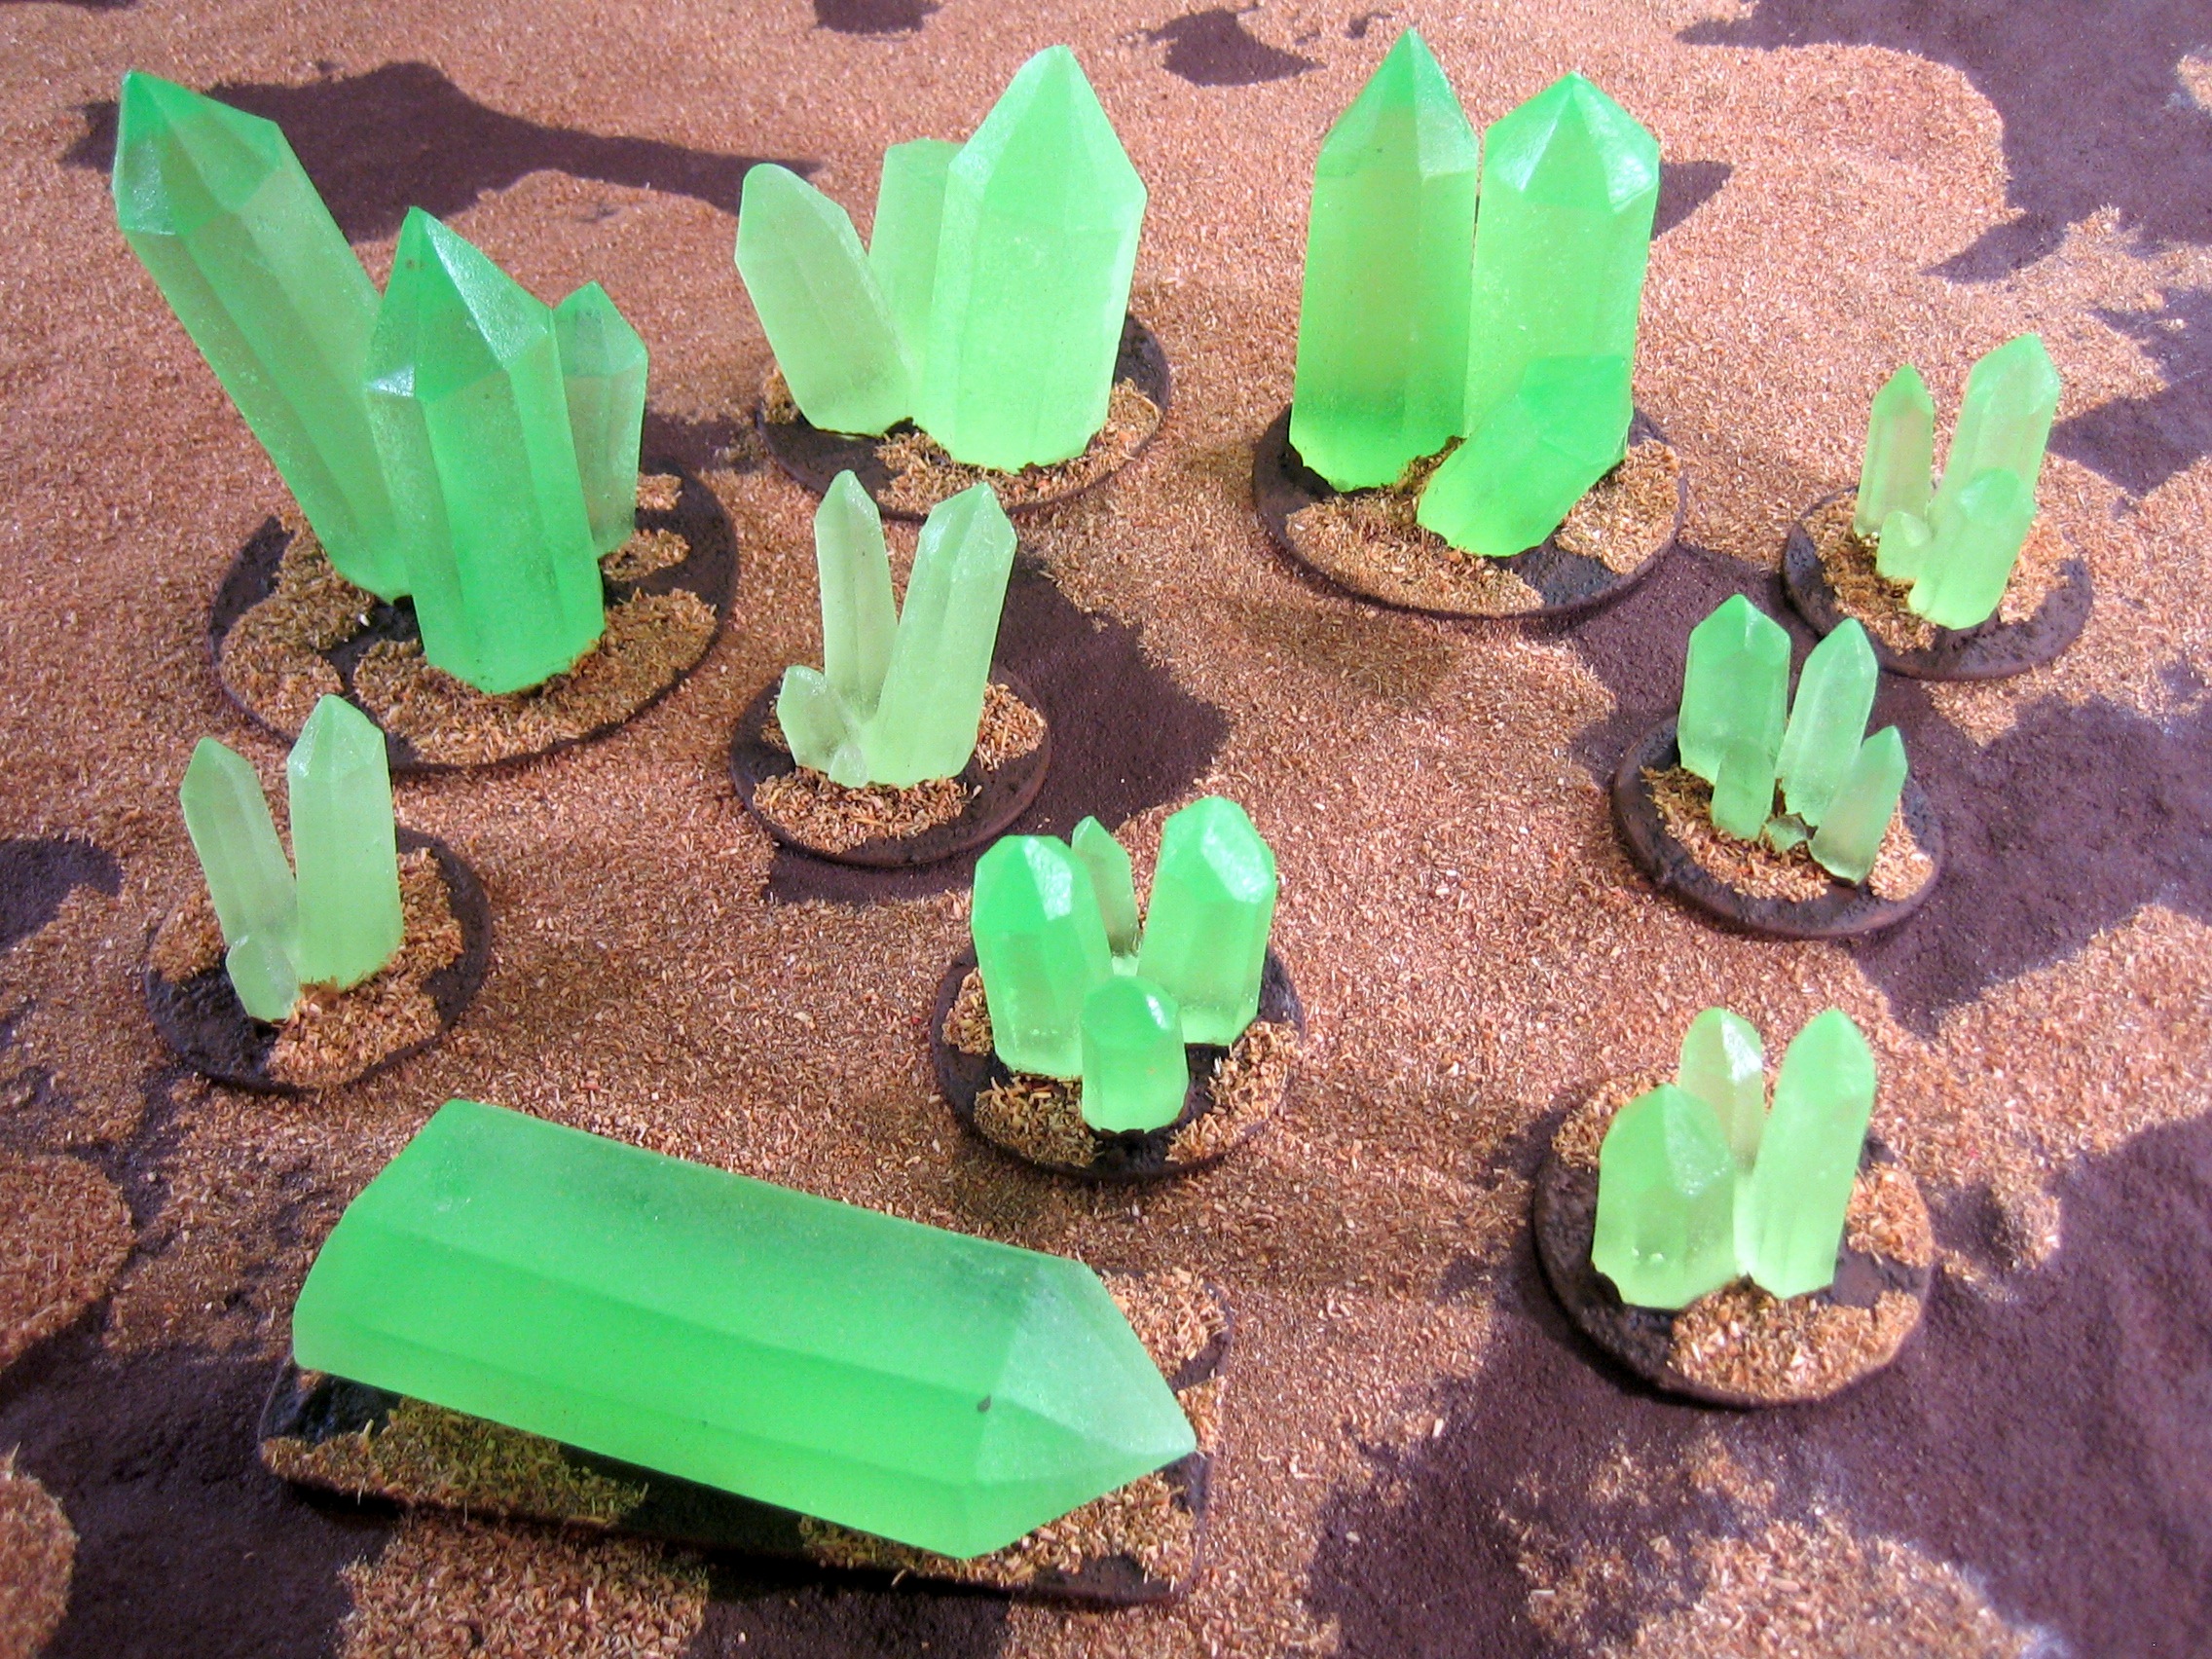
I found out about these terrain pieces from the Beasts of War, who have a series of excellent unboxing videos.
I realised that they are perfect for both 40k and Epic scale games. Unfortunately they're extremely hard to get hold of! It took me a while but I finally tracked down a box of them on the Marquee Models website (they're now out of stock on there as well).
I decided that I wanted to base them so that they'd be more stable on the gaming table. Taking my trusty compass cutter I made some based from 1mm plasticard and glued them on. All I needed to do then was apply some Basetex textured paint, some Devlan Mud, and then the same flock that I use to base my Epic necron models. Here's the result:
Epic Necron Tomb Structure Finished
First up is the large tomb structure that I've featured in the last two posts. It was initially sprayed black. I tried a number of different techniques to give it an aged stone appearance, including stippling and airbrushing, and I even got out my old airbrush to give that a try! In the end I used an old bath sponge to apply successively lighter shades of gray. Then I just needed to texture and flock the base and apply some decals from Games Workshop's Necron Transfer Sheet.


At Cavalier last year I picked up some resin Egyptian obelisks. I necron-ified them by filling in the hieroglyphic writing on the sides, and then sanding them smooth. They got the same paint job as the Necropolis, and some decals as well:


Next up is an Exodus Wars Khazari Droid Controller painted up to look like a Necron Abattoir (I previewed this miniature in a post last year:


I met Tom Webb of Steel Crown at Salute earlier this month and he's a very nice chap. Go buy his stuff!
Lastly there's the board I used to take these photos with. This is one of six Ziterdes modular gaming table modules that I bought a few years ago and use for Epic games. They were originally painted using car body sprays, but I've never been very keen on the shiny finish that they picked up, so I made up a texture paint using brown craft paint, aquatic sand and PVA glue (similar to the "concoction" used by Beasts Of War), which gives a nice flat muddy finish, and is flexible as well. I then applied some of the same flock I use on my Epic necron model's bases.

Large-scale Epic Necron Structure

The original piece is a 28mm scale defensive wall, so I cut out a square of plasticard and placed it on top of some balsa wood supports that I glued to the inside of the walls.
The roof is a bit featureless, so a while back I started making a huge great obelisk to sit on top, but I think it might be a little over-the-top:

What do you think?
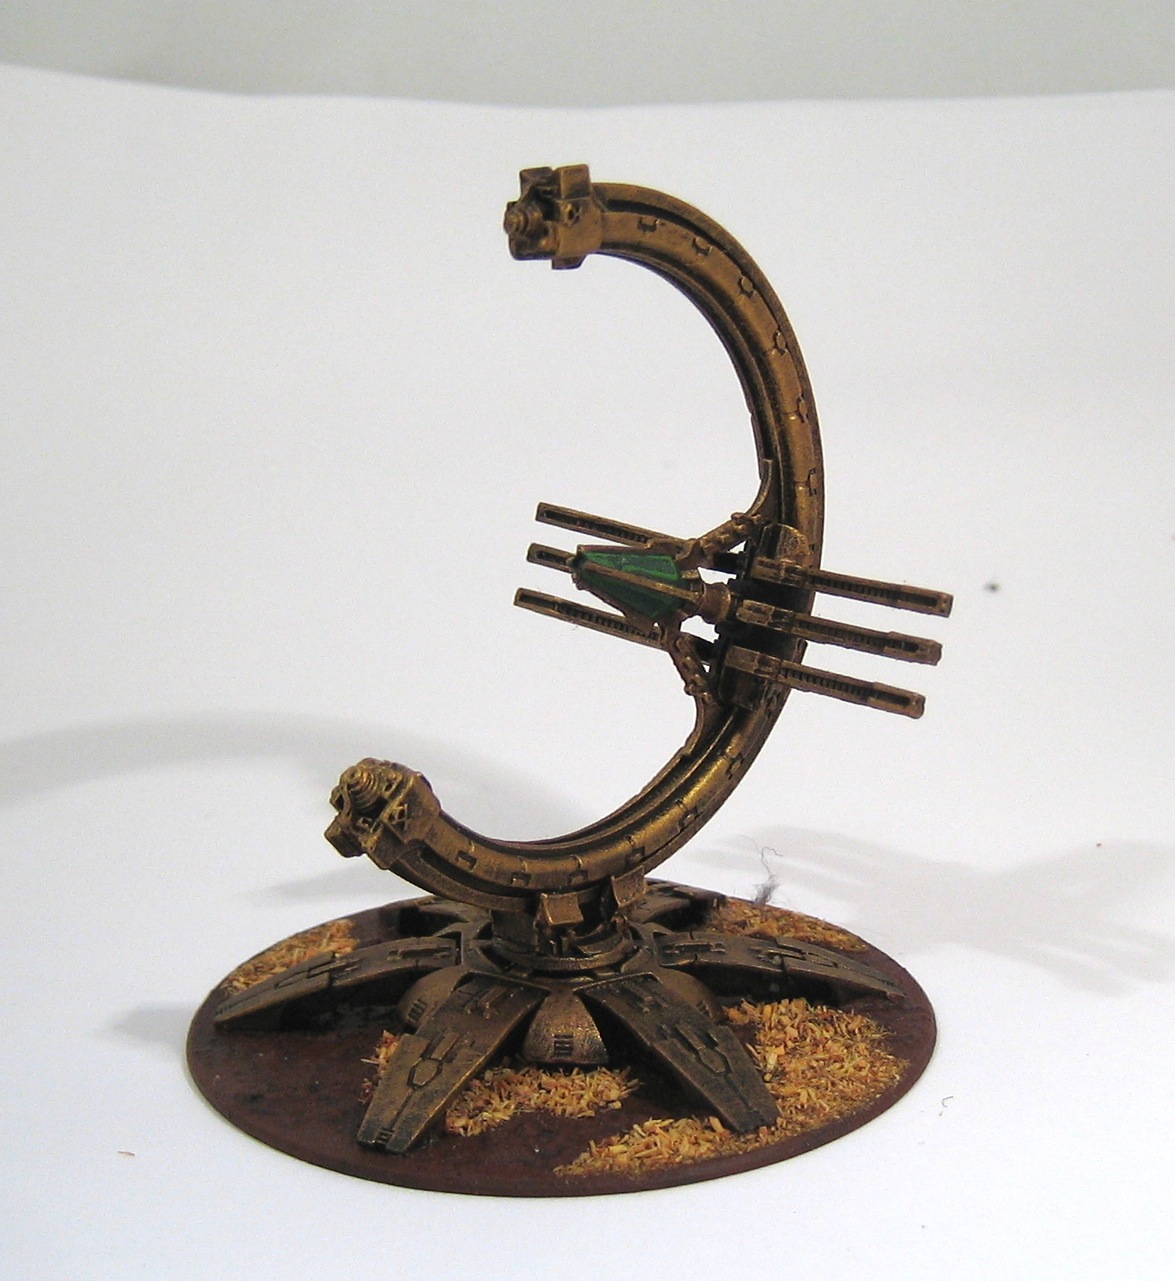
Epic Necron Summoning Cores

I wrote some rules (for the NetEpic Necron codex here), which you can download from this link.
Epic Necron Terrain Pieces

This is the method I came up with (it took a couple of attempts). First, the ingredients:
- 3mm plasticard
- 1mm or 0.5mm plasticard
- Liquid poly cement
- 5mm drill
- Razor saw
- Clothes pegs
The first thing to do is cut out two 15mm x 24mm rectangles from the 3mm plasticard. I decided to score on the design while they were still attached to the main sheet. You'll almost certainly want to use a razor saw to do this.

Then cut a 12mm x 22mm piece of 1mm or 0.5mm plasticard. This is a spacer that goes between the other two pieces, making a sort of sandwich. It's smaller than the other two pieces so that a gap shows. Glue them all together with liquid poly and use some clothes pegs to clamp them together.

Once the glue has set, use a 5mm drill to drill a hole through the middle. The hole should be 7.5mm from the top, and on the centre line. I drilled a pilot hole with a pin vise to make the drilling a bit easier.
Once you've drilled the hole, take your razor saw and cut grooves over where you've previous scored. If your razor saw is a thin one like mine, you may need to make two parallel cuts and carve out between them. A round file can be used to chamfer the edges of the grooves.
Mount on a 24mm base and you're done! Here's the finished piece.

Here's another terrain piece I made. You can get quite nice effects with just a few bits of plastic.


More Epic Necrons


2010, a year in gaming
2010 was a great year for me (in Real Life as well as in my Gaming Life): I feel that my painting and modelling skills have improved a great deal: in basing, in my use of washes, and in the techniques and tools I've learned to use. I have the great gaming blogosphere to thank for that: many of my favourite blogs are linked to in the links on the right.
I played a lot of Space Hulk in 2010: it's great for time-starved veterans like me and my friends. You can have a great gaming experience in a couple of hours, with none of the preparatory work required for a game like Epic.
I also managed to get my 15mm SF soldiers into battle, albeit only once, using a gaming system of my own devising. It's the first time I've ever written and used a set of gaming rules, and was a great experience. Hopefully I'll be able to get some more games in during 2011, and refine the rules, perhaps even publish them!
The thing I'm most pleased with this year has been the creation of an Epic Necron army. This is mainly thanks to the brilliant chaps on the Tactical Command forums: creative geniuses who have, purely for fun, created very impressive proxies for many of the Necron units. It's also due to the excellent miniatures produced by Steel Crown Productions for their Exodus Wars game: their Edenite miniatures are great quality and value, and are very good proxies.
The army isn't finished: I have some Wraiths to assemble and paint, some Obelisks that have been troublesome (they're resin and I didn't wash them before undercoating, so the paint's flaking off, grrh), and I need some more Monoliths, as I found out when I took the army out for a test game (the only game of Epic I managed this year). Playing against Squats, I was narrowly defeated because of the lack of fast close combat troops (ie Wraiths) and the need to keep the Monoliths in unit coherency. Having another group of them that is free to move around will give me more flexibility. I've also got another super-heavy monstrosity that still needs painting.
I've been meaning to take some photos of the complete army, and I finally managed to do it today. Here they are. I hope they inspire you!


Epic Necron Tomb Stalker
Necrons don't use Titans per se, the closest thing to a Titan on the Necron Epic army list (a fan effort) is the Tomb Stalker, which is described as an oversized Tomb Spider. This makes it very easy to create one: all you do is take a 40k scale Tomb Spider and mess around with it a bit:
One of the things I've learned from painting this miniature is how to produce "seamless" decals: I've had some very bad experiences with decals in the past which has put me off using them. I decided to bite the bullet this time and am very pleased with the technique I came up with (which is probably worth a post of its own).
I have a few more miniatures to show you from my epic Necron army: keep 'em peeled!
Work-In-Progress: Epic Scale Super-Heavy Monstrosity
Test Necron
I'm planning on building a Warhammer 40,000 Necron army. Earlier this year I bought a box of Necron warriors, but due to real life interrupting, have only just finished the first test model. Here it is:

Click to embiggen. I designed the painting process to optimise for speed: once prepped, the model was sprayed with silver spray paint bought from my local Hobbycraft store. The next stage was to give it a thorough wash with the Citadel Devlan Mud wash, however the finish of the silver spray meant that the wash didn't adhere, so it was given a coat of Purity Seal to give the wash something to stick to. A couple of washes were added, and the base painted with Snakebite Leather. Total time involved: about fifteen minutes!